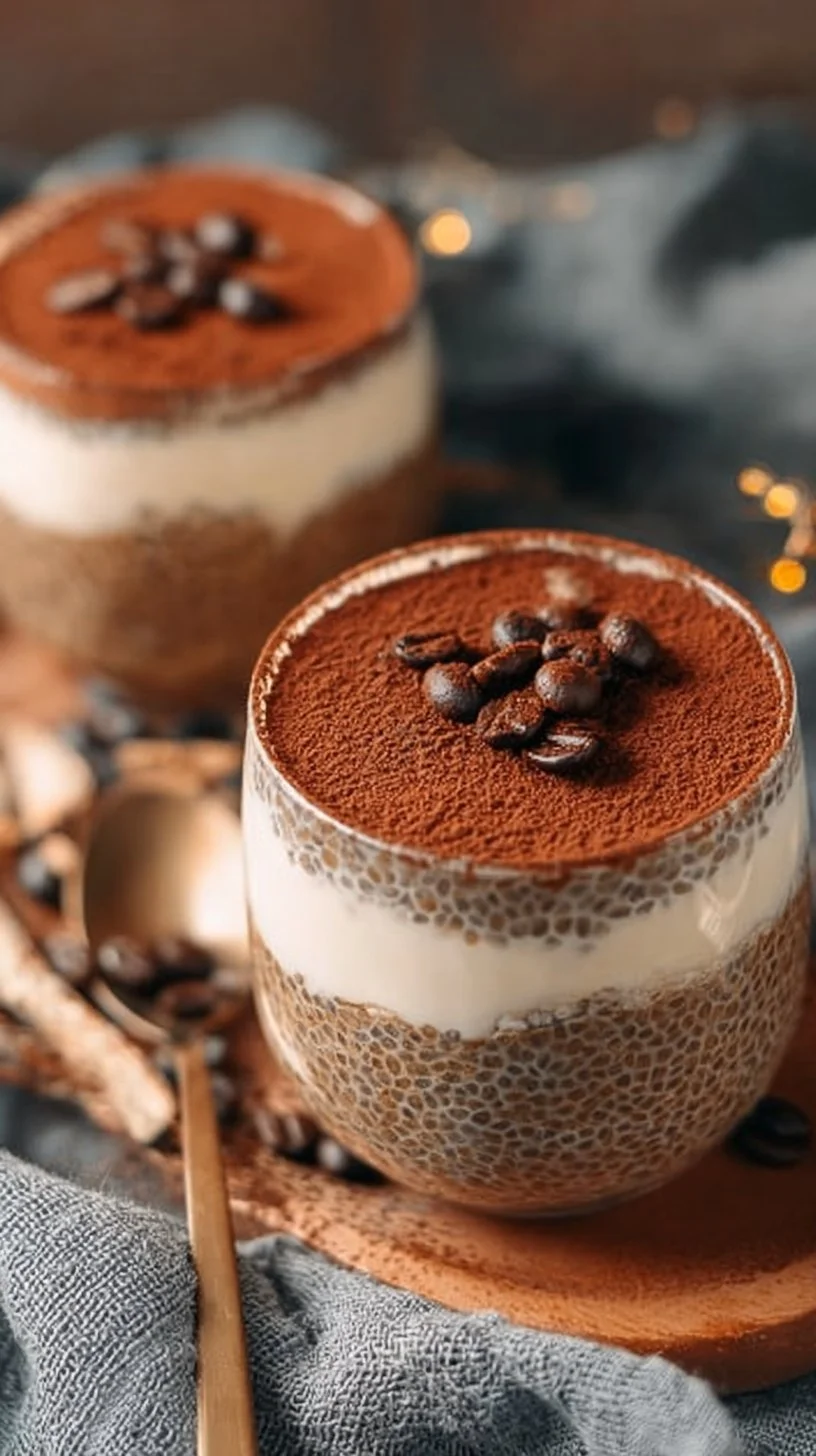
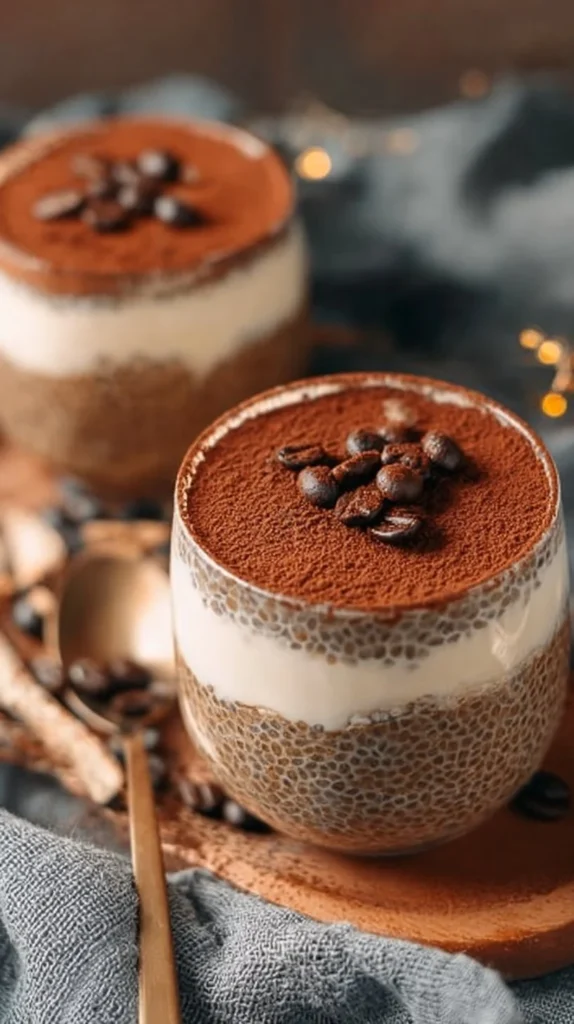
Tiramisu Chia Pudding With Greek Yogurt
If you love the idea of tiramisu but want something lighter, simpler, and ready for busy mornings, this Tiramisu Chia Pudding With Greek Yogurt is for you. I’m Carla Carter, founder and recipe developer at RecipesCabin, and I design recipes that help you feel capable in the kitchen — not overwhelmed. This recipe is approachable because it trades long, technical steps for a few thoughtful actions that happen mostly in the blender and the fridge. It’s forgiving, fast to assemble, and gives you that coffee-and-cocoa flavor in a way that feels gentle and reliable.
If you’re the kind of home cook who’s come back to the kitchen after a break, or who likes a straightforward dessert that doubles as breakfast, this is a lovely place to practice. If you want similar make-ahead breakfasts, try my raspberry chia pudding sweetened with maple syrup for another easy, layered option you can leave in the fridge.
Why this recipe is easy to get right
This recipe is forgiving in three simple ways: texture, flavor, and timing. The chia seeds soak and thicken the mixture, and you’ll notice the mixture becomes plump and pudding-like as it chills. If it’s a touch thinner right after blending, that’s expected — chilling is when the final texture sets. Flavor is also easy to tune. The instant espresso powder gives a clear tiramisu note without needing complicated extraction or brewing, and the maple syrup is a gentle sweetener that blends smoothly with yogurt.
Precision isn’t critical here. The blender smooths things out for you, so uneven stirring or slightly off measurements won’t ruin the final dish. Many of us worry about “messing it up” when we make layered desserts, but this one rewards small imperfections: a slightly lumpy top or uneven cocoa dusting still tastes wonderful. If you want to practice the same math once you’re confident, check my recipe for frozen Greek yogurt peanut butter bites — it uses similar ideas of mixing and chilling to set texture.
How to make Tiramisu Chia Pudding With Greek Yogurt
At a glance, the process breaks into three parts: make the pudding base, make the topping, and assemble then chill. First you measure and blend everything for the pudding base — that creates the coffee-flavored, creamy mixture that will become the body of the pudding. Next you portion it into jars and prepare a simple yogurt topping that adds a clean, tangy layer reminiscent of mascarpone in traditional tiramisu. Finally, you layer, dust, and chill so the chia seeds do their work.
Focus on a few checkpoints: when you blend, watch for a smooth, mousse-like texture and a uniform color; when you portion, smooth each jar so the topping sits evenly; when you chill, give at least two hours — overnight yields the best texture. Beginners should slow down at blending (scraping the blender sides helps) and when combining the topping so it’s airy but not runny. The rest is mostly patience while the fridge does the final setting.
Ingredients
2 cups plain Greek yogurt, 2 tablespoons maple syrup, 1 teaspoon vanilla extract, 1 cup milk of your choice (dairy or plant-based), ½ cup chia seeds, 1.5 tablespoons instant espresso powder, A pinch of salt, 1 cup plain Greek yogurt (for topping), 2 teaspoons maple syrup (for topping), 1 teaspoon vanilla extract (for topping), Unsweetened cocoa powder for dusting
Let’s talk about what each ingredient does and why none are intimidating:
- 2 cups plain Greek yogurt: This gives the pudding its rich, creamy body and provides protein and tang. It stands in for heavier ingredients like mascarpone while keeping the feel of a dessert.
- 2 tablespoons maple syrup: Adds sweetness and a mild caramel note. It blends seamlessly into the yogurt and espresso flavors without being cloying.
- 1 teaspoon vanilla extract: A small amount brightens the flavors and helps the coffee notes feel smoother.
- 1 cup milk of your choice (dairy or plant-based): Thins the base to a blendable consistency so the blender can work; dairy or plant milk both behave similarly here.
- ½ cup chia seeds: The thickening agent. Chia seeds swell with liquid and create the pudding texture as they absorb moisture during chilling.
- 1.5 tablespoons instant espresso powder: Provides the tiramisu coffee flavor immediately — no brewing required. It dissolves quickly in the blended mixture.
- A pinch of salt: Balances sweetness and deepens flavor; such a small amount makes a noticeable difference.
- 1 cup plain Greek yogurt (for topping): Used to create the creamy cap, echoing a classic tiramisu top.
- 2 teaspoons maple syrup (for topping): A subtle sweetness for the topping so it’s light and not overly sweet.
- 1 teaspoon vanilla extract (for topping): Adds aroma and a slight sweetness perception.
- Unsweetened cocoa powder for dusting: The final visual and flavor cue that signals tiramisu; it’s dry and bitter-leaning, which balances the sweet and tangy layers.
Together these ingredients create a balanced dessert that’s straightforward to assemble. None require special equipment beyond a blender and fridge, and none are technically challenging — just measure, blend, assemble, and chill.
Directions
- Prepare your ingredients: Gather all ingredients for the pudding base. Measure the Greek yogurt, maple syrup, vanilla extract, milk, chia seeds, espresso powder, and a pinch of salt., 2. Blend the base: Place all pudding-base ingredients into a high-speed blender. Blend on medium-high for about 60 seconds, scraping down the sides occasionally, until the mixture is smooth and mousse-like., 3. Portion the pudding: Divide the blended pudding evenly into four jars or containers. Smooth the tops slightly with a spoon., 4. Prepare the topping: In a separate small bowl, combine 1 cup Greek yogurt, 2 teaspoons maple syrup, and 1 teaspoon vanilla extract. Whisk until smooth and slightly airy., 5. Layer the topping: Spoon the prepared topping evenly over each of the four pudding jars, creating a clean layer on top., 6. Dust with cocoa powder: Generously sprinkle unsweetened cocoa powder on top of each jar., 7. Chill to set: Cover the jars and refrigerate for at least 2 hours. For the best results, chill overnight., 8. Serve and enjoy: Serve straight from the jar. Optionally, stir gently to mix the cocoa into the pudding before eating.
Supportive guidance for these steps:
- Step 1 (Prepare): Lay everything out so you’re not hunting for a measuring spoon or the espresso powder mid-blend. Visual cue: the yogurt should be smooth and lump-free before you start.
- Step 2 (Blend): After about 45–60 seconds you want a mousse-like look — slightly airy, uniformly colored, no visible espresso granules. If you see unblended specks, stop and scrape the sides once or twice and blend again for a few seconds.
- Step 3 (Portion): Aim for even fills so the jars chill at the same rate. If one jar is slightly fuller, that’s okay; it won’t ruin anything.
- Step 4 (Topping): Whisk until the topping is a little lighter in texture than straight yogurt — it should still hold a soft peak if lifted with a spoon but shouldn’t be runny.
- Step 5 (Layer): Smooth tops help the cocoa dusting lay evenly. A clean edge on the topping makes the jars look finished, but a rustic edge is perfectly fine.
- Step 6 (Dust): Hold the cocoa sifter or spoon a few inches above the jar and sweep across for even dusting. Too heavy a dusting can taste chalky — a generous but even sprinkling is best.
- Step 7 (Chill): Chilling is where chia seeds bloom and the texture becomes pudding-like. Two hours gives a decent set; overnight is creamier and more integrated.
- Step 8 (Serve): Serve straight from the jar. If you prefer the cocoa mixed in, stir gently — it will deepen the coffee flavor.
If something looks a little thin after blending, don’t worry: chilling is the fix. If the topping feels too sweet or too tangy to your taste, adjust the spoonful you stir in at serving time — small personal tweaks are fine here.
Key techniques you’ll practice in this recipe
This recipe helps you practice a few fundamental skills that are useful in many kitchens:
- Blending for texture: Learning how long to blend and when to scrape the sides gives you confidence with other blended preparations like smoothies or creamy soups.
- Portioning: Even fills and clean layering are handy for lunches, desserts, and meal prep containers.
- Gentle whisking: Creating a slightly airy topping helps you learn to combine ingredients without overworking them.
- Chilling to set: Understanding how chilling changes texture (especially with seeds or gelatin-like thickeners) applies to puddings, panna cottas, and no-bake cheesecakes.
These techniques are small but powerful. Practice them here, and you’ll find they make many other recipes more successful.
Common mistakes and how to avoid them
- Mistake: Not scraping the blender sides. Result: small bits of espresso or unblended chia. Fix: stop once, scrape down, and blend another 5–10 seconds.
- Mistake: Serving too early. Result: a loose, runny texture. Fix: give the jars at least two hours to chill; overnight is better.
- Mistake: Over-sweet topping. Result: an overly cloying final bite. Fix: follow the topping measurements and taste as you whisk; a little less maple syrup is fine if you prefer tang.
- Mistake: Too dense a topping from over-whisking. Result: the topping becomes almost whipped and thick, which can overwhelm the pudding. Fix: whisk just until slightly airy.
- Recovery tip: If one jar sets firmer or softer than the others, that’s okay — pop them in the fridge together and rotate them after an hour if you want even chill. If a jar is too thin after chilling, let it sit a bit longer; chia often needs extra time to fully absorb.
Small slip-ups rarely ruin the whole batch. The fridge and a gentle eye will get you back on track.
How to adjust confidently without changing the recipe
Even when you’re not changing ingredients or steps, you can think conceptually about adjustments:
- Portion scaling concepts: To make more servings, double everything evenly. The texture scales linearly because the chia-to-liquid ratio is fixed.
- Flavor preference adjustments: Prefer stronger coffee? Conceptually, you could increase the espresso powder slightly in the base (but don’t do that here — just consider it if you make the recipe again). For now, use the given ingredients and evaluate for next time.
- Texture tweaks (conceptual): If you want a firmer set in future batches, increase chia slightly; for a silkier mouthfeel, use a higher-fat yogurt or full-fat milk next time. For now, work with the recipe and note your preference for the next batch.
These are ideas to explore later, not changes to make now. For inspiration on other ways to use Greek yogurt that rely on similar balancing, see my Greek yogurt brownies and Greek yogurt protein muffins.
Serving, storage, and reheating made simple
Serve these directly from the jar for a pretty, fuss-free presentation. A small spoon is all you need. If you’d like to create a layered look, use a spoon to make a neat top and dust cocoa at the end. Leftovers store well: keep them covered in the fridge for up to 4–5 days. The chia will continue to thicken a little each day, so expect a slightly denser texture on day two or three.
Reheating is rarely needed — this is a chilled dessert/breakfast — but if you prefer it warmer, let the jar sit at room temperature for 15–20 minutes to take the chill off. Avoid microwaving in the jar, which can overheat and change texture; if you must microwave, transfer to a microwave-safe bowl and warm in short 10–15 second bursts, stirring gently between intervals.
Questions new cooks often ask about this recipe
- How long does it really need to chill? At least two hours is the minimum for a set, but overnight gives the best flavor and texture. If you’re in a rush, a 2–3 hour chill will still be pleasant.
- Do I need a high-speed blender? A high-speed blender makes the base very smooth; a regular blender will work, but you may need to blend a little longer and be diligent about scraping the sides.
- Is it normal to see chia seeds on the sides of the jar? Yes — they can cling to glass during portioning. Gently stir before eating if you want even distribution.
- What if my topping is too thin? A quick whisk or a minute in the fridge will help it firm slightly. If it’s still thin, a gentle dollop works as a softer cap.
- Will the espresso make it bitter? Instant espresso powder adds coffee flavor without bitterness when used as directed. Taste the blended base before portioning to ensure the balance is right.
Final encouragement from Carla
You don’t need to be an expert to make something that feels special. Follow the simple steps, check the few visual cues I suggested, and remember that a little patience in the fridge is the secret here. Small imperfections are part of home cooking and often add character. Each time you make this recipe you’ll learn a tiny bit more about texture and balance — and that progress is what builds real confidence.
Conclusion
If you’d like a version of this pudding with a slightly different protein balance and inspiration for presentation, check out this helpful variation in the High Protein Tiramisu Chia Seed Pudding with Yogurt for ideas. For another popular, crowd-pleasing take that’s gluten-free and refined sugar free, the Viral Tiramisu Chia Pudding write-up is a useful reference to compare textures and flavorings. Keep practicing — you’re doing great.
Tiramisu Chia Pudding With Greek Yogurt
Ingredients
Method
- Gather all ingredients for the pudding base.
- In a high-speed blender, combine all pudding base ingredients.
- Blend on medium-high for about 60 seconds, scraping down sides until smooth and mousse-like.
- Divide the blended pudding into four jars or containers, smoothing the tops slightly.
- In a small bowl, whisk together the topping ingredients until smooth and slightly airy.
- Spoon the topping evenly over each pudding jar.
- Dust cocoa powder generously on each jar.
- Cover the jars and refrigerate for at least 2 hours, preferably overnight.
- Serve straight from the jar, optionally stirring in the cocoa before eating.