Greek Yogurt Fruit Dip
Introduction
This Greek Yogurt Fruit Dip is one of those kitchen helpers: quick to pull together, flexible, and familiar enough that kids will happily dunk whatever fruit you have on hand. It’s the kind of recipe I make when the after-school crowd needs a snack, when I want a calm appetizer for a casual gathering, or when I need something easy to add to a lunchbox that won’t wilt my plans.
This dip works for busy families because it takes minutes and uses ingredients most kitchens already have. It’s a small thing that still feels complete: creamy, slightly sweet, and reliably kid-friendly. If you enjoy turning simple ingredients into little moments of comfort, you’ll appreciate how this dip fits a lot of routines — from weeknight snacks to last-minute party platters.
If you like convenient make-ahead ideas that freeze well for grab-and-go treats, I’ve also used similar yogurt combinations in freezer snacks like these frozen Greek yogurt peanut butter bites, which are great to have on hand for a quick, cooling option when life gets hectic.
How to make Greek Yogurt Fruit Dip
Think of this recipe as a three-step rhythm: mix, flavor, serve. The real work is in measuring and giving the yogurt a quick stir; everything else is lightweight and forgiving.
What to expect at each stage:
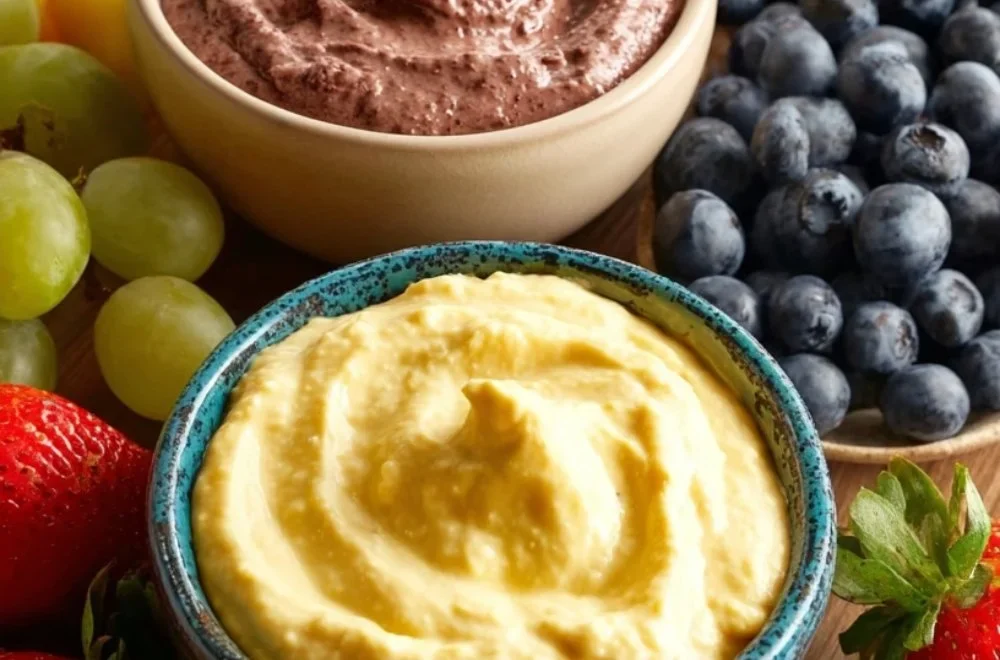
- Mixing: You’ll combine the creamy base (Greek yogurt) with a sweetener and vanilla for warmth. This is where the texture comes together. Give it a good stir so flavors meld — but you don’t need to overwork it.
- Dividing and flavoring: The recipe suggests dividing into three bowls to create simple flavor variations. This is useful if you have picky eaters or want to offer variety without much extra fuss.
- Serving: Fresh fruit is your dipping vehicle. Keep things close to hand — bowls of strawberries, apple slices, or banana rounds — and let everyone dig in.
Where beginners should slow down:
- Taste as you go: Honey preferences vary, so start with a modest tablespoon and add more if you prefer it sweeter.
- Texture check: If your yogurt is very thick and hard to whisk, let it sit at room temperature for 10 minutes so it loosens slightly. It mixes more smoothly and even coats fruit better.
Shortcuts that naturally exist:
- Use pre-sliced fruit or a bag of mixed berries to save prep time.
- If you’re short on bowls for dividing, simply reserve small scoops into ramekins or cups — no special equipment required.
This is a forgiving, low-drama recipe that makes a lot of weeknight sense: it’s quick, predictable, and naturally crowd-pleasing.
Ingredients
1 cup Greek yogurt, 1 tablespoon honey (or to taste), 1 teaspoon vanilla extract, Fruit of choice (e.g., strawberries, apple slices, bananas), Optional flavorings (e.g., cinnamon, cocoa powder, nutmeg)
Here’s what each ingredient does in plain home-cook terms:
- Greek yogurt: The thick, tangy base. It’s creamy, holds its shape, and clings to fruit so every bite has that satisfying creaminess.
- Honey: Sweetness that dissolves easily and keeps the overall flavor familiar and inviting for kids. You can use a touch more or less depending on your household’s sweetness tolerance.
- Vanilla extract: A small amount goes a long way to round and warm the flavor. It’s the quiet background note that makes the dip feel slightly decadent without being fussy.
- Fruit of choice: This is where the fun happens. Choose fruit that is in season (strawberries are a classic), or whatever the kids will eat. Apples give a nice crunch; bananas bring softness and sweetness.
- Optional flavorings: Cinnamon, cocoa powder, or nutmeg are simple ways to create subtle variations. They don’t change the core method — they keep things interesting with minimal effort.
All of these are pantry-friendly and familiar — no exotic shopping list required, which is why I reach for this one on busy days.
Directions
- In a bowl, combine Greek yogurt, honey, and vanilla extract.
- Mix until well combined.
- Divide the mixture into three bowls and add optional flavorings to each bowl for different flavors.
- Serve with fruit for dipping.
A few friendly notes about the steps above:
- Step 1: Use a medium bowl so you have room to stir without making a mess. Scoop the yogurt in, drizzle the honey, and add the vanilla last. If your honey is very thick, warm it briefly (10 seconds) in the microwave so it mixes smoothly.
- Step 2: “Mix until well combined” looks like a smooth, uniform bowl with no streaks of honey or clumps of yogurt. It should be glossy and easy to scoop. If it seems too thick to stir, let it rest for a few minutes so the yogurt loosens naturally.
- Step 3: Dividing into three bowls is optional but makes the recipe feel special for kids — they love being offered choices. Try cinnamon in one, a dash of cocoa powder in another, and leave one plain. Keep the add-ins minimal; a little goes a long way.
- Step 4: Arrange fruit on a platter so it’s easy to dip without crowding. For apple slices, toss them briefly in a squeeze of lemon if you want to slow browning — but that’s purely optional.
Common small mistakes to avoid:
- Over-sweetening: Start with the recipe amount and taste. Kids often prefer less-sweet dips than we imagine.
- Adding too much optional flavoring: Spices are potent — add a little, taste, then adjust.
- Serving the dip ice-cold right from the refrigerator: Let it sit for 5–10 minutes if it’s stone cold. That makes flavors come together better.
Why families love this dish
There are several obvious reasons families return to this dip. The flavors are familiar and comforting: tangy yogurt, gentle vanilla, a kiss of honey. That combination speaks to both adults who want something not overly sweet and kids who respond to creamy textures and sweet fruit. It’s also versatile: switch the fruit to fit the season, play with one optional flavoring if someone is hungry for a little variety, or keep everything plain for small children.
It’s a comfort food in a small package — reliable and low-stakes. If a snack needs to happen fast, you don’t need to make a plan: combine three ingredients and you’re done. For parents balancing activities or bedtime routines, that simplicity is gold.
Smart substitutions and simple variations
I always like to give a few practical swaps that keep the recipe reliable:
- Sweeteners: If you don’t have honey, a little maple syrup or even a touch of granulated sugar will work. The texture is slightly different, but the result is still familiar.
- Yogurt: The recipe calls for Greek yogurt specifically for thickness and tang. If you only have regular yogurt, you can use it, but expect a looser dip.
- Spices and flavorings: Cinnamon is great with apple slices; cocoa powder pairs well with banana slices for a dessert-like twist; nutmeg is subtle and warms the dip without changing it drastically.
For picky eaters:
- Keep one bowl plain and offer small plates with different fruits. Kids often like the power of choosing.
- Use small ramekins or even muffin liners as individual snack cups to make the dip feel special and portion-controlled.
Remember: these are suggestions for tweaking flavor, not changing the recipe itself. The original ingredient list and directions remain the reliable base.
Pairing ideas for a complete, satisfying meal
This dip is a terrific complement to light and easy additions when you want something more substantial:
- Simple sides: Whole-grain crackers or a crusty baguette on the side make the dip feel more like an appetizer plate. Add a handful of nuts for crunch if everyone’s okay with them.
- Salads: A quick green salad with a lemon vinaigrette balances the richness of the dip and fruit.
- Vegetables: Sliced cucumbers and bell pepper make the platter more colorful and stretch the snack into a mini-meal.
- Breakfast pairing: Serve alongside oatmeal or pancakes for a family breakfast where everyone can help themselves to fruit and dip.
The idea is to keep the accompaniments easy and familiar so nothing derails a busy evening.
Make-ahead tips, leftovers, and storage
This dip is easy to make ahead for short-term plans. Store it in an airtight container in the refrigerator for up to 48 hours. The texture will generally hold up well, though the surface might form a slight film — a quick stir brings back the original texture.
Best storage methods:
- Use a clear container so you can see when it’s time to use it.
- If you’ve divided into three flavors, keep them covered separately so the spices don’t mingle.
Lunchbox or next-day uses:
- Pack the dip in a small container with fruit on the side. It’s a real crowd-pleaser for school lunches or picnics.
- For leftovers, spread a spoonful over toast or stir into plain oatmeal for a tangy-sweet breakfast upgrade.
How well it holds up:
- The dip doesn’t reheat; it’s meant to be enjoyed cold or at room temperature. There’s no need to warm it — warming changes the texture and melts the pleasant tang into something less fresh.
If you like freezing yogurt combos, you might also enjoy experimenting with similar mixtures in frozen snacks like these high-protein frozen peanut butter Greek yogurt bites, which are handy for longer-term make-ahead treats.
Common questions home cooks ask about this recipe
Timing: How long does it take?
- Total hands-on time is under 10 minutes. Allow an extra five minutes for fruit prep if you’re slicing apples or peeling bananas.
Texture issues: What if the dip is runny?
- That usually means the yogurt is thin. Either let it thicken in the fridge, or drain regular yogurt through a cheesecloth for an hour. If you don’t have time, you can also stir in a spoonful of instant powdered milk to thicken without changing flavor much.
Scaling the recipe:
- The recipe scales easily — double or triple the base amounts. Keep honey measured by taste, especially when increasing volume. It’s better to under-sweeten and adjust than to overdo it.
Make-it-again confidence:
- This is one of those recipes that’s hard to mess up. Use good-quality yogurt, be modest with optional spices, and let everyone customize at the table. That approach keeps me coming back to it as a reliable, comforting option.
If you want another portable idea for keeping yogurt-based snacks in rotation, try making small frozen portions like these blueberry swirl yogurt bites for mornings when fresh fruit isn’t available — they pair well with the same flavor combinations.
Final thoughts from Sarah
This Greek Yogurt Fruit Dip is one of those recipes that rewards simplicity. It’s quick when you need speed, flexible when you want variety, and comforting in a way that feels familiar to both kids and adults. Keep the ingredients on hand, give it a gentle stir, and let everyone pick their favorite fruit — you’ll have a snack that’s family-friendly and low-stress.
Try it as written first, then experiment with a small variation or two. You’ll quickly learn which fruit and flavor combinations your household prefers, and before long this simple dip will be one of those go-to recipes you turn to without thinking.
Happy dipping — Sarah
Conclusion
If you want another quick reference for a similar, two-minute take on this idea, I like the practical approach shown in Easy Greek Yogurt Fruit Dip (Healthy 2-Minute Recipe) – Live Simply for a quick inspiration boost. For a registered-dietitian perspective on simple yogurt dips and how to balance flavors, see 5-Minute Healthy Yogurt Fruit Dip | Walder Wellness, RD. And if you’re collecting kid-friendly dip ideas to keep in rotation, the roundup at 5 Easy Greek Yogurt Fruit Dips – Healthy Family Project has a few straightforward variations worth bookmarking.