Greek Yogurt Protein Muffins
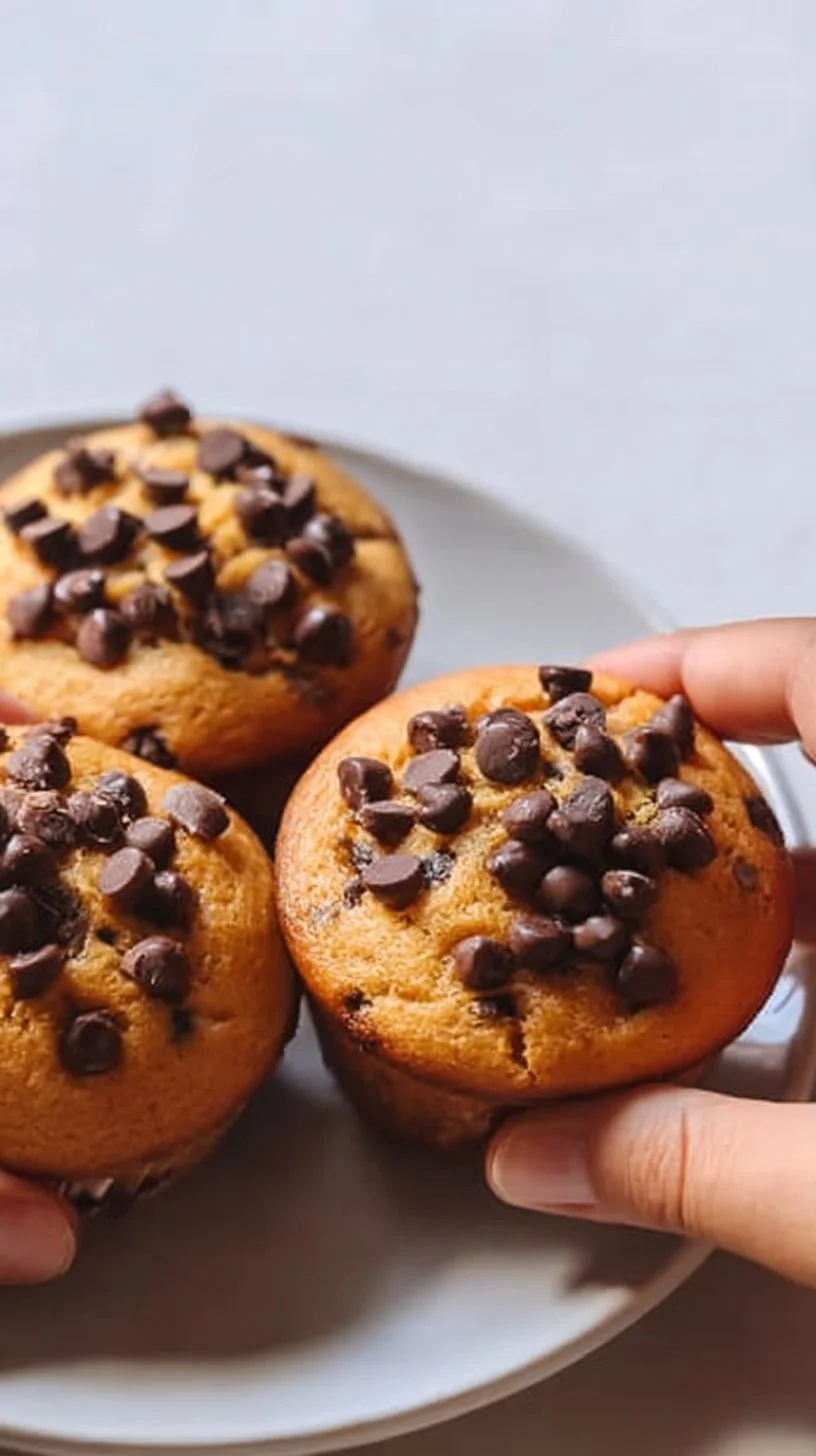
If you’re looking for a simple, nourishing muffin that won’t intimidate you, these Greek Yogurt Protein Muffins are for you. I’m Carla Carter, founder and recipe developer of RecipesCabin, and I designed this recipe so cooks at any level can feel calm and capable in the kitchen. These muffins are straightforward, forgiving, and quick to pull together — a great project if you’re new to baking or returning after a long break.
If you like portable breakfasts or post-workout snacks, you’ll find these especially helpful. They strike a nice balance: not overly sweet, with a tender crumb thanks to the Greek yogurt. If you want ideas for pairing or similar make-ahead snacks, I often point readers to my recipes for high-protein frozen peanut butter treats; one good example you might enjoy is my high-protein frozen peanut butter Greek yogurt bites, which are great for meal prep on busy days.
My goal in this article is to walk beside you, step by step, explaining what’s happening and why, so you can succeed on your first try and feel proud of the result.
Why this recipe is easy to get right
This recipe is forgiving for several reasons. First, the batter is simple — a small set of wet ingredients combined with ground oats and a couple of leavening agents. Because Greek yogurt adds moisture and structure, small variations in stirring or oven time won’t ruin the muffins. The oats provide a sturdy base, so the muffins hold together well even if you slightly overmix.
There’s flexibility in the sweetener: honey or maple syrup both work, so you can use what you have on hand. Optional add-ins like chocolate chips, nuts, or fruit can be added without changing the base balance. That means you can customize flavor without worrying about the chemistry of baking.
For more ideas on yogurt-based snacks and easy protein options, you might like my recipe for frozen Greek yogurt peanut butter bites — they’re another low-effort way to use Greek yogurt in healthy treats.
Why it’s suitable for all skill levels:
- Minimal equipment: a bowl, whisk or spoon, muffin tin, and an oven.
- No delicate folding or complex technique required.
- Clear visual cues for doneness — toothpick test and gentle springiness.
All of that means you can approach these muffins with a calm mindset: small imperfections are normal, and they’ll still taste great.
How to make Greek Yogurt Protein Muffins
Overall process: mix wet ingredients, mix dry ingredients, combine, bake. That’s it — three clear stages.
What happens first: Preheating the oven and lining the muffin tin sets you up for success. Getting the oven to the right temperature before you bake ensures even rise and consistent texture. While the oven warms, you’ll mix the wet and dry components.
Next: Combine the wet ingredients until they’re smooth and homogenous. You want a uniform mixture so the baking powder and baking soda can do their work evenly once the dry ingredients are added.
After combining wet and dry: Stir until just combined. This step matters because overmixing can make muffins tough. The batter will be a bit thicker than a cake batter because of the oat flour and Greek yogurt; that’s normal. Fold in add-ins gently to keep an even texture.
Last: Bake and cool briefly in the pan. Muffins continue to set as they cool. Let them rest a few minutes in the pan, then move them to a rack to finish cooling so they don’t become soggy from trapped steam.
Where beginners should slow down:
- Grinding oats to flour: take a moment to pulse them evenly so you don’t end up with larger bits unless you like texture.
- Mixing wet and dry: stir gently and stop when you can’t see dry streaks.
- Filling muffin cups: aim for about 3/4 full to allow room for rise without overflow.
If you want to explore other breakfast-bake ideas that use similar, approachable techniques, check out this baked dish that’s great for protein-packed mornings: baked cottage cheese eggs.
Ingredients
1 cup Greek yogurt, 2 large eggs, 1 cup oats (ground to flour), 1/2 cup honey or maple syrup, 1 teaspoon baking powder, 1/2 teaspoon baking soda, 1 teaspoon vanilla extract, 1/2 teaspoon salt, Optional: add-ins like chocolate chips, nuts, or fruits
What each ingredient does and why none are intimidating:
- 1 cup Greek yogurt: Adds moisture, richness, and protein. Greek yogurt also helps create a tender crumb; it’s what keeps these muffins from drying out. Don’t worry if your yogurt is a little thick — that’s fine.
- 2 large eggs: Provide structure and help the muffins rise. Eggs also add a bit of lift and help bind the oats and yogurt together so the muffins aren’t crumbly.
- 1 cup oats (ground to flour): Ground oats act like flour here. They’re wholesome and mild in flavor. If you pulse them in a blender until they look like a soft powder, you’ve done it right.
- 1/2 cup honey or maple syrup: Sweetener and flavor. Both options add moisture, so choose based on taste. Honey will give a slightly floral note; maple syrup a deeper sweetness.
- 1 teaspoon baking powder & 1/2 teaspoon baking soda: These are the leavening agents. They work together to give lift and a gentle crumb. The yogurt’s acidity helps the baking soda activate.
- 1 teaspoon vanilla extract: Enhances overall flavor without being assertive. It rounds out the sweetness and adds familiarity.
- 1/2 teaspoon salt: Balance. Salt is subtle but important — it brings out the other flavors and keeps the muffins from tasting flat.
- Optional add-ins: chocolate chips, nuts, fruits. These are for texture and flavor; adding them won’t break the recipe. Fold them in so they’re evenly distributed.
All of these ingredients are common pantry staples or easy to find. They work together to create a moist, flavorful muffin that’s forgiving to make.
Directions
- Preheat your oven to 350°F (175°C) and line a muffin tin with liners.
- In a large bowl, mix together the Greek yogurt, eggs, honey (or maple syrup), and vanilla extract until well combined.
- In another bowl, combine the ground oats, baking powder, baking soda, and salt.
- Gradually add the dry ingredients to the wet ingredients, stirring until just combined. If using, fold in any optional add-ins.
- Pour the batter into the prepared muffin tin, filling each cup about 3/4 full.
- Bake for 18-20 minutes, or until a toothpick inserted into the center comes out clean.
- Allow to cool slightly before removing from the pan. Enjoy your healthy muffins!
Supportive guidance around the steps:
Step 1: Preheating — Make sure the oven reads 350°F (175°C) before you put the muffins in. If your oven runs hot or cool, an oven thermometer helps, but it’s not essential. A steady preheat is a big contributor to even baking.
Step 2: Mixing wet ingredients — Stir until smooth. You’ll notice the mixture become glossy and uniform. That’s the sign you’re done. It should pour slowly but be thicker than pancake batter.
Step 3: Dry ingredients — Your ground oats should look like a fine, slightly sandy flour. If there are a few flecks, that’s okay; they add a pleasant texture.
Step 4: Combining — Stir until just combined. The batter will still have some small streaks of oat flour at first, but it should come together without needing aggressive mixing. Overmixing develops the oat structure and can lead to denser muffins. If you accidentally overmix, they’ll still be edible — just slightly firmer.
Step 5: Filling the tin — Use an ice cream scoop or large spoon to portion batter evenly. Filling to about 3/4 full gives a rounded top without spillover.
Step 6: Baking time — Ovens vary, so start checking at 16 minutes toward the shorter end of the range. The toothpick should come out clean or with a few moist crumbs (not wet batter). Tops will be lightly golden and spring back gently when touched.
Step 7: Cooling — Let muffins rest in the pan for 5 minutes, then transfer to a rack. This helps them finish setting while avoiding trapped steam that could make bottoms soggy.
If things don’t look perfect: If a few muffins rise unevenly, or a top cracks a bit, that’s normal. Muffins may brown slightly more on one side if your oven has a hot spot — rotate the pan halfway through baking next time if that happens. Small imperfections don’t affect flavor.
Key techniques you’ll practice in this recipe
- Measuring and combining wet vs. dry ingredients: Learning to keep these separate until just before mixing helps with consistency in many baked goods.
- Grinding oats to flour: This is a basic technique that introduces whole grains to baking while keeping them light.
- Gentle mixing/stirring until just combined: This skill prevents toughness and is useful for quick breads and muffins across the board.
- Portioning batter into a muffin tin: Even scooping creates uniform bake times and attractive results.
- Checking doneness with a toothpick and visual cues: This builds intuition for baking times and when to trust your oven.
These techniques are foundational for many simple bakes and will give you confidence to try other straightforward recipes. If you enjoy experimenting with yogurt-based treats, you might also like my easy blueberry yogurt bites for a fruity twist — see my blueberry swirl yogurt bites for an idea that uses similar patience and gentle handling.
Common mistakes and how to avoid them
- Overmixing the batter: Stir only until you no longer see dry flour. Overmixing can make muffins dense. If you do overmix, don’t panic — bake them anyway; they’ll still be tasty, just a bit firmer.
- Using cold ingredients: If your Greek yogurt or eggs are very cold, the batter can be uneven. If you remember, take them out for 10–15 minutes before starting so they’re closer to room temperature. It’s not a strict requirement, but it helps the ingredients blend more smoothly.
- Filling cups unevenly: Use a scoop or measure to portion batter. Uneven filling leads to muffins that bake at different rates. A consistent fill produces uniform tops and doneness.
- Not preheating the oven: Putting batter into a cold oven can alter rise and texture. Give your oven time to reach temperature.
- Overbaking: Muffins continue to set after you remove them. If the toothpick has a few crumbs but no wet batter, they’re done. Slightly underbaked muffins can be punished by cooling too long in the pan — remove them to a rack.
If something goes off track:
- If muffins are too wet in the center after the full time, give them 2–4 more minutes and retest. If they’re still wet after extra time, cool them briefly and consider slicing and toasting for serving.
- If too dry, next time reduce baking time slightly or check oven temperature accuracy.
How to adjust confidently without changing the recipe
You can change portion sizes by baking the batter in mini muffin tins (reduce bake time) or in a loaf pan (increase bake time). Conceptually, smaller portions bake faster; larger ones take longer.
For flavor preferences:
- Swap honey for maple syrup without changing measurement — both act as moist sweeteners.
- Add 1/3 to 1/2 cup of mix-ins like chocolate chips, chopped nuts, or berries for texture and taste — fold gently.
For texture tweaks (conceptual only):
- If you want a chewier muffin, leave in some larger oat bits instead of finely grinding all the oats.
- For a lighter crumb, ensure your baking powder and soda are fresh; old leaveners can reduce rise.
Remember: these are conceptual adjustments. Do not change the stated ingredient quantities or the step order when you first learn the recipe — practice it as written to understand its baseline, then experiment confidently.
Serving, storage, and reheating made simple
Serving:
- These muffins are great warm or at room temperature. A little spread of nut butter or a thin drizzle of yogurt makes a lovely touch.
- Pair them with fruit, coffee, or a protein shake for a balanced snack or breakfast.
Storage:
- At room temperature: store in an airtight container for up to 2 days.
- In the refrigerator: they keep well for up to 5 days in a sealed container.
- Freezer: Wrap individually or place in a freezer-safe bag for up to 3 months. To avoid freezer burn, remove as much air as possible.
Reheating:
- From refrigerated: microwave one muffin for 15–20 seconds; it will steam and soften pleasantly.
- From frozen: thaw at room temperature for 30–60 minutes, or microwave on a defrost setting for short bursts, then warm for 20–30 seconds.
- To keep texture: reheat briefly rather than for long periods — quick warming preserves moisture without drying.
For other make-ahead snack ideas that freeze and reheat well, my meal-prep-friendly protein muffins offer similar convenience and portability — they’re a good companion recipe to try after you’ve mastered this one: high-protein frozen peanut butter Greek yogurt bites.
Questions new cooks often ask about this recipe
Q: My muffins sank in the middle — why?
A: This can happen if the oven temperature was too low, or if the batter was overmixed and then deflated, or if you opened the oven door too early. Give the muffins a gentle spring back test and a toothpick check next time; preheat fully and avoid opening the oven until near the end of the bake time.
Q: Can I use rolled oats without grinding?
A: You can, and the texture will be heartier with noticeable oat bits. If you prefer a smoother crumb, grind to a flour first. Both are acceptable — neither is a mistake.
Q: My tops browned too quickly — what now?
A: Rotate the pan halfway through baking and consider lowering the oven rack. If tops brown too fast, place a sheet of foil loosely over the muffins for the last few minutes.
Q: Is it normal for batter to be thick?
A: Yes. Because of the Greek yogurt and oat flour, the batter won’t pour like cake batter. It should be spoonable and scoopable.
Q: Do I need special equipment?
A: No. A blender for grinding oats is helpful but not required — a food processor or even finely chopping oats by hand will work. The rest is basic: bowl, spoon, muffin tin, oven.
Final encouragement from Carla
Cooking is a series of small experiments, and most of them turn out better than you expect. These Greek Yogurt Protein Muffins are designed to give you an early win: simple steps, forgiving ingredients, and a tasty result. If your first batch isn’t perfect, that’s part of learning — note one small change to try next time and celebrate what went well. Keep going; every bake builds confidence.
Conclusion
If you’d like another muffin-style idea that stays low in sugar while keeping moisture from Greek yogurt, see this helpful variation at Greek Yogurt Blueberry Muffins (Low Sugar Recipe) – Scrummy Lane for inspiration. For a meal-prep friendly protein muffin approach that complements this recipe’s simplicity, check out Easy Greek Yogurt Protein Muffins (meal-prep friendly) – MattsfitChef.

Greek Yogurt Protein Muffins
Ingredients
Method
- Preheat your oven to 350°F (175°C) and line a muffin tin with liners.
- In a large bowl, mix together the Greek yogurt, eggs, honey (or maple syrup), and vanilla extract until well combined.
- In another bowl, combine the ground oats, baking powder, baking soda, and salt.
- Gradually add the dry ingredients to the wet ingredients, stirring until just combined. If using, fold in any optional add-ins.
- Pour the batter into the prepared muffin tin, filling each cup about 3/4 full.
- Bake for 18-20 minutes, or until a toothpick inserted into the center comes out clean.
- Allow to cool slightly before removing from the pan.