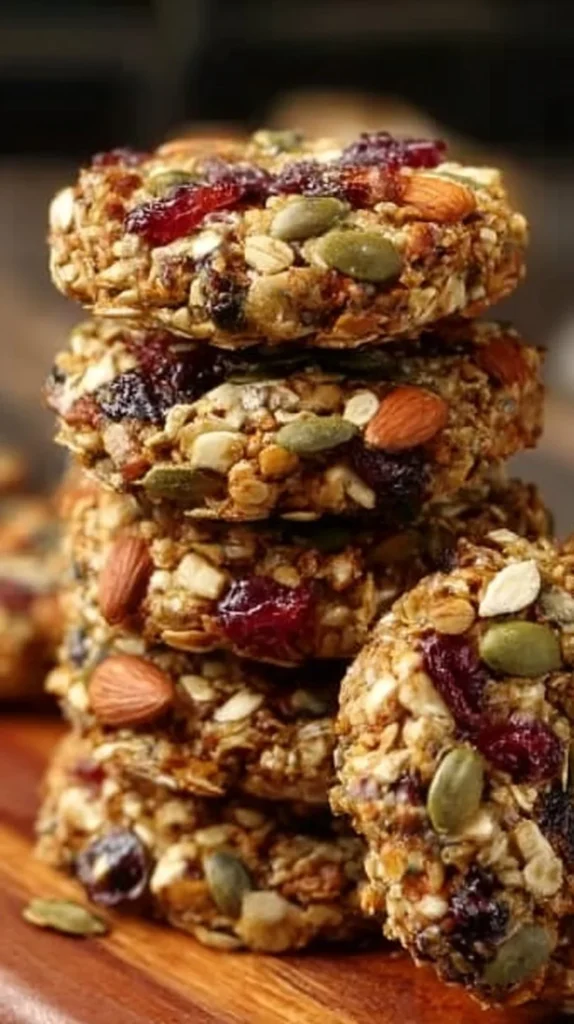
Healthy Nut & Seed Energy Cookies

If you’re looking for a simple, nourishing snack that you can feel good about, these Healthy Nut & Seed Energy Cookies are a wonderful place to start. I’m Carla Carter, Founder & Recipe Developer of RecipesCabin, and I design recipes so people who are new to cooking—or who’ve had a few kitchen misses—can feel calm and confident as they try something new. This cookie is for busy mornings, mid-afternoon energy dips, or for anyone who wants a wholesome bite without fuss.
This recipe is approachable because the ingredients are familiar and the method is straightforward. If you enjoy other easy, wholesome recipes, you might also like my take on quick, flavorful sautéed vegetables, which also focuses on simple steps and dependable results.
I’ll walk you through what each ingredient does, what to watch for, and how to feel confident at every step. Small imperfections are not only okay here—they’re expected. Let’s make something nourishing without stress.
Why this recipe is easy to get right
What makes these cookies forgiving is their texture and ingredients. They don’t rely on delicate chemical reactions that demand perfect timing or precise temperatures. The oats, nuts, seeds, and dried fruit provide structure and chew, while the nut butter and honey (or maple syrup) act as natural binders and sweeteners. That means if one cookie spreads a little more or less than another, the results will still be tasty and satisfying.
There’s flexibility in the mix: nuts and seeds can vary by size and shape, and the mixture will still hold together. You don’t need special tools—just a couple of bowls and a baking sheet. Because the process is mostly mixing and scooping, it’s forgiving for beginners and doubles as a great recipe to practice simple kitchen skills like measuring, mixing, and timing.
Finally, the bake window (10–12 minutes) gives you time to develop a golden color without worrying about an exact moment to take them out. The visual cue—golden brown edges and a toasted top—is your friend here.
How to make Healthy Nut & Seed Energy Cookies
At a glance, the process has three clear stages: prepare, combine, and bake.
First, prepare by preheating the oven and lining a baking sheet. Preheating ensures the cookies begin cooking immediately and get a light, even rise; lining the sheet prevents sticking and makes cleanup easier.
Next, combine dry ingredients in one bowl and mix the wet ingredients in another. This keeps the texture even and makes it easier to coat everything consistently. When you pour the wet into the dry, you’ll see the mixture shift from loose and crumbly to a more cohesive, sticky mass—that’s the moment everything is binding together.
Last comes shaping and baking. Scoop tablespoon-sized portions and flatten them slightly so they bake evenly. Watch for a golden brown color and a toasted smell—those are your signals that the cookies are done. Allow them to cool briefly on the baking sheet so they firm up, then transfer to a wire rack to finish cooling and set.
If you’re new to baking, slow down during the combining stage. Take a minute to stir thoroughly so every oat and seed is coated—this helps with texture and flavor. Remember, small imperfections are fine; the goal is a cookie that tastes good and gives you energy.
Ingredients
1 cup oats, 1/2 cup assorted nuts (e.g., almonds, walnuts, pecans), 1/2 cup seeds (e.g., sunflower seeds, pumpkin seeds), 1/2 cup dried fruits (e.g., raisins, cranberries, apricots), 1/2 cup nut butter (e.g., almond butter, peanut butter), 1/4 cup honey or maple syrup, 1 teaspoon vanilla extract, 1/4 teaspoon salt
Let’s break down what each ingredient does and why none are intimidating:
- Oats: They are the backbone of these cookies, giving them structure and a pleasant chew. Oats are gentle in flavor and hold the mixture together with the help of the wet ingredients.
- Assorted nuts: Chopped nuts add crunch and depth. They also provide healthy fats and a satisfying contrast to the oats.
- Seeds: Sunflower or pumpkin seeds bring a toasty bite and extra nutrition. They’re small but they make each bite interesting.
- Dried fruits: Raisins, cranberries, or chopped apricots add pockets of sweetness and chew. They balance the nutty flavors without needing refined sugar.
- Nut butter: This is the primary binder. It coats the dry ingredients and helps hold the cookies together. Choose one you enjoy the flavor of—almond or peanut are both reliable.
- Honey or maple syrup: These liquid sweeteners add sweetness and help the mixture stick. They also contribute a glossy, slightly chewy finish.
- Vanilla extract: A small amount goes a long way in rounding the flavors and adding warmth.
- Salt: Salt is a flavor amplifier here; it brings out the nuttiness and balances the sweetness.
All of these ingredients are pantry-friendly and familiar. If you want ideas for other small snacks that use the same pantry approach, you might enjoy my recipe for frozen Greek yogurt peanut butter bites, which also pairs simple ingredients into a satisfying snack.
Directions
- Preheat the oven to 350°F (175°C) and line a baking sheet with parchment paper., 2. In a large bowl, combine the oats, chopped nuts, seeds, and dried fruits., 3. In another bowl, mix the nut butter, honey or maple syrup, vanilla extract, and salt until well combined., 4. Pour the wet mixture into the dry ingredients and stir until everything is evenly coated., 5. Scoop tablespoon-sized portions of the mixture onto the prepared baking sheet, flattening them slightly., 6. Bake for 10-12 minutes, or until golden brown., 7. Allow to cool on the baking sheet for a few minutes before transferring to a wire rack to cool completely.
Supportive guidance for these steps:
- Step 1 (preheat and line): The oven should be fully heated before the cookies go in. You’ll notice the difference when the cookies begin to color evenly. Using parchment keeps the bottoms from browning too quickly.
- Step 2 (combine dry): Look for a uniform spread of oats, nuts, seeds, and fruit. The mix should look varied but evenly distributed—no large clumps of one ingredient.
- Step 3 (mix wet): The nut butter and honey/maple syrup will look glossy and smooth when combined. If your nut butter is thick, stirring a bit longer helps loosen it so it coats the dry ingredients better.
- Step 4 (mix together): Stir until the dry is fully coated. The texture should move from powdery to clumpy and slightly sticky—that’s how you know the cookies will hold their shape. If something looks a little dry, a gentle extra stir will usually do the trick.
- Step 5 (scoop and flatten): Use a tablespoon to keep the cookies even in size. Flattening slightly helps them bake through and develop that classic cookie shape.
- Step 6 (bake): Watch the edges and the top for a warm golden color. The smell will be toasty and nutty—another good sign. If you’re between 10 and 12 minutes, aim for color over exact time.
- Step 7 (cool): Cookies continue to set as they cool. Leaving them on the sheet for a few minutes helps them firm up and makes them easier to transfer.
If a cookie spreads more than you expect, don’t worry—flatter cookies are still delicious. If a cookie feels underbaked in the center after cooling, pop it back in the oven for a minute or two; small adjustments are fine.
Key techniques you’ll practice in this recipe
This recipe builds a few fundamental kitchen skills that are useful elsewhere:
- Measuring and proportion: You’ll get comfortable eyeballing and measuring dry vs. wet ingredients—an essential skill for many recipes.
- Mixing for texture: Learning when a mixture has gone from loose to properly coated is a tactile skill; you’ll recognize the sticky, cohesive point in other recipes, too.
- Timing and visual cues: Watching for color and aroma during baking teaches you to rely on senses rather than just the clock.
- Gentle shaping: Scooping and flattening teach even portioning, which is useful for cookies, patties, and fritters.
These are low-pressure ways to practice skills that translate to breakfasts, snack bars, and simple baked goods.
Common mistakes and how to avoid them
Here are typical slips and how to fix them without starting over:
- Mistake: Mixture looks too dry and won’t stick together. Fix: Stir a bit more until the nut butter and honey have fully coated the dry ingredients. If still dry, use a tiny extra drizzle of honey or a teaspoon of nut butter—do this sparingly.
- Mistake: Cookies spread too flat. Fix: Next time, try slightly smaller scoops or gently press them less; also check that the oven was properly preheated. Flat cookies may still taste great—just enjoy them as crisp energy bites.
- Mistake: Uneven baking (some cookies darker than others). Fix: Space the scoops evenly, rotate the pan halfway through baking, and avoid crowding the tray.
- Mistake: Centers feel gummy after cooling. Fix: Return the tray to the oven for 1–2 minutes, watching carefully. Let cookies cool fully—they often firm up as they reach room temperature.
If something goes off track, patience and small adjustments are your friends. This recipe is resilient; most problems can be corrected without tossing the batch.
How to adjust confidently without changing the recipe
While you shouldn’t change the listed ingredients or steps for this version, you can think about adjustments conceptually:
- Portion scaling: To make more or fewer cookies, scale each ingredient by the same factor. The important idea is keeping the same proportions so the texture stays balanced.
- Flavor preferences: If you prefer more nuttiness, use slightly larger chunks of nuts; for extra sweetness, choose a sweeter dried fruit. These changes are about swapping options rather than altering amounts.
- Texture tweaks: For chewier cookies, use larger pieces of dried fruit. For crunchier cookies, chop nuts coarser. These are conceptual tweaks in ingredient size rather than changing the recipe measurements or steps.
Always remember that small changes in ingredient sizes or types will shift texture and flavor, but won’t break the recipe as long as proportions remain similar.
Serving, storage, and reheating made simple
Serving: These cookies are great straight from the cooling rack with a cup of tea or as a quick grab-and-go snack. They pair well with yogurt or a piece of fruit for a balanced mini-meal.
Storage: Once completely cool, store in an airtight container at room temperature for up to 4 days. For longer storage, place them in the fridge for up to two weeks or freeze in a single layer on a tray, then transfer to a freezer container for up to 3 months.
Reheating: If you like them warm, microwave one for 8–10 seconds or warm in a preheated 300°F oven for 3–5 minutes. Warming brings back a fresh-baked feel—just avoid overheating, which can make them hard.
If you want other make-ahead snack ideas that store well, try these high-protein cottage cheese cookies for a different flavor and texture profile.
Questions new cooks often ask about this recipe
- Timing concerns: “What if my oven runs hot?” If you know your oven leans hot, check the cookies at 8 minutes and follow visual cues rather than the clock. Golden edges and a toasted top mean done.
- Equipment questions: You don’t need special tools—a tablespoon for scooping, a spatula, and a wire rack are all that’s required. Parchment paper is helpful but a lightly greased baking sheet will work in a pinch.
- Is this normal? moments: If the dough seems crumbly at first, that’s normal—keep stirring until it comes together. If one cookie is a little misshapen, it’s still okay to eat and enjoy.
- Will they stick to the pan? Using parchment paper or a non-stick surface prevents sticking. If you don’t have parchment, let the cookies cool a few extra minutes and they’ll release more easily.
If you’re ever unsure, take a breath and check the visual cues: color, aroma, and how the mixture feels in your hands. Those are dependable signs of progress.
Final encouragement from Carla
You don’t need a perfect kitchen or exact timing to make something nourishing and satisfying. These Healthy Nut & Seed Energy Cookies are designed to be kind to beginners and forgiving enough to welcome repeat attempts. Each batch teaches you something small—how a mixture comes together, how color signals doneness, and how your senses guide you more than a number on a timer.
If a batch isn’t exactly like you pictured, that’s part of learning. Celebrate the textures you created and take one step forward next time. Cooking is a series of small wins, and I’m cheering for you as you build confidence in the kitchen.
Conclusion
If you want another crunchy cookie inspiration, check out this Best Ever Breakfast Cookies – Bowl of Delicious for a different take on wholesome baked bites. For a version close to today’s cookies with helpful variations, see the Healthy Nut & Seed Energy Cookies – Recipe Flowy page for extra ideas.
Healthy Nut & Seed Energy Cookies
Ingredients
Method
- Preheat the oven to 350°F (175°C) and line a baking sheet with parchment paper.
- In a large bowl, combine the oats, chopped nuts, seeds, and dried fruits.
- In another bowl, mix the nut butter, honey or maple syrup, vanilla extract, and salt until well combined.
- Pour the wet mixture into the dry ingredients and stir until everything is evenly coated.
- Scoop tablespoon-sized portions of the mixture onto the prepared baking sheet, flattening them slightly.
- Bake for 10-12 minutes, or until golden brown.
- Allow to cool on the baking sheet for a few minutes before transferring to a wire rack to cool completely.