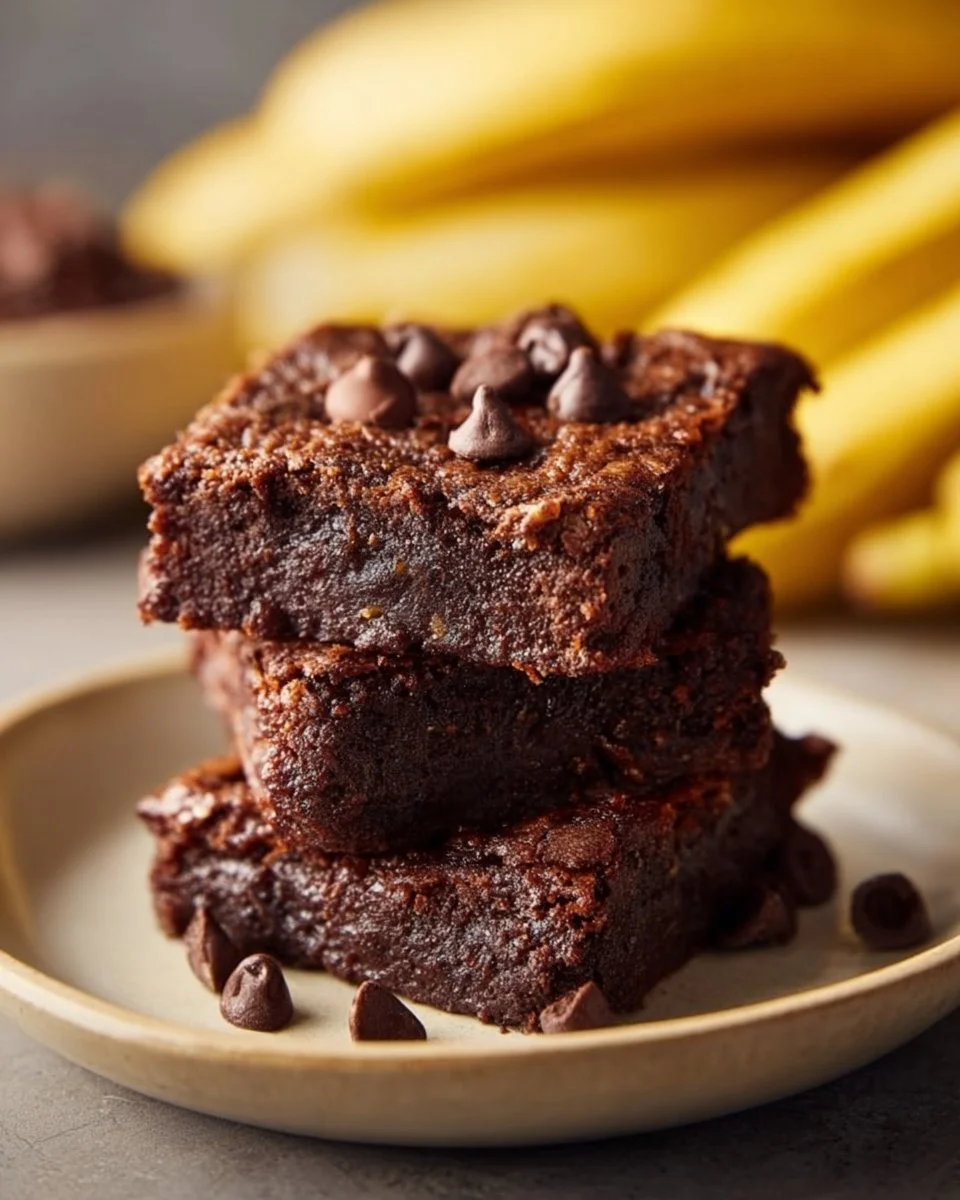
Healthy Banana Brownies Recipe
As a busy parent and home cook, I look for recipes that are comforting, quick, and hard to mess up — the kind of dishes that feel like a small, reliable victory in a weeknight routine. This Healthy Banana Brownies recipe is exactly that: familiar chocolate flavor, simple ingredients, and a process that doesn’t demand a lot of babysitting. You can pull it together with stuff you likely have on hand, and it’s forgiving if your timing isn’t perfect.
I often turn to recipes like this on school nights, after weekend playdates, or when I want a make-ahead treat for lunches and after-school snacks. It’s the kind of recipe you can hand to an older child to finish while you supervise homework, or whip up while dinner is bubbling on the stove. If you’ve tried other straightforward banana-brownie ideas, you might also like how this one balances sweetness and texture without a long ingredient list — a quality I appreciate when I’m short on time and patience. For more recipe inspiration in the same vein, I sometimes compare notes with other simple takes on banana treats like this Healthy banana brownies to see what small twists families have liked.
This recipe is built on familiar flavors — banana, cocoa, a touch of vanilla and cinnamon — so even picky eaters tend to accept it easily. It’s reliable because the steps are straightforward, and it fits into real schedules: you can bake it after school, bring it to a potluck, or slice and freeze portions for later. Below I’ll walk you through what to expect at each stage, how to keep things simple, and how to adapt the flavors without complicating the process.
How to make Healthy Banana Brownies
Making these brownies is a friendly, one-bowl kind of project. Expect three main stages: mash and mix, combine dry and wet, and bake. Each stage is quick, and the progress is easy to judge by how the batter looks and smells.
- Stage 1 — Mash and mix: You’ll break down the bananas until they’re smooth and mix in the eggs and sweetener. This is where the banana flavor forms the base of the brownies, and it’s also where moisture gets introduced. If you’re new to baking, slow down here and be sure the banana is evenly mashed — no large chunks — so your texture comes out consistent.
- Stage 2 — Add the dry ingredients: Cocoa and flour are stirred in to form a smooth batter. This step is forgiving; a few gentle folds with a spatula are enough. If you rush and overmix, you won’t ruin these, but pausing to scrape the bowl and make sure everything is combined helps the center set evenly.
- Stage 3 — Bake and cool: These brownies bake in a compact, 8×8 pan for a short time. The oven does the heavy lifting; you just need to watch the center rather than the edges. Cooling fully before slicing helps them hold together when you cut them into nine squares.
Beginners should take their time with the first mash and the final smoothing into the pan — those two small moments make a big difference in texture and appearance. Shortcuts naturally exist: use pre-mashed banana from the freezer if you’ve got it, or line your pan ahead of time so you can move straight from mixing to baking without stopping.
Ingredients
2 ripe bananas (mashed (about 1 cup)), 2 large eggs, 1/4 cup cup maple syrup (or honey), 1/4 cup unsweetened Greek yogurt (or applesauce), 1 tsp vanilla extract, 2 tbsp coconut oil (melted), 1/3 cup unsweetened cocoa powder, 1/2 cup oat flour (or almond flour for a grain-free option), 1/4 tsp baking soda, 1/4 tsp sea salt, 1/4 tsp cinnamon for added warmth (optional)
Here’s what each thing does in everyday language:
- Bananas: They’re the sweet, moist backbone. The riper the bananas, the sweeter and more banana-forward the flavor — which most kids and many adults love.
- Eggs: They bind everything and help the brownies set so you can slice them. They’re a simple, dependable structure-builder.
- Maple syrup (or honey): Adds sweetness and a little extra moisture. I like the subtle depth maple gives, but honey works well if that’s what you have.
- Unsweetened Greek yogurt (or applesauce): Either of these keeps the brownies tender. Greek yogurt adds a bit of tang and density; applesauce keeps them moist and dairy-free if needed.
- Vanilla extract: Small but important for familiar, rounded flavor.
- Coconut oil: Adds a touch of richness and helps with texture. Melt it so it mixes evenly.
- Cocoa powder: The chocolate flavor — unsweetened to control sweetness and keep the cocoa bright.
- Oat flour (or almond flour): Oat flour keeps things simple and accessible; almond flour is a fine swap if you need grain-free. Each gives a different crumb but both are reliable.
- Baking soda: Helps a light rise and keeps the texture from becoming too flat.
- Sea salt: Small amount to balance and highlight the chocolate and banana.
- Cinnamon (optional): A gentle warmth that plays nicely with banana and chocolate, but optional if you prefer it straightforward.
These are common pantry items for many households. Keeping them handy means you can put this together without a special grocery run, which is exactly what I look for in a go-to family recipe.
Directions
Preheat oven to 180°C (350°F). Line an 8×8-inch baking pan with parchment paper., Mash the ripe bananas in a mixing bowl until smooth., Add egg, maple syrup, and vanilla; mix until combined., Stir in cocoa powder, oat flour, baking powder, and salt to form a smooth batter., Pour the batter into the prepared pan and spread evenly., Bake for 20 minutes or until the center is set., Cool completely, then slice into 9 brownies.
A few friendly notes about those steps:
- Preheat and prep: Get the oven to temperature and line the pan first. I like to do this while I mash the bananas so I don’t lose heat in the oven. Lining the pan with parchment means easy removal and cleaner cuts after cooling.
- Mashing the bananas: Smoothness matters here. If the bananas are a little lumpy, you’ll get pockets of banana in the brownies — not a disaster, but if you want a uniform texture, press them until they’re almost puree-like.
- Mixing wet ingredients: When you add the egg, maple syrup, and vanilla, stir until everything looks blended. There’s no need to overwork it; you’re aiming for a homogeneous wet mixture.
- Combining dry and wet: Stir in the cocoa, flour, baking powder (as the recipe lists), and salt until a smooth batter forms. Scrape the sides of the bowl so nothing gets missed. The batter should be thick but pourable; if it looks too dense, a tablespoon of yogurt or a splash of milk can loosen it slightly.
- Baking: Because this is a small pan and a short bake time, watch the center at about 18–20 minutes. The center should be set and not wobbly; a toothpick should come out with a few moist crumbs, not raw batter.
- Cooling and slicing: Cooling completely is the most important finish — it lets the brownies firm up so they slice cleanly into nine squares. If you’re impatient like I sometimes am, pop the pan in the fridge for 20–30 minutes after it’s at room temperature to speed things along.
Common small mistakes include under-mashing bananas, not scraping the bowl, and slicing too soon. None are fatal, but taking those tiny extra seconds makes the result more consistent and presentable for guests or lunchboxes.
Why families love this dish
There’s something inherently comforting about banana and chocolate together — it’s familiar and gentle, not overly sweet, and it tends to be a crowd-pleaser. These brownies hit a sweet spot: they’re dessert-like without being fussy, and they transport well for after-school snacks, weekend road trips, or casual family gatherings.
Kids gravitate toward the chocolate flavor, while adults appreciate the more restrained sweetness and wholesome ingredients. The texture is soft and slightly dense, which makes it satisfying and filling — a good mid-afternoon pick-me-up that pairs well with milk or a cup of tea. Because the recipe is simple, you can involve kids in the process — having them mash bananas or pour ingredients is an easy cooking confidence-builder.
It’s also versatile enough for busy schedules. You can double the batch for a weekend bake-and-freeze session, or make a single pan to use up ripe bananas on the counter. The predictable timing and short bake make it easy to slot into a weeknight timeline.
In case you’re exploring similar simple recipes, some families find it helpful to compare methods — for example, a no-bake option or a flourless spin can be useful when you have limited time or ingredients.
Smart substitutions and simple variations
This recipe is designed to be forgiving, so a few swaps will keep it reliable without changing the method.
- Flour swaps: If you need grain-free, almond flour is suggested in the ingredient notes; it will change the crumb a bit but remains dependable. Oat flour keeps things neutral and is a pantry standby for many households.
- Sweetener variation: The recipe allows maple syrup or honey. Use whichever you have — maple gives a deeper flavor, honey is brighter. If you must, a light brown sugar can be used in the same volume, though the texture will shift slightly.
- Dairy swap: The recipe already offers unsweetened Greek yogurt or applesauce. Choose yogurt for a bit more body; applesauce for a dairy-free approach.
- Add-ins and flavor tweaks: If your family likes mix-ins, a small handful of chocolate chips or chopped nuts folded into the batter right before pouring will be welcomed by kids. Cinnamon is optional in the ingredients; it brings warmth if you choose it.
- For picky eaters: If banana flavor is a concern, use very ripe bananas so the sweetness is mellow and the banana taste blends with the cocoa. You can also mash very finely to reduce visible banana bits.
If you’re curious about other easy banana-brownie takes — like flourless or oil-free versions — I’ve found it useful to glance at different approaches for ideas on texture and ingredient choices. For an alternate grain-free method or a no-oil approach, trying a few recipes side-by-side helps you decide what your family prefers; for example, a simple reference is a recipe that focuses on flourless versions.
Here’s a helpful note for substitutions: whatever you swap, keep the overall balance of wet and dry similar. Small changes won’t derail the recipe, but large scale swaps (doubling a flour alternative without adjusting liquids) can affect texture.
For more dessert ideas that are simple and kid-friendly, I sometimes pair this with other no-bake snack concepts like no-bake Oreo cheesecake bites for gatherings where a variety of treats is appreciated.
Pairing ideas for a complete, satisfying meal
These brownies work best as a sweet finish or a standalone snack, but you can easily round out a casual family meal around them:
- Breakfast or brunch pairing: Serve a brownie alongside plain yogurt and fresh fruit for a playful brunch plate kids love.
- After-school snack pack: Pack a brownie with a small container of nut butter and apple slices for a balanced snack that satisfies without feeling heavy.
- Potluck or picnic: Pair with simple sandwiches (turkey or grilled cheese), a big green salad, and a pitcher of iced tea for a relaxed gathering where the brownies serve as a familiar dessert everyone reaches for.
- Beverage pairing: Milk for kids, coffee or tea for adults — the brownies are comforting with any of these.
Keep sides simple and familiar. The idea is minimal extra work for a rounded, satisfying experience.
Make-ahead tips, leftovers, and storage
This recipe is forgiving when it comes to storage, which is great for busy families:
- Room temperature: Store brownies in an airtight container at room temperature for up to 2 days. Keep them out of direct sunlight and away from heat.
- Refrigerator: For longer life, refrigerate in an airtight container for up to 5 days. The fridge firms them up slightly, which can be nice for neat slices.
- Freezing: You can freeze individual squares wrapped tightly in plastic and foil for up to 2 months. Thaw at room temperature or warm gently in the microwave for 20–30 seconds.
- Reheating: A short zap in the microwave (10–20 seconds) brings back softness without drying them. If you prefer the oven, wrap in foil and warm at a low temperature for 5–8 minutes.
- Lunchbox use: These cut into neat squares and travel well. Pack them with an ice pack if they’re stored with perishable sides.
Leftovers are a blessing here — they reheat well and retain flavor. I often make a double batch on a weekend and stash portions for school snacks and quick desserts through the week.
Common questions home cooks ask about this recipe
Q: What if the center is gummy after baking?
A: The most common cause is underbaking. Oven temperatures vary, so if your center is wobbly, return to the oven for 3–5 minute increments. Remember that cooling helps the center set, so let it rest before judging.
Q: Can I double the recipe?
A: Yes — use a larger pan (like 9×13) and increase bake time, checking at 5-minute intervals after the original baking time. Keep an eye on the center; you want it set, not dry.
Q: My batter was too thick. What do I do?
A: A tablespoon or two of yogurt or milk loosens it. Aim for a thick but spreadable batter.
Q: Can I omit the coconut oil?
A: The oil adds richness and helps with texture. If you omit it, expect a slightly denser result; you can replace it with a little extra yogurt or applesauce in a pinch.
Q: Why does the recipe list baking powder in the directions but baking soda in the ingredients?
A: Follow the ingredient list provided, but if you’re ever unsure when trying similar recipes, a small leavening agent like baking soda or powder is intended to lighten the texture. In practice, this recipe is forgiving — slight differences in leavening won’t ruin it.
Q: Is the cinnamon necessary?
A: It’s optional. A pinch adds warmth, but omit it if your family prefers plain chocolate-banana flavor.
These are the kinds of questions I see from other busy cooks — small troubleshooting items that help you feel confident about repeating the recipe.
Final thoughts from Sarah
I love recipes that become quietly dependable: they save mental energy and deliver comfort when life is full. These Healthy Banana Brownies are exactly that kind of recipe — straightforward to make, kid-approved, and pleasantly versatile for weeknights, small gatherings, or prepping for the week ahead.
If you’re looking for a no-fuss dessert that your family will accept as both a treat and a snack, this one deserves a spot in your rotation. Make it once, notice the simple wins (easy clean-up, familiar flavor, short bake time), and you’ll find yourself reaching for it again.
Warmly,
Sarah Collins
Conclusion
If you’d like to compare this version to other simple, flourless takes, try Healthy Banana Brownies (3 Ingredients, Flourless) for a very pared-down option. For another straightforward recipe with similar goals, Quick and Healthy Banana Brownies – | The Oven Light offers another home-cook approach worth a look. If you’re curious about a slightly different ingredient balance, this The Best Flourless Banana Brownies {6 Ingredients} recipe shows how different textures can be achieved with minimal swaps. And for an oil-free, vegan take that still focuses on simple ingredients, see Healthy Vegan Banana Brownies – My Quiet Kitchen.

Healthy Banana Brownies
Ingredients
Method
- Preheat oven to 180°C (350°F). Line an 8×8-inch baking pan with parchment paper.
- Mash the ripe bananas in a mixing bowl until smooth.
- Add eggs, maple syrup, and vanilla; mix until combined.
- Stir in cocoa powder, oat flour, baking soda, and salt to form a smooth batter.
- Pour the batter into the prepared pan and spread evenly.
- Bake for 20 minutes or until the center is set.
- Cool completely, then slice into 9 brownies.