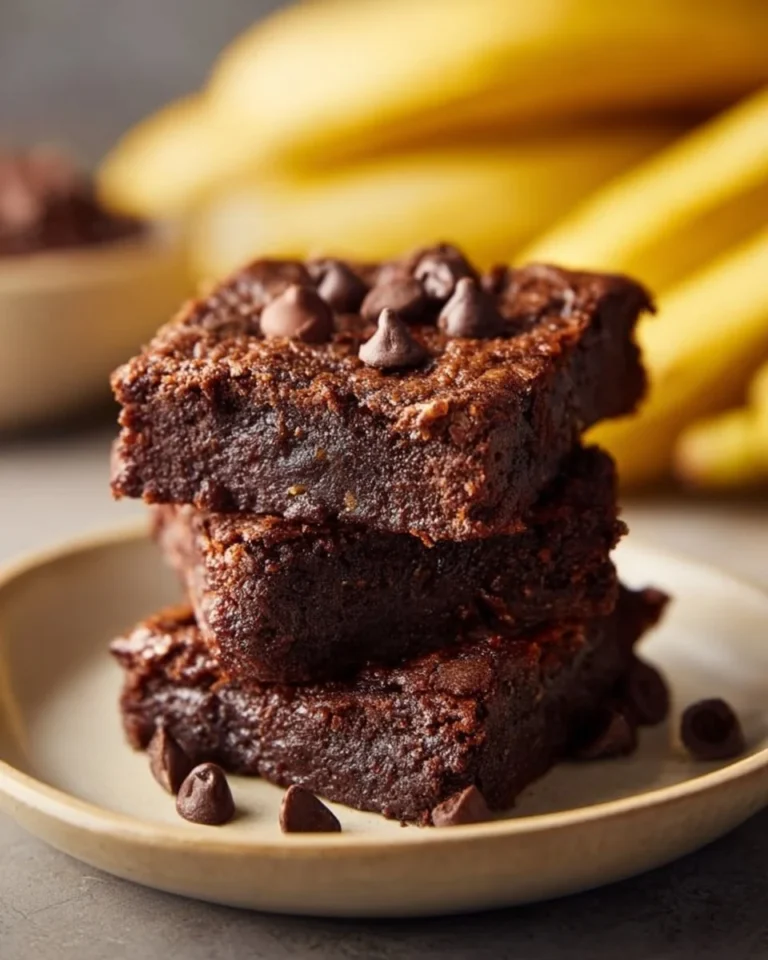
Healthy Banana Brownies
This Healthy Banana Brownies recipe is for anyone who wants a simple, nourishing treat without fuss — whether you’re new to the kitchen, returning after a long break, or have tried and burned a few things in the past. It’s short, forgiving, and uses just three wholesome ingredients, so it’s easy to feel confident as you go. I’ll walk you through each step like we’re baking side by side, and I’ll share the small checks that mean you’re on the right track.
If you enjoy straightforward recipes that build your confidence, these brownies are a great next step after simple breakfasts or snacks. For example, if you’ve tried my easy breakfast ideas and want to expand into sweet bakes, you might also enjoy my take on waffles that keep things uncomplicated and tasty: easy healthy protein waffles. That same spirit — approachable ingredients and gentle technique — is exactly what I’m aiming for here.
Why this recipe is easy to get right
Three ingredients and one bowl make this recipe hard to overcomplicate. There’s no creaming, no tempering, and no special equipment. The ingredients do heavy lifting for you: ripe bananas provide moisture and sweetness, peanut butter brings richness and structure, and cocoa powder adds chocolate flavor without needing melted chocolate or sugar. Because the formula is simple, small variations in technique rarely ruin the result.
This recipe is forgiving in two important ways. First, texture is naturally fudgy; if you underbake slightly the center will still be pleasant rather than raw. Second, sweetness and flavor depend on the bananas you use — ripe ones are sweeter and more fragrant — so the final taste will vary but remain enjoyable. You don’t need precision scales or a pastry degree to succeed here. That said, I’ll point out where a little attention helps: checking banana ripeness, smoothing the batter, and watching the bake time near the end.
How to make Healthy Banana Brownies
Overall flow: mash — mix — spread — bake — cool — slice. Those five actions are easy to remember and keep you moving without stress.
What happens first: Preheat and prepare. Turning the oven on ahead of time gives the brownies a predictable environment. Line a baking dish with parchment so the brownies lift out easily when cool.
Next: combine the wet and dry elements. Mashing the bananas until mostly smooth creates a satin base that the cocoa and peanut butter will cling to. When you stir in the cocoa and peanut butter you’re creating a thick, chocolatey batter. Think of it like mixing two comfortable textures — the glossy peanut butter and the mellow banana — until they become one.
Last: bake and cool. Baking sets the mixture. The top will become slightly drier while the inside stays fudgy. Letting the brownies cool is where they finish — they firm up and slice neatly. Beginners should slow down when spreading the batter and when checking doneness at the end; both moments reward a gentle touch and a little patience.
When you’re mixing and baking I’ll remind you of the simple visual cues to look for: the mash should be creamy, the stirred batter should be uniform in color, the baked surface should look set and slightly matte, and the cooled brownies should hold their shape when lifted.
Ingredients
2 ripe bananas, 1/2 cup cocoa powder, 1/2 cup peanut butter
- 2 ripe bananas: The bananas provide sweetness, moisture, and structure. Ripe means the peel is speckled or mostly brown — the interior will mash easily and taste sweeter. They act like a binder in this flourless recipe, replacing eggs and flour in a gentle, natural way.
- 1/2 cup cocoa powder: Cocoa gives the chocolate flavor without adding extra fat or sugar. It also helps the mixture set and keeps the brownies tasting classically chocolatey even though there’s no added sugar. If your cocoa is unsweetened, expect a pleasantly dark flavor that the bananas mellow.
- 1/2 cup peanut butter: Peanut butter contributes fat, richness, and texture. It helps the brownies hold together and gives a fudgy mouthfeel. Choose a smooth or slightly creamy peanut butter if you want a more even batter; chunky works too but will give a more textured bite.
None of these ingredients are complicated. You don’t need specialty items or precise subcomponents. They work together by balancing sweetness, structure, and flavor: banana offers moisture and sugar, peanut butter adds fat and body, and cocoa powder provides the chocolate backbone.
Directions
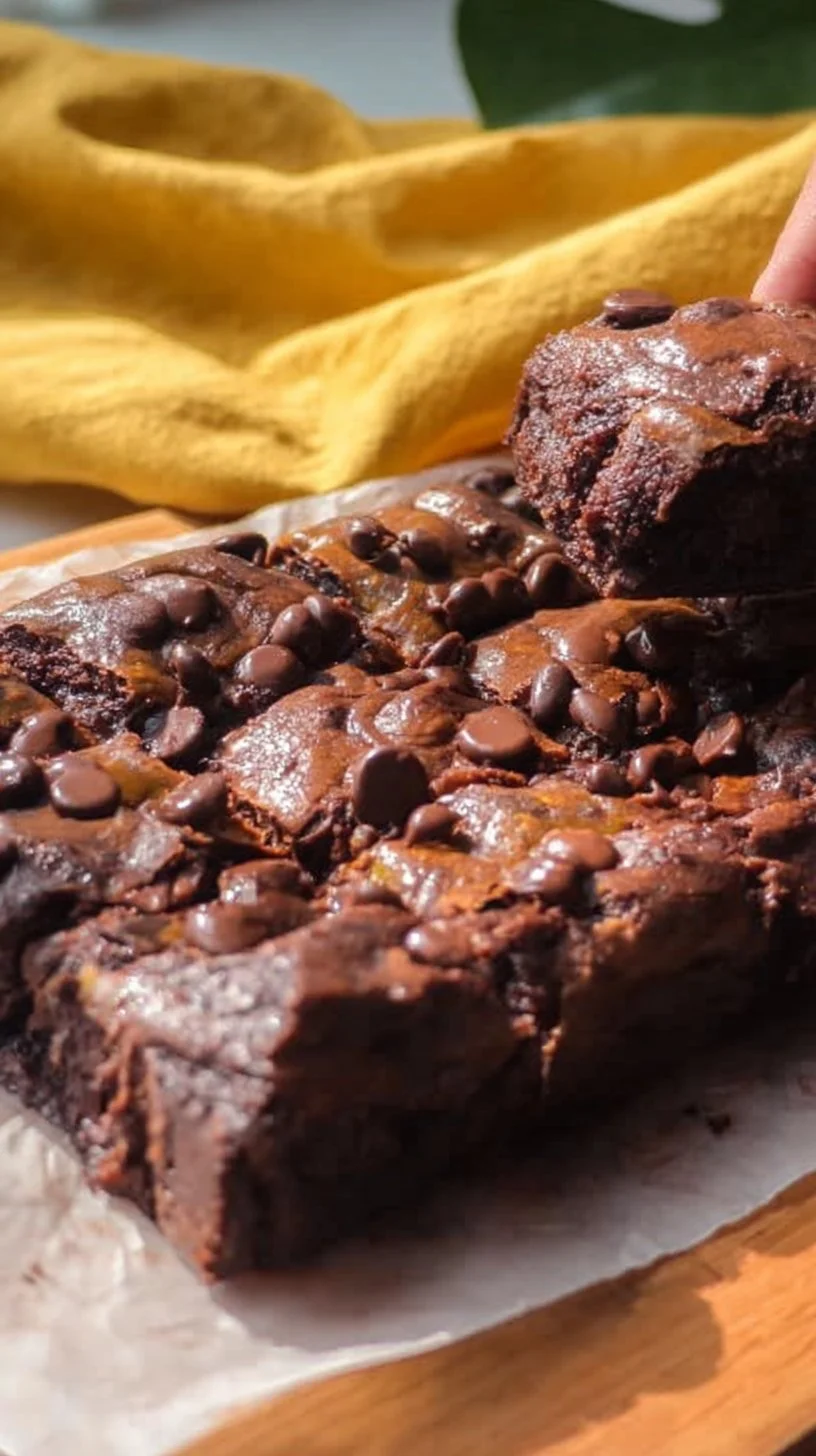
- Preheat your oven to 350°F (175°C) and line a baking dish with parchment paper., 2. In a mixing bowl, mash the ripe bananas until smooth., 3. Stir in the cocoa powder and peanut butter until well combined., 4. Pour the mixture into the prepared baking dish and spread it evenly., 5. Bake for 20-25 minutes or until set., 6. Allow to cool before slicing into squares, and enjoy your fudgy vegan brownies!
Supportive guidance for each step:
- Step 1 — Preheat and line: Preheat early so your oven reaches temperature before you start mixing. Lining the dish with parchment prevents sticking and makes it easy to lift the whole slab out to cool. If your parchment is a bit small, lightly oil the pan first so the paper stays put.
- Step 2 — Mashing the bananas: Use a fork or potato masher. You’re aiming for mostly smooth with just a couple small lumps okay — they’ll add character. The bananas should smell sweet and look glossy when mashed.
- Step 3 — Stirring in cocoa and peanut butter: Add the cocoa gradually if it looks dusty, stirring until you have a uniform, glossy batter. If the peanut butter is very thick, warming it briefly (10–15 seconds in the microwave) makes mixing easier; don’t overheat it. You want a uniform color with no streaks of cocoa or peanut butter.
- Step 4 — Spreading into the dish: Use a spatula to press and smooth. The batter should spread fairly easily but may be thick — that’s normal. Aim for an even thickness so the brownies bake evenly.
- Step 5 — Baking: The edges will pull away slightly and the center will look set but still moist; a toothpick inserted into the center may come out with a few moist crumbs, and that’s okay — these brownies are meant to be fudgy. If you prefer a firmer texture, give them an extra 2–3 minutes, watching closely.
- Step 6 — Cooling and slicing: Cooling is where they finish; if you cut too soon they may crumble. Allowing the slab to come to room temperature, or chilling briefly in the fridge, will make neat squares.
If something looks different — batter too thin, top too cracked, or center very gooey — read on to the troubleshooting section below. Small imperfections like an uneven top or slightly irregular squares are normal and do not affect flavor.
Key techniques you’ll practice in this recipe
- Mashing fruit: This teaches you how to turn whole fruit into a uniform base — a skill useful for quick breads, pancakes, and other simple bakes. Notice how pressure and time change the texture from coarse to creamy.
- Folding and stirring until uniform: You’ll learn to look for color and texture consistency. This is the same eye you’ll use when mixing frostings, dressings, or batters.
- Even spreading and baking checks: Learning to make an even layer and to check doneness by sight or a gentle toothpick test transfers to sheet cakes, bars, and thin bakes.
- Cooling and releasing from a pan: Using parchment and allowing cool-down time prevents breakage — a small habit that improves presentation across many recipes.
These techniques are foundational and low-pressure, and they show up in countless other kitchen tasks. Practice here builds muscle memory without stakes.
Common mistakes and how to avoid them
- Using underripe bananas: If the bananas are very firm and not sweet, the brownies will be less sweet and the texture will be less cohesive. Avoid this by choosing speckled, soft bananas.
- Overheating peanut butter: If you microwave peanut butter too long it can separate and become oily, which affects texture. Warm it briefly only if thick, and stir to recombine before adding.
- Overbaking: Because these are meant to be fudgy, overbaking makes them dry. Watch the last few minutes closely and use the toothpick test — a few moist crumbs are a green light.
- Cutting too soon: Slicing while warm can lead to crumbly edges. Allow cooling time; if you’re in a hurry, refrigerate for 15–20 minutes to firm them up.
- Skipping parchment: Without it, the brownies can stick to the pan and tear when you try to remove them. If you don’t have parchment, lightly grease and dust the pan instead.
If something goes off track — say the batter looks too thin — don’t panic. Chill the batter briefly to firm it, then bake and check early. If the top cracks, the inside may still be fine; slicing into imperfect-looking brownies often reveals a moist, tasty center.
How to adjust confidently without changing the recipe
Although you mustn’t change the ingredients or steps, you can conceptually consider adjustments:
- Portion scaling: Doubling the recipe means using a larger pan and adding a few extra minutes of baking time; halving would mean a smaller pan and slightly less time. The key idea is to keep an eye on oven time and the set of the center rather than strict minutes.
- Flavor preferences: While you can’t alter ingredients here, consider serving ideas — a dusting of cocoa, a sprinkle of flaky salt, or a smear of extra peanut butter on top after baking — to nudge flavors without modifying the bake itself.
- Texture tweaks (conceptual): If you like a firmer edge, bake toward the longer end of the range; for a softer center, remove from oven a touch earlier and let residual heat finish the set.
These are conceptual handles to help you think like a cook without breaking the rules of the recipe.
Serving, storage, and reheating made simple
Serving: Cut into squares and serve at room temperature. A small scoop of dairy-free yogurt or a few fresh berries on the side complements the chocolate-peanut combo nicely. For a treat, warm a square for 8–10 seconds in the microwave and top with a dab of peanut butter.
Storage: Store cooled brownies in an airtight container at room temperature for up to 2 days. For longer storage, refrigerate up to a week, or freeze individual squares wrapped tightly for up to 2 months.
Reheating: If refrigerated, allow to come to room temperature or warm gently in the microwave for 10–15 seconds. If frozen, thaw in the fridge overnight and warm briefly. Reheating briefly is enough to soften the fats and refresh the fudgy texture.
Questions new cooks often ask about this recipe
- How ripe should the bananas be? Aim for bananas with brown speckles and a soft interior — they should mash easily and smell sweet.
- Do I need special cocoa? No. Standard unsweetened cocoa works fine. Dutch-process cocoa will change the flavor subtly but won’t break the recipe.
- What pan size should I use? A small square or round dish that fits the batter with a shallow depth is ideal. If your pan is deeper, the bake time may need a few extra minutes.
- Is it normal if the top cracks a bit? Yes. Cracking doesn’t mean failure — it often indicates a tender, fudgy center.
- Can I make these nut-free? Not within this exact ingredient list; peanut butter is required for structure here. If you need a nut-free version, look for safe substitutions in other recipes.
If anything worries you, remember: these are forgiving treats. The smell of chocolate and banana is a good early sign that everything is moving in the right direction.
Final encouragement from Carla
You don’t need perfection to make something delicious. These Healthy Banana Brownies are an excellent exercise in simple techniques that build confidence: mash, mix, spread, bake, and cool. Each step teaches you something small that adds to your comfort in the kitchen. If a square breaks or the top isn’t glossy, it’s still a success — you learned, you practiced, and you have a nourishing treat at the end. Keep baking, keep experimenting gently, and celebrate the progress.
Warmly,
Carla Carter
Founder & Recipe Developer, RecipesCabin
Conclusion
If you’d like to compare similar simple banana-brownie approaches and see another three-ingredient version for inspiration, this write-up on Healthy Banana Brownies (3 Ingredients, Flourless) is a helpful reference. For a second perspective and another take on quick banana brownies, try this guide to Quick and Healthy Banana Brownies – | The Oven Light.

Healthy Banana Brownies
Ingredients
Method
- Preheat your oven to 350°F (175°C) and line a baking dish with parchment paper.
- In a mixing bowl, mash the ripe bananas until smooth.
- Stir in the cocoa powder and peanut butter until well combined.
- Pour the mixture into the prepared baking dish and spread it evenly.
- Bake for 20-25 minutes or until the brownies are set.
- Allow to cool before slicing into squares and enjoy your fudgy vegan brownies!