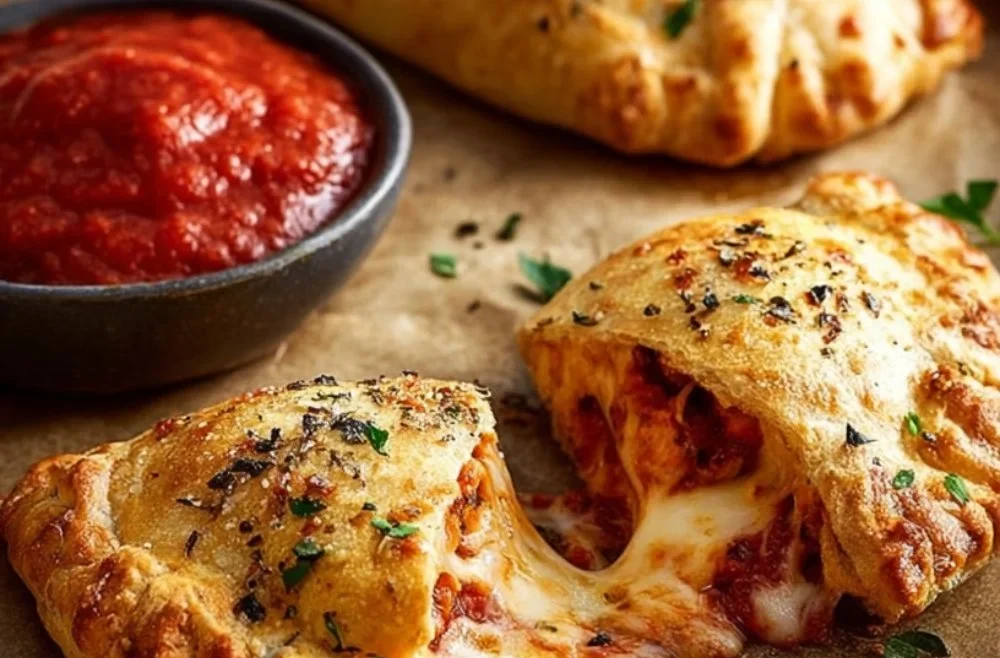
High Protein Pizza Hot Pockets
Introduction
This High Protein Pizza Hot Pockets recipe is for anyone who wants a comforting, handheld meal that’s simple to make and forgiving if you’re new to the kitchen. If you’ve been curious about making warm pockets of melty cheese and sauce at home but worried about dough or sealing, this is a great place to start.
These pockets are approachable because the dough is made with just Greek yogurt and flour, so there’s no need for messy yeast or long rises. If you like other easy, protein-forward snacks, you’ll recognize the same practical mindset behind my high-protein bagel bites — both recipes use familiar ingredients and straightforward steps to build confidence as you cook.
My goal here is to walk beside you, step by step, so you know what to watch for, what’s flexible, and how to recover if something doesn’t go exactly to plan. Let’s make something warm, satisfying, and something you’ll want to make again.
Why this recipe is easy to get right
This recipe is forgiving in several ways. The dough is sturdy and tolerant — it won’t collapse if you press a little too hard while sealing, and small tears can be patched with a pinch of extra dough. Using baking powder instead of yeast removes timing pressure; you’re not watching for a rise, so the clock is your friend and the process stays predictable.
The filling is also low-stakes. Pizza sauce and pre-shredded low-fat cheese hold their form well: too little filling just means a less-full pocket, and too much is easy to spot and correct before sealing. If you love building simple, reliable recipes into your rotation, this one rewards small adjustments without punishing mistakes.
Where it allows flexibility: you can make the dough a little thinner or thicker without ruining the result, and the bake time window (18–20 minutes) gives you a safe range. Those features make this suitable for new cooks, folks returning to cooking after a break, and anyone who prefers straightforward wins in the kitchen.
How to make High Protein Pizza Hot Pockets
At a glance, the process moves in three main phases: make a simple dough, shape and fill pockets, then bake until golden. Here’s what happens first, next, and last — and what to focus on at each stage.
First: combine dry ingredients and yogurt, then knead briefly. You’re looking for a smooth, slightly tacky ball that holds together without sticking to your fingers too much. The knead is short — 2–3 minutes — so focus on even mixing and a gentle rhythm.
Next: divide and roll the dough into ovals about 6 inches long. This is a good moment to slow down if you’re new to rolling. Roll from the center outward, turning the dough a quarter turn as you go so it stays even. If one oval is thicker on one side, don’t worry — the goal is workable pieces you can fill.
Last: assemble, seal, and bake. Place sauce and cheese on half of each oval, leaving a ½-inch border. Fold, press edges with a fork, and optionally dab water along the border before folding for extra sealing strength. Bake until the outside is golden, then let the pockets rest 5 minutes — that rest is important so the filling sets a little and doesn’t steam your mouth on the first bite.
Beginners should slow down at two points: when kneading to get a smooth dough, and when sealing to avoid leaks. These are low-pressure moments where a minute of care pays off.
For more ideas that use similar dough-handling and folding skills, you might enjoy the technique tips in my high-protein breakfast burritos recipe — the folding principles are very similar and help build confidence.
Ingredients
410g low-fat Greek yogurt, 400g all-purpose flour, 2 tsp baking powder, 1 tsp Italian seasoning, ½ tsp garlic powder, ½ tsp salt, 120g pizza sauce (15g per pocket), 160g low-fat cheese (20g per pocket)
Every ingredient here is doing clear, simple work:
- 410g low-fat Greek yogurt: This is the liquid and binder for the dough. Greek yogurt brings tang, moisture, and protein, and its thicker texture helps create a dough that’s soft but not sticky. Because it’s thicker than milk or water, you don’t need eggs or oil here — that’s part of what makes this approachable.
- 400g all-purpose flour: Flour provides structure. As you mix and knead, the flour develops just enough cohesion to form pockets that hold filling and rise slightly with baking powder.
- 2 tsp baking powder: This is the leavening agent. It gives the dough a gentle lift so the pockets bake up light rather than dense. No yeast, no wait.
- 1 tsp Italian seasoning & ½ tsp garlic powder: These are gentle, flavorful additions that season the dough itself. They make the crust taste “pizza-like” even before you bite into the filling.
- ½ tsp salt: Salt brings out flavors and balances the tang of the yogurt.
- 120g pizza sauce (15g per pocket) & 160g low-fat cheese (20g per pocket): The filling ingredients are exactly portioned here so each pocket has enough sauce and cheese for a classic, not-overloaded bite. The amounts are conservative on purpose so the pockets are easy to seal and bake evenly.
None of these ingredients are intimidating — most are pantry staples or easy to buy. Together they create a dough that’s flavorful, flexible, and forgiving, and a filling that’s true to the pizza idea without being messy.
If you like experimenting with protein-packed snack ideas, you may also enjoy my high-protein cottage cheese cookies, which use similar thinking about accessible, high-protein swaps.
Directions
Preheat oven to 375°F (190°C). Line a baking tray with parchment paper., Mix dough: In a large bowl, combine flour, baking powder, herbs, garlic, and salt. Stir in yogurt. Knead 2–3 mins until smooth., Shape: Divide dough into 8 balls. Roll each into a 6-inch oval., Fill: On half of each, add sauce and cheese. Leave a ½-inch border., Fold & seal: Fold dough over, press edges firmly with a fork. Optional: dab water along edges before folding for a stronger seal., Bake 18–20 mins until golden. Let rest 5 mins before serving.
Supportive guidance for these directions:
- Preheat and line: Give your oven time to reach 375°F (190°C) so the pockets bake evenly. Parchment paper keeps them from sticking and makes cleanup easier — a small convenience that matters when you’re building kitchen confidence.
- Mixing the dough: When you stir in the yogurt, the mixture will look rough at first — lumps of flour and yogurt. That’s normal. Kneading for 2–3 minutes smooths it into one cohesive ball. If the dough feels dry, a quick splash of yogurt (not called for in the recipe) is tempting, but stay within the given measurements to learn how the original texture behaves.
- Shaping: Divide into 8 equal balls by eye if you don’t have a scale — aim for similar sizes so they cook evenly. Rolling into a 6-inch oval: press evenly, and if the dough shrinks back a bit, let it rest for a minute and roll again. The dough relaxes quickly.
- Filling and borders: Leave a clear ½-inch border so the seal has surface to stick to. If you add too much sauce and you see it creeping to the edge, remove a little before folding. Use the fork to press firmly — you’re compressing the edge so it holds while baking.
- Optional water dab: A tiny bit of water on the border acts like glue. Dab lightly; you don’t want puddles that will make the pocket soggy.
- Baking and resting: Watch for even golden color — that’s your cue the pockets are done. The 5-minute rest lets steam inside settle so the filling won’t be lava-hot and runny when you bite in.
For a small extra tip, if you enjoy frozen make-ahead snacks, the same Greek-yogurt approach is used in my high-protein frozen peanut butter Greek yogurt bites, which are good practice for portioning and timing.
Key techniques you’ll practice in this recipe
This recipe reinforces a handful of fundamental kitchen skills:
- Quick dough making: Mixing and a short knead teach you how to turn a shaggy mixture into a cohesive dough. That feeling — when it starts to hold together and stop sticking — is a useful benchmark across many recipes.
- Rolling evenly: Learning to roll to a consistent thickness helps the pockets bake at the same rate. Roll from the center outward for the most even result.
- Portioning and sealing: Dividing dough into equal pieces and sealing edges with a fork are basic assembly skills that transfer to pies, empanadas, and hand pies.
- Visual doneness: Watching for a golden exterior rather than relying solely on a timer builds kitchen intuition.
These are not advanced techniques, but they’re foundational. Practice here makes other recipes more approachable.
Common mistakes and how to avoid them
Mistake: Dough too sticky or too dry.
- How to avoid: Stick to the provided measurements. If you’re working in a very dry kitchen, take your time kneading; the dough often comes together as you work it. If it clings excessively, flour your hands lightly rather than adding more flour to the dough.
Mistake: Filling leaks during baking.
- How to avoid: Leave the ½-inch border and press edges firmly with a fork. If you notice sauce at the edge, remove the excess before folding. Dab a small amount of water on the edges before folding for a stronger seal.
Mistake: Unevenly rolled pockets that bake at different rates.
- How to avoid: Roll each oval to approximately 6 inches and aim for similar thickness. Turn the dough as you roll to keep the shape consistent.
If something goes off track: small imperfections are normal. A slightly misshapen pocket still tastes great. If a pocket bursts in the oven, you can bake the rest and enjoy the burst one right away; it’s not a failure—just a charming reminder that home cooking is human.
How to adjust confidently without changing the recipe
You may want to think about portion scaling, flavor preferences, or textural tweaks — conceptually only, without altering the ingredient list or steps.
- Portion scaling: To make more or fewer pockets, think in multiples of eight. The dough and filling proportions are designed so each pocket is similar, so scaling up by two or halving will keep the balance consistent. When scaling, keep bake time roughly the same for similarly sized batches, but bake in batches if trays would overcrowd the oven.
- Flavor preferences: The seasoning in the dough is mild. If you like a bolder herb flavor, imagine increasing the Italian seasoning slightly on future attempts (not in this version) — for now, taste the finished pocket and note how the herbs come through. That helps you decide what you prefer next time.
- Texture tweaks: If you like a chewier exterior, a slightly thinner roll will do that; for a softer bite, keep the dough a bit thicker. The 2–3 minute knead is a control point — a little more kneading develops more structure, a little less keeps it tender.
The important part is to take notes mentally or on paper about what you liked and what you might change next time — that’s how confident adjustments are built.
Serving, storage, and reheating made simple
Serving: These pockets are best warm from the oven, with a short 5-minute rest so the filling isn’t too hot. Serve plain or with a small side salad or extra pizza sauce for dipping.
Storing: Cool completely, then store in an airtight container in the refrigerator for up to 3 days. For longer keeping, freeze on a tray until solid, then transfer to a freezer-safe bag for up to 1 month.
Reheating: For a crisp exterior, reheat from refrigerated in a 350°F (175°C) oven for 8–10 minutes, or from frozen for 12–15 minutes. A toaster oven works well too. Avoid microwaving straight from frozen if you want to maintain a crisp crust; if convenience is priority, microwave briefly and then crisp in a hot pan or under the broiler for a minute.
Questions new cooks often ask about this recipe
Q: How do I know the dough is kneaded enough?
A: It should feel smooth and move as one ball when you press it. It won’t be glass-smooth like bread dough — a slight texture is fine.
Q: Can I use full-fat Greek yogurt instead of low-fat?
A: Yes, full-fat will work, and it may create a slightly richer dough. The recipe lists low-fat, so stick with that if you want the exact original texture.
Q: Is it normal for some pockets to be slightly irregular?
A: Absolutely. Small shape differences are normal and don’t affect taste. Focus on sealing and even bake color.
Q: What if my filling seems watery?
A: If your sauce is unusually runny, spoon out a little before filling so the border can be sealed cleanly.
Q: Do I need special equipment?
A: A rolling pin, fork, and a baking tray lined with parchment are all you need. No special tools required.
Final encouragement from Carla
Cooking at home is a steady practice, not a test. These High Protein Pizza Hot Pockets are designed to be a safe, satisfying project that builds skills and confidence — and to give you a warm, protein-rich snack at the end of it. If the first batch isn’t perfect, that’s part of learning. Celebrate the wins: the smell of baking, the first golden pocket, the first confident fold. You’re doing well.
Keep notes on what you liked and what you’d tweak next time, and remember that every attempt is progress. Come back to this recipe the way you’d return to a favorite chair: comfortable, familiar, and ready for small improvements.
Conclusion
If you’d like a variation that focuses specifically on protein-forward pizza pockets, take a look at this helpful write-up from High-Protein Pizza Hot Pockets – Fit Foodie Finds for inspiration on flavors and portion ideas. For an overview of different cooking methods and timing, this Easy Pizza Pockets (Air Fryer + Oven Instructions) – My Protein Pantry article provides a clear comparison that can help you decide if you want to try an air fryer next time.