Healthy Twix Bars (Gluten-free) Homemade Recipe

If you’re juggling school drop-offs, work emails, and a dinner that needs to be on the table in under an hour, having a few reliable dessert recipes in your back pocket makes life easier. These Healthy Twix Bars (Gluten-free) Homemade Recipe are one of those little wins that feel indulgent but are straightforward enough to make on a weekend afternoon or to prep ahead for a week of sweet snacks. The flavors are instantly familiar — buttery shortbread, creamy peanut caramel, and a chocolate shell — so kids ask for them, partners nod approvingly, and you don’t need a pastry degree to pull them off.
This recipe is especially helpful when you want to bring something to a gathering, pack treats for lunchboxes, or keep a stash in the freezer for when the after-school sugar craving hits. If you like easy desserts that travel well, these are it — and they sit nicely alongside other family favorites in my dessert rotation. For ideas on pairing treats and planning a sweet week of recipes, take a peek at my round-up of dessert recipes to mix and match treats for a crowd.
What makes these bars a go-to is their predictability: the shortbread bakes quickly, the “caramel” layer comes together without long stovetop simmering, and the chocolate sets fast when chilled. Between the quick bake time and the simple hands-on steps, this recipe fits real schedules and busy hands. I’ll walk you through each stage so you know what to expect, where to take it slow, and where you can shave off minutes without changing the outcome.
How to make Healthy Twix Bars (Gluten-free) Homemade Recipe
Think of this recipe as three easy stages: the shortbread base, the peanut-caramel layer, and the chocolate shell. Each one is short on active time and forgiving if you follow a few simple cues.
Stage 1 — Shortbread base: You mix and press the dough, bake it for 10–12 minutes, and let it cool. This stage gives you a firm, slightly crumbly base that holds up to the next layers. Don’t rush cooling; spreading the filling on a warm base can make the layers blur together.
Stage 2 — Caramel filling: This isn’t a cooked, chewy caramel — it’s a smooth peanut-butter-on-maple mixture thickened with a little almond flour. It’s quick to stir and spreads easily. Pop the pan in the freezer to set the layer solidly before chocolateing, which helps keep neat lines and clean slices.
Stage 3 — Chocolate coating: Melt the chocolate chips with coconut oil for a glossy coating. You can dip each bar for a full cover or pour and spread the chocolate for a quicker finish. Chill briefly to harden.
Places to pause: Beginners should slow down when pressing the shortbread into the pan (even pressure helps it bake evenly) and when slicing the bars — use a sharp knife, and if the chocolate is too soft, give it a couple more minutes in the freezer so your cuts stay tidy.
Shortcuts that work: If you’re pressed for hands-on time, press the shortbread and while it’s baking, clean up and set up your mixing bowl for the filling. The freezing step is a real time-saver — while the bar chills, tidy the kitchen, and the rest of the work will be fast.
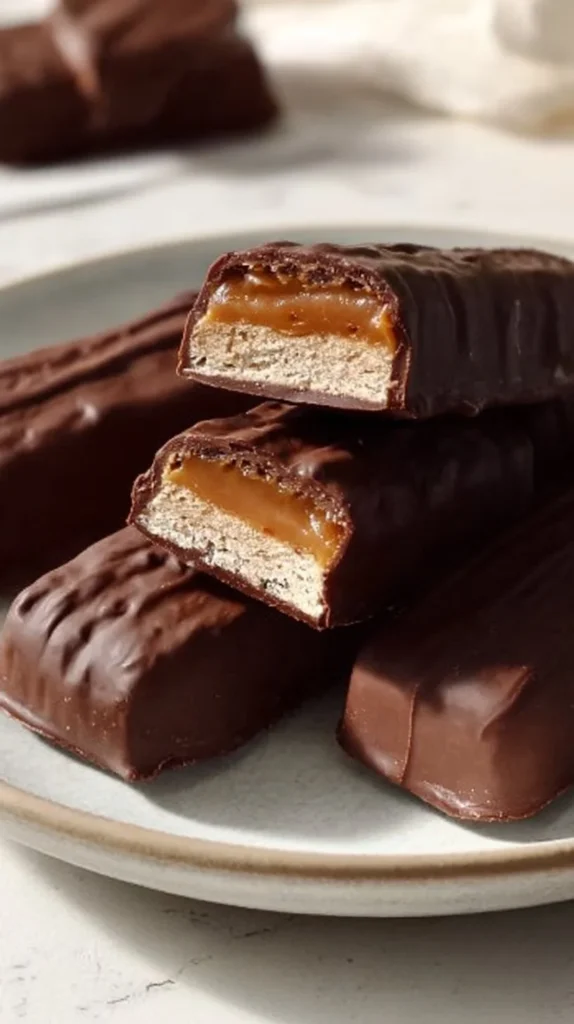
By the end you’ll have 16 neat bars with three satisfying layers. The technique is steady and reliable, which is why I recommend it for busy families: predictable steps, obvious visual cues, and results that travel well.
Ingredients
1 1/2 cups Almond Flour, 3 tbsp Butter (melted), 1 1/2 tbsp Maple Syrup, 1/2 tsp Vanilla Extract, 1/4 tsp Salt, 1 cup Creamy Peanut Butter, 1/3 cup Maple Syrup, 1 tsp Vanilla Extract, 1/4 cup Almond Flour, 1 cup Chocolate Chips, 1 1/2 tbsp Coconut Oil
In simple kitchen terms, here’s what each ingredient does and why it’s worth having on hand:
- Almond Flour: Provides the base texture for the shortbread and helps thicken the peanut layer. It’s naturally a bit tender and gives a slightly nutty flavor that pairs perfectly with peanut butter and chocolate.
- Butter (melted): Binds the almond flour and adds that classic shortbread richness. The melted form makes it easy to mix and press into the pan.
- Maple Syrup: Used twice in the recipe — once to lightly sweeten the shortbread and again to sweeten the caramel layer. It’s a pantry-friendly liquid sweetener that dissolves easily and keeps the texture smooth.
- Vanilla Extract: A small splash in both layers amplifies the overall flavor and makes everything taste more rounded and familiar.
- Salt: Just a pinch in the shortbread balances sweetness and brings out the butteriness.
- Creamy Peanut Butter: The star of the caramel layer — creamy provides a smooth spreadable texture that sets firm when chilled.
- Almond Flour (in the caramel): A little goes a long way here to thicken the peanut-maple mixture so it spreads evenly and firms up when frozen.
- Chocolate Chips: For dipping and topping — use a chocolate your family enjoys (semi-sweet is reliable for balancing sweetness but milk chocolate will make them sweeter and kid-approved).
- Coconut Oil: Helps the melted chocolate shine and sets up a slippery, glossy coating that isn’t too hard to bite through.
All of these are common pantry ingredients for most home cooks, which is why this feels like a real, usable recipe rather than a specialty project.
Directions
Preheat your oven to 350°F (175°C). Line an 8×8 inch baking pan with parchment paper, ensuring the edges are well covered. This step is crucial for easy removal of the shortbread base later., Prepare the Shortbread: In a large mixing bowl, combine the almond flour, melted butter, maple syrup, vanilla extract, and salt. Stir until the ingredients are fully incorporated, forming a dough. Press this mixture firmly and evenly into the prepared baking pan. Bake for 10-12 minutes, or until the edges are golden brown. Set aside to cool while you prepare the caramel filling., Make the Caramel Filling: In a medium bowl, mix together the peanut butter, maple syrup, vanilla extract, and almond flour until smooth and well combined. Once the shortbread has cooled, spread the caramel mixture evenly over the top. Place the pan in the freezer for at least 1 hour to set., Prepare the Chocolate Coating: After the caramel layer has set, melt chocolate chips and coconut oil together in a shallow bowl over a pot of boiling hot water, or you can do this by microwaving in 30-second intervals, stirring in between, until the mixture is smooth and fully melted., Assemble the Bars: Remove the pan from the freezer and lift the block out using the parchment paper. Place it on a cutting board and slice into 16 bars (cut in half once, then slice each half into 8 even bars)., Coat the Bars: Dip each bar into the melted chocolate, ensuring it’s fully covered. Gently tap off any excess chocolate and place the bars on a parchment-lined tray. Repeat for all bars., Final Touch: Optionally, drizzle the remaining melted chocolate over the bars and add a sprinkle of flaky sea salt overtop. Return the tray to the freezer for about 10 minutes, or until the chocolate has hardened., Enjoy! These homemade healthy Twix bars are ready to be savored. Store any leftovers in an air-tight container in the fridge or freezer.
Notes and friendly guidance around the steps:
- Lining the pan with parchment and leaving an overhang really makes life easier when you lift the whole block out; it also helps you slice square bars without breaking them.
- When pressing the shortbread into the pan, press evenly and firmly — I like to use the bottom of a measuring cup to get a flat surface.
- Cooling the shortbread before spreading the peanut layer is key. If it’s warm, the peanut mixture can slide and make a mess.
- Freeze time matters: at least an hour for the peanut layer to firm up is the safest bet. If you’re short on time, an hour in a very cold freezer can be enough, but don’t skip it entirely.
- When melting chocolate, low and slow is the rule. If you’re microwaving, short bursts and stirring prevent scorching.
- For cleaner cuts: let the chocolate set fully in the freezer for about 10–15 minutes. Run your knife under hot water and dry it before slicing for the neatest edges.
Common small mistakes to avoid: spreading the caramel on a warm crust, skimping on the parchment overhang, or dipping bars when the chocolate is too cool and clumpy. If the chocolate thickens while you’re dipping, warm it gently and stir until smooth.
Why families love this dish
There’s a reason Twix-style bars are so universally loved: the combo of a crunchy (or tender) shortbread, a sweet chewy middle, and chocolate on top is about as comforting as dessert gets. These bars hit all of those familiar notes in a format that’s easy to portion and pack.
Kid-friendly: The flavors are straightforward and not fussy. Most kids respond to peanut butter and chocolate instantly, and the bars are small enough to be a controlled treat in a lunchbox or after school.
Versatile: If someone prefers a sweeter or milder bar, swapping chocolate variety or using a bit more or less maple syrup in the caramel layer keeps things simple without altering technique. For picky eaters, slice smaller bars — presentation helps a lot.
Smart substitutions that keep the recipe reliable (without changing the recipe itself): use a different nut butter if you need a mild swap for taste-testing at home (note: the recipe lists creamy peanut butter specifically, so this is just an option if you’re experimenting). Try different chocolate types to suit your family — darker for grown-ups, milk for kids.
Pairing ideas: These bars are a dessert, but they also make a great treat alongside a cup of coffee for parents, or with a bowl of fresh fruit for a slightly lighter finish. For a weekend spread, serve with simple bowls of berries and yogurt so everyone can pick their favorites.
Make-ahead tips, leftovers, and storage
One of the biggest conveniences of this recipe is how well it holds up when stored. After the chocolate hardens, keep the bars in an airtight container in the refrigerator for up to a week. For longer storage, freeze them in a single layer, then transfer to a sealed container with parchment between layers for up to 2–3 months. Thaw in the fridge for 30–60 minutes before serving so the texture softens just a touch.
For lunchboxes: Pop one bar in a small container and it will stay neat until lunch if kept cool with an ice pack. If you’re planning a big batch for school week snacks, make a double batch and keep extras in the freezer for easy grabbing.
If you like planning breakfasts and snacks ahead of time, consider keeping a few of these on hand alongside quick morning options — they’re a nice treat in the afternoon and pair well with quick breakfast ideas in a busy household. For similar make-ahead snack inspiration, I often refer back to easy breakfast recipes that play nicely into morning and after-school routines.
Common questions home cooks ask about this recipe
Q: My shortbread was too crumbly — what went wrong?
A: Most likely it needed a touch more pressing or a tiny bit more melted butter. The almond flour base is naturally tender, so pressing firmly into the pan before baking helps it hold together.
Q: The caramel layer slid off the shortbread when I sliced — how do I fix that?
A: Let the caramel layer set fully in the freezer for at least an hour and make sure the shortbread is fully cooled before spreading. A chilled block slices much more cleanly.
Q: Can I scale this up?
A: Yes. If you want more bars, double the ingredients and use a larger pan — just keep an eye on baking time for the shortbread (it may need a few extra minutes) and let the layers chill sufficiently.
Q: My chocolate coating looks dull — what happened?
A: Chocolate can lose shine if overheated or if it sets in a warm room. Adding the coconut oil helps gloss, and chilling until fully set gives a nicer finish. If it looks dull, a quick melt-and-re-dip can refresh it.
Q: Will these keep their texture in the fridge?
A: They do. Stored airtight in the fridge, they stay pleasantly firm, and the freezer keeps them longer without sacrificing texture. Just allow a brief thaw for the best bite.
Final thoughts from Sarah
I love recipes that feel both comforting and practical, and these Healthy Twix Bars fit that bill — familiar flavors, easy steps, and dependable results. They’re the kind of treat you can make with children at your side (with careful supervision around hot melted chocolate), or prep on a quiet morning to have on hand all week. If you keep the basic rhythm — bake the base, chill the filling, and then coat — you’ll be rewarded with neat, delicious bars that always get disappearances at snack time.
Give the recipe a try on a weekend batch-making day, and keep a few in the freezer for emergencies (the good kind). If something doesn’t come out perfect the first time, don’t worry — these bars are forgiving, and small tweaks like a little extra chill time or a hot knife for slicing will fix most hiccups.
Happy baking, and enjoy the simple pleasure of a homemade treat that the whole family will reach for. — Sarah Collins
Conclusion
If you’d like ideas for similar takes or inspiration from other home bakers, try this version from Ambitious Kitchen’s Healthy Peanut Butter Twix Bars for another approachable riff. For a vegan and gluten-free variation with different technique notes, see the guide at Bakerita’s Homemade Gluten-Free & Vegan Twix Bars. And if you want another healthy spin with refined-sugar-free options, Rachael provides a thoughtful version at Rachael’s Good Eats Healthy Twix Bars.
Healthy Twix Bars (Gluten-free) Homemade Recipe
Ingredients
Method
- Preheat your oven to 350°F (175°C). Line an 8×8 inch baking pan with parchment paper.
- In a large mixing bowl, combine almond flour, melted butter, maple syrup, vanilla extract, and salt. Stir until fully incorporated.
- Press the mixture firmly and evenly into the prepared baking pan.
- Bake for 10–12 minutes or until the edges are golden brown. Set aside to cool.
- In a medium bowl, mix together peanut butter, maple syrup, vanilla extract, and almond flour until smooth.
- Spread the caramel mixture evenly over the cooled shortbread base.
- Place the pan in the freezer for at least 1 hour to set.
- Melt chocolate chips and coconut oil together until smooth.
- Remove the pan from the freezer and lift the block out using the parchment paper.
- Slice into 16 bars.
- Dip each bar in the melted chocolate and gently tap off excess.
- Optionally, drizzle remaining chocolate over the bars and sprinkle with flaky sea salt.
- Return to the freezer for about 10 minutes to harden.