blueberry oatmeal bars

Busy evenings and rushed Saturday mornings call for recipes that are simple, dependable, and beloved by everyone at the table — and these blueberry oatmeal bars fit that bill. They feel like a humble, homey bake: familiar oat-crumble texture, a jammy blueberry center, and just enough sweetness to make them feel like a treat without any fuss. I reach for recipes like this when I want something that travels well to school events, makes a gentle breakfast for a crowd, or slides into a lunchbox without complaints.
This recipe is especially useful for families because it doesn’t require any special equipment, long ingredient lists, or fussy timing. You can swap pantry staples, use frozen fruit when fresh isn’t handy, and still end up with a result that kids will gobble and adults will happily enjoy with coffee. If you enjoy layering bright berry flavor into everyday meals, you might also like my take on a blueberry cottage cheese breakfast bake, which leans more breakfast-forward but shares the same easy, family-friendly spirit.
I’ll walk you through why this works, what to expect at each stage, and little tips that make the whole process feel relaxed and reliable.
How to make blueberry oatmeal bars
This is a straightforward, two-part assembly: a crumbly oat base and a simple blueberry filling, topped with more oat crumb before a single bake. Expect about 10–15 minutes of hands-on time and a bake time that lets you handle other tasks while the oven does the work.
Stage 1 — Dry mix and binding: You’ll start by combining the oats, flour, sugars, leavening, salt, and cinnamon (if using). This step is just about even distribution — everything should look combined and uniform, without any clumps of brown sugar or pockets of salt. Stirring in the melted butter and vanilla turns the dry mix into a crumbly dough that holds together when pressed. If it still feels powdery, the melted butter hasn’t been fully worked in; a few more stirs will bring it together.
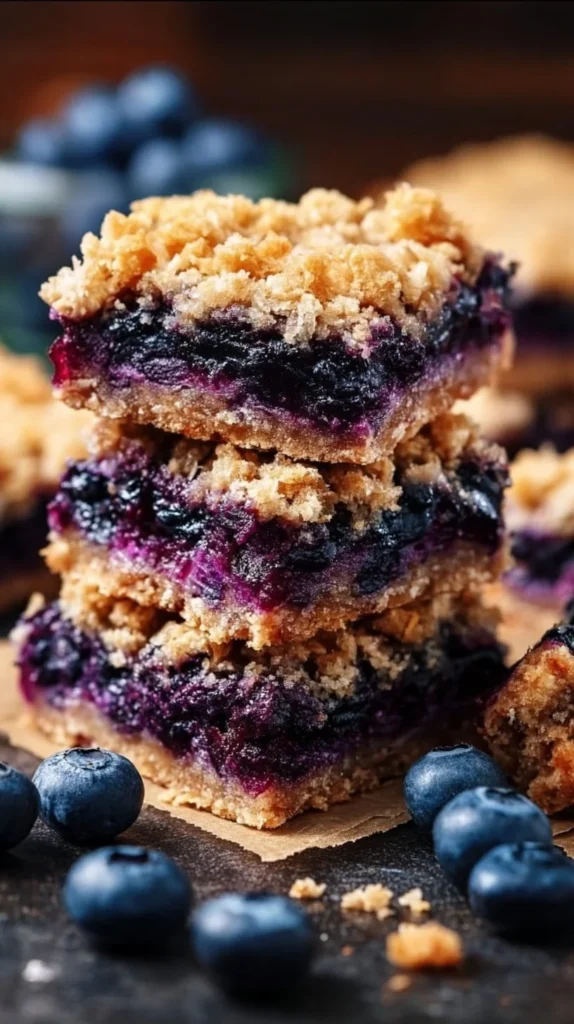
Stage 2 — Press and fill: Half of that crumbly oat mixture becomes the base. You press it into an 8-inch square pan to form a compact layer. The blueberry mixture goes on top — a quick toss with granulated sugar and cornstarch makes a glossy, slightly thickened filling that won’t sog the crust. The remaining oat mixture is crumbled gently over the top and only lightly pressed so you keep a nice contrast of tender fruit and crisp top.
Stage 3 — Bake and cool: The bars bake until golden and the filling is bubbling at the edges. Cooling fully is important — the filling sets as it cools, making clean cuts easier and helping the bars hold their shape. If you’re short on time, you can speed up cooling by placing the pan on a wire rack, but avoid cutting while warm unless you want soft, messy squares.
Where beginners should slow down: pressing the base evenly (so the bars bake uniformly) and waiting for the bars to cool before cutting. Shortcuts that make sense: using frozen blueberries straight from the freezer (no need to thaw), and lining the pan with parchment so you can lift the whole slab out easily.
Ingredients
1 cup old-fashioned oats, 3/4 cup all-purpose flour (or gluten-free flour blend), 1/3 cup light brown sugar, 1/4 teaspoon baking soda, 1/4 teaspoon salt, 1/2 teaspoon cinnamon (optional), 6 tablespoons unsalted butter, melted (or coconut oil), 1 teaspoon vanilla extract, 1 cup blueberries (fresh or frozen), 1/4 cup granulated sugar, 2 teaspoons cornstarch
Here’s what each ingredient is doing in plain kitchen terms:
- Old-fashioned oats: These are the backbone of the texture. They give the bars a pleasing chew and a little rustic heartiness that kids seem to love. Quick oats would work faster, but old-fashioned oats hold their shape better and give more structure.
- All-purpose flour (or gluten-free flour blend): Flour ties the oat crumbs together so you get a firm base and crisp topping. If you need gluten-free, a 1:1 blend swaps in without changing the overall balance.
- Light brown sugar: Adds sweetness plus a touch of molasses flavor that deepens the oat mixture. It helps the crumble brown nicely.
- Baking soda: A tiny lift to keep the crumb from getting too dense. You won’t taste it, but it helps with texture.
- Salt: Balances sweetness and brightens flavors — a small but essential player.
- Cinnamon (optional): If your family likes a little warm spice, it’s a gentle flavor that pairs beautifully with blueberries. Leave it out if your kids prefer plain.
- Unsalted butter, melted (or coconut oil): The fat binds and browns the oat mixture. Melted butter is familiar and gives that cozy baked-butter aroma; coconut oil is an easy swap if you prefer plant-based.
- Vanilla extract: A subtle background note that rounds out the flavors.
- Blueberries (fresh or frozen): The star. Frozen berries are a time-saver and work beautifully — toss them frozen with the sugar and cornstarch.
- Granulated sugar and cornstarch: Sugar sweetens the filling while cornstarch thickens the juices so the filling isn’t runny.
All of these are common pantry items, which is exactly why this recipe is great for busy households: no last-minute supermarket trips for obscure ingredients.
Directions
Preheat your oven to 375°F (190°C) and line an 8-inch square baking pan with parchment paper., In a large bowl, combine the oats, flour, brown sugar, baking soda, salt, and cinnamon (if using). Mix well., Stir in the melted butter and vanilla extract until crumbly for the base of your bars., Press half of the oat mixture into the bottom of the prepared pan., In a separate bowl, toss the blueberries with granulated sugar and cornstarch. Spread this mixture over the oat base., Crumble the remaining oat mixture over the blueberries, gently pressing down., Bake for 35-40 minutes or until golden brown and bubbly., Allow to cool completely, then lift out and cut into squares.
Friendly guidance around the printed steps:
- Preheat and line the pan: Don’t skip lining the 8-inch pan with parchment. It’s a tiny bit of prep that makes the finish effortless — you’ll lift the whole slab out to cool, and cutting is neater.
- Mixing the dry ingredients: Stir until uniform. You don’t need a mixer here; a wooden spoon or spatula does the job. You want even distribution so every bite tastes balanced.
- Stir in melted butter and vanilla: The mixture should become crumbly and slightly cohesive. If it clumps into big wet globs, you’ve added too much butter; stir a bit longer to distribute it, or add a teaspoon of flour if absolutely needed (this is rare if you measure carefully).
- Pressing half the mixture: Use the bottom of a measuring cup or a small flat spatula to press the base evenly. Even pressure means even baking and fewer overly crisp edges.
- Blueberry toss: When you coat the berries with sugar and cornstarch, you’re building a filling that will thicken while baking. Cornstarch is the quiet hero that prevents a soggy bottom.
- Crumbling and gentle pressing: The top should be loose crumbs, but tamping them lightly helps them adhere during baking without turning into a solid crust.
- Baking time: Ovens vary — mine is honest, but if you know yours runs hot, check around 32 minutes. Golden top and bubbling edges are the visual cues to watch for.
- Cooling completely: This matters. Warm bars are soft and will fall apart. Cool fully so the cornstarch sets and you can neatly lift and cut the bars.
Common small mistakes to avoid: over-pressing the top (you want a crumbly contrast), cutting too soon, and skipping the cornstarch if using very juicy, fresh berries.
Why families love this dish
This recipe checks all the boxes many parents look for: approachable prep, familiar flavors, and a result everyone eats without fuss. The oat crumble feels wholesome and homey, while the blueberry filling provides that bright, fruity pop that kids and adults both enjoy. The texture contrast — slightly crisp top, tender fruit, and a chewy base — is universally appealing.
It’s comforting rather than trendy: nothing in here requires explanation to the pickiest family member. You can make it for school bake sales, after-school snacks, casual potlucks, or a cozy weekend breakfast. The flavors are familiar enough to be comforting, but the bars still feel a little special when you serve them warm with a glass of milk or a cup of tea.
These bars are also forgiving: frozen blueberries work when fresh ones aren’t in season, and small adjustments (like skipping cinnamon) allow you to adapt for picky eaters without changing the core recipe — so you can reliably make these when schedules are tight and expectations are high.
Smart substitutions and simple variations
While you should keep the original ingredients and steps when following the recipe, here are family-friendly swaps and tweaks to try that keep the recipe reliable:
- Butter vs. coconut oil: Use coconut oil if you want to avoid dairy — it behaves similarly in binding and browning.
- Frozen vs. fresh blueberries: Frozen is a convenience win. No need to thaw; toss them with sugar and cornstarch while frozen.
- Cinnamon: Leave it out for kids who prefer plain flavors, or replace with a small pinch of nutmeg in winter for a warm variation.
- Add-ins: If your family likes a nutty crunch, sprinkle a tablespoon of chopped walnuts or pecans on top before baking — simple and optional.
These alternatives are about fitting this recipe into your pantry and your family’s palate rather than reinventing the wheel.
Pairing ideas for a complete, satisfying meal
Blueberry oatmeal bars can be the star of a light breakfast, a sweet snack, or a dessert after a simple dinner. Here are easy, minimal-effort pairings to round out a meal:
- Breakfast tray: Pair warm bars with yogurt and a drizzle of honey for a balanced, hand-held spread.
- Brunch spread: Add a pitcher of cold-brew coffee, a bowl of fresh fruit, and something savory like scrambled eggs or a simple frittata.
- School snack or lunchbox: A bar, a small box of cheese cubes or a hard-boiled egg, and sliced apples make an easy, balanced lunchbox.
- For pancake mornings: Serve alongside a stack of pancakes if you want a berry-forward spread — I love this with a simple maple syrup pancake, and it works especially well with a recipe like these blueberry maple pancakes for a weekend breakfast feast.
Pick one or two elements from the list and you’ve got a satisfying plate without extra time or fuss.
Make-ahead tips, leftovers, and storage
This recipe is a great make-ahead item. Once cool, store the bars in an airtight container at room temperature for up to two days. For longer storage, keep them in the refrigerator for up to five days; bring to room temperature or warm briefly before serving so the filling softens.
Freezing: These bars freeze beautifully. Wrap them individually in plastic wrap or parchment, then store in a freezer-safe bag for up to three months. Thaw overnight in the refrigerator or for a few hours at room temperature. A quick 15–20 second zap in the microwave refreshes a thawed bar nicely.
Reheating without drying out: Warm bars in a 300°F oven for 8–10 minutes covered loosely with foil to prevent the top from crisping too much, or microwave a single bar for 12–20 seconds depending on your microwave’s power. The goal is to soften the filling without turning the top soggy or burnt.
Lunchbox and next-day uses: Cut smaller squares for lunchboxes, or crumble a bar over plain yogurt for an instant parfait. The texture holds up well and tastes fresh even a day or two after baking.
Common questions home cooks ask about this recipe
Q: My bars were soggy in the center — what happened?
A: Often that’s from under-baking or cutting too soon. Make sure the edges are bubbling and the top is golden. Let the pan cool fully so the cornstarch sets the filling.
Q: Can I double the recipe?
A: Yes. Use a 9×13 pan for a doubled batch and watch the bake time — it may take longer. Also, a larger pan produces thinner bars, so reduce bake time slightly and check early.
Q: Can I use instant oats?
A: Instant oats will work, but old-fashioned oats give better texture and structure. Instant oats tend to break down more and can make a softer, less textured bar.
Q: My top didn’t brown — why?
A: Either your oven runs cool or the oat top was too thick in some spots. Rotate the pan halfway through baking and press the base evenly before adding the filling to encourage even browning.
Q: Are frozen berries okay?
A: Yes — toss them straight from the freezer with the sugar and cornstarch. They release more juice as they bake, so the cornstarch is important to keep the filling from getting too runny.
Final thoughts from Sarah
This recipe is the kind of no-fuss, reliable bake that deserves a steady spot in your repertoire. It’s forgiving, familiar, and quick to pull together — perfect for the rhythm of family life where you need good food without a lot of hand-holding. Whether you’re serving them for breakfast, wrapping them up for a school snack, or bringing a pan to a casual gathering, these blueberry oatmeal bars deliver steady comfort and genuine crowd-pleasing flavor.
Give it a try on a busy morning or a leisurely weekend; once you see how easily it comes together, I think you’ll find yourself baking it again and again. From my kitchen to yours — happy baking, and enjoy these warm, simple treats. — Sarah Collins
Conclusion
If you want a few more takes on blueberry oatmeal bars from other home bakers, I find it helpful to compare techniques and tips on sites like Blueberry Oatmeal Bars – Pastry & Beyond for texture notes, Blueberry Oatmeal Bars {One Bowl Recipe!} – WellPlated.com for single-bowl convenience ideas, and Blueberry Oatmeal Bars | Stress Baking for another reliable family-friendly version.
Blueberry Oatmeal Bars
Ingredients
Method
- Preheat your oven to 375°F (190°C) and line an 8-inch square baking pan with parchment paper.
- In a large bowl, combine oats, flour, brown sugar, baking soda, salt, and cinnamon (if using). Mix well.
- Stir in melted butter and vanilla extract until crumbly for the base.
- Press half of the oat mixture into the bottom of the prepared pan.
- In a separate bowl, toss blueberries with granulated sugar and cornstarch. Spread this over the oat base.
- Crumble remaining oat mixture over the blueberries, gently pressing down.
- Bake for 35-40 minutes or until golden brown and bubbly.
- Allow to cool completely before lifting out and cutting into squares.