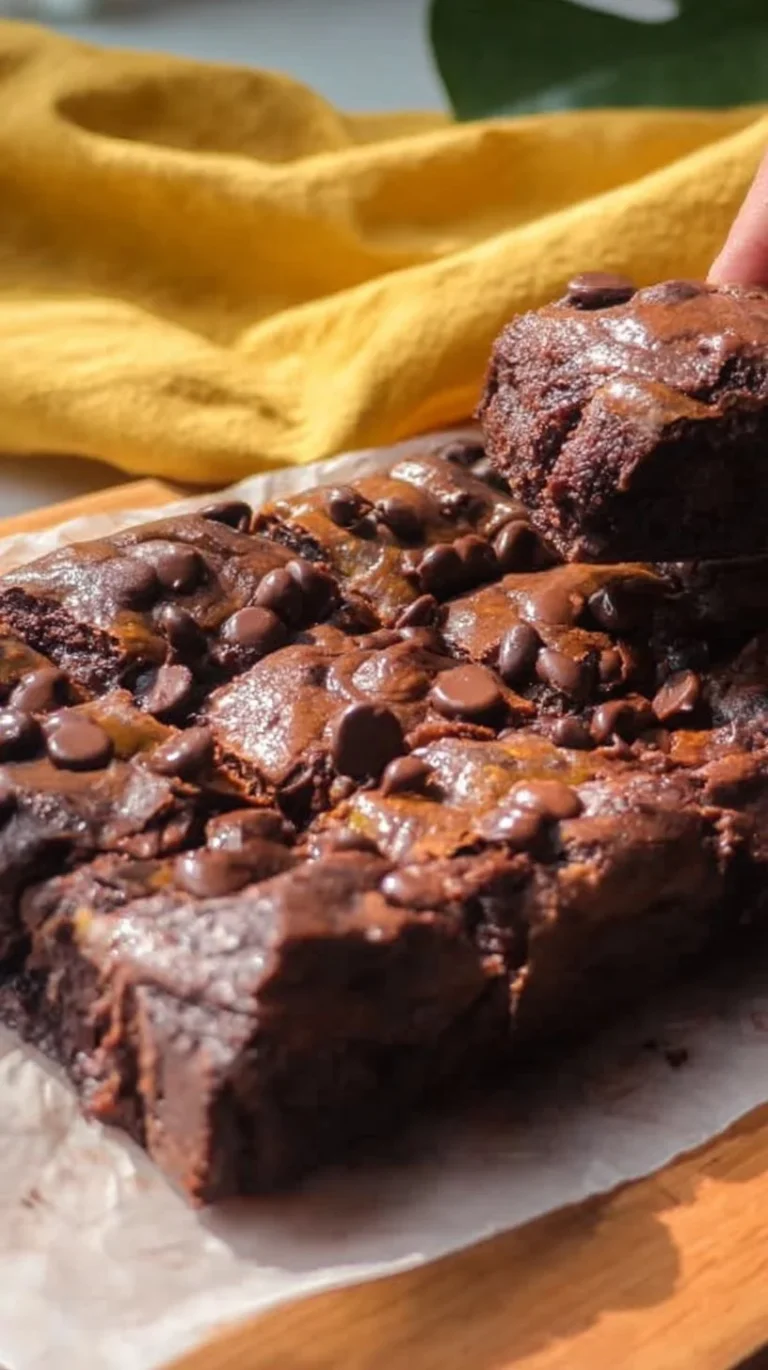
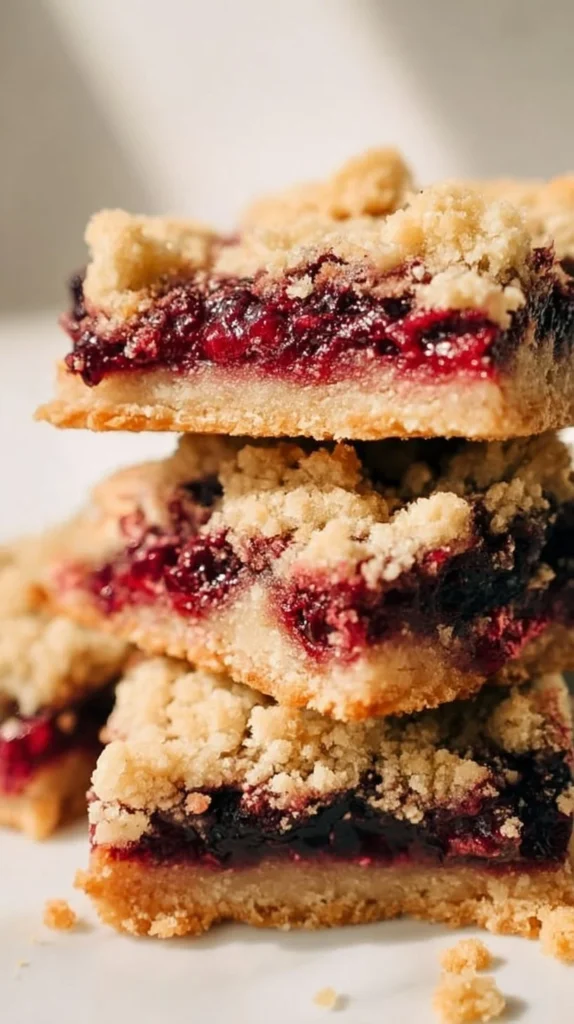
Vegan Berry Crumble Bars
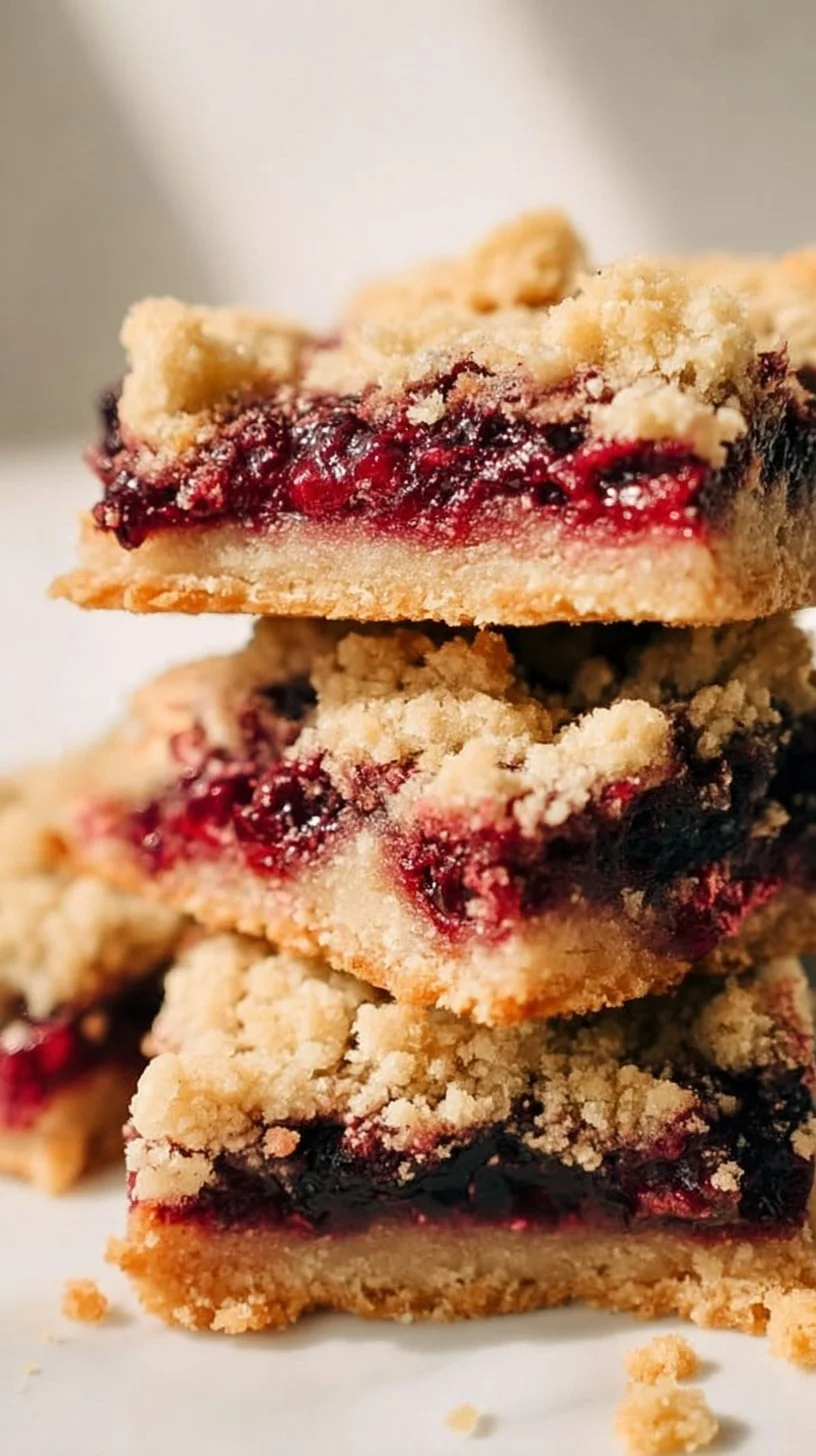
There’s something wonderfully comforting about a tray of warm crumble bars — they hit that sweet, familiar spot that kids and grown-ups both reach for after dinner, and they’re forgiving on busy weeknights. As someone who cooks for a busy household, I love recipes that deliver consistent results with minimal fuss. These Vegan Berry Crumble Bars do just that: a simple base, a jammy berry middle, and a rustic crumble on top. They come together quickly, can be made with store-bought or frozen fruit, and hold up well for breakfasts, snacks, or dessert.
This recipe is one I turn to when I need a sweet treat that doesn’t demand perfection but still feels special. It’s excellent for weeknights because you can make the berry filling while the base chills or bakes, and it’s brilliant for gatherings since you can slice it into portable squares that kids can carry around without utensils. If you enjoy easy berry bakes, you might also like a lighter breakfast option like the Blueberry Cottage Cheese Breakfast Bake, which follows the same idea of fruit plus a simple grain or flour base.
In the sections that follow I’ll walk you through what to expect at each stage, why steps are ordered the way they are, and the small, practical tips that make this recipe reliable for busy families. You’ll get swap ideas for picky eaters, make-ahead notes, and a few easy serving suggestions so these bars can fit into weeknight routines, school lunches, and relaxed weekend baking.
How to make Vegan Berry Crumble Bars
Making these bars is a very manageable three-part process: the base, the berry filling, and the crumble topping. Each stage is straightforward and breathes a bit of margin for error, which is exactly what you want on a rushed afternoon.
Base: The base is a pressed-together mixture that bakes briefly before the filling goes on. Expect a slightly sandy, tender crust that holds together when cooled. When you press it into the pan, don’t worry about making it perfectly smooth — a rustic surface gives the bars a homemade look. If you’re new to working with almond flour mixtures, press a little firmer so the base stays intact when you cut the bars.
Berry layer: The fruit filling is simmered on stove to break down the berries and thicken slightly with cornstarch. This gives you a spreadable, jam-like layer rather than runny fruit. If you’re using frozen berries, there’s no need to thaw completely first — start them on low heat and they’ll break down as they warm. When the mixture thickens and you chill it briefly, it sets nicely so the bars slice cleanly.
Crumble topping: The crumble is quick to mix and should feel clumpy but moist from the coconut oil and maple syrup. Pinching it into chunks before placing it on the berry layer helps create that classic crumble look. It bakes into crunchy pockets that contrast the jammy center.
Where beginners should slow down: take a moment to flatten the base evenly and watch the berry pan as it simmers so you don’t overcook the fruit. Shortcuts: use pre-measured almond and oat flours if you have them, and it’s fine to use a potato masher or fork — no special tools required. This recipe is intentionally forgiving and fits easily into an evening routine: start it while dinner’s finishing or make the filling earlier in the day and assemble before baking.
Ingredients
1 1/2 cup almond flour, 1/4 cup oat flour, 1/3 cup melted refined coconut oil, 1/4 cup pure maple syrup, 1 tsp vanilla extract, 1/4 tsp salt, 1 cup berries, fresh or frozen, 1 1/2 tbsp pure maple syrup, 1 tbsp water, 1/2 tsp cornstarch, 1/2 cup oat flour, 1/4 cup oats, 2 tbsp almond flour, 1/4 cup melted refined coconut oil, 1 tbsp pure maple syrup, 1/2 tsp vanilla extract, pinch of salt
Below I’ll walk through what each ingredient brings, in plain home-cook language, so you understand why they’re used and how they influence the final bars.
Almond flour: This gives the base and crumble a tender, slightly nutty texture and helps the bars hold together without being cakey. It’s the backbone of the crust and topping.
Oat flour and oats: Oat flour lightens the texture and adds a mild, comforting grain flavor. The oats in the topping create chew and crunch pockets that kids love to bite into.
Melted refined coconut oil: Refined coconut oil is used for a neutral fat that binds dry ingredients, helps the crumble crisp up, and keeps the recipe vegan. It melts into the flour, creating that shortbread-like quality.
Pure maple syrup: Used in the base, filling, and topping, maple syrup provides sweetness and keeps the bars moist. It’s easier to mix in than granulated sugar in this recipe and helps everything brown gently.
Vanilla extract: A small splash goes a long way toward rounding the flavors; it makes the berry filling taste more dessert-like and pulls the base and crumble together.
Salt / pinch of salt: Salt is essential even in sweet baking — it heightens the berry flavor and balances the sweetness.
Berries (fresh or frozen): The star. Fresh gives a brighter flavor; frozen works great any time and is a wonderful shortcut — no thawing necessary, just give them a little extra time on the stove if still icy.
Water and cornstarch: The water helps the berries come together while simmering; the cornstarch is the thickener that turns fruity juices into a spreadable filling.
Each ingredient is a common pantry item for most families and plays a clear role: structure, sweetness, moisture, or flavor. That makes substitutions straightforward if needed (see the substitutions section for ideas).
Directions
Set the oven to 350 degrees., Start with the base layer. In a mixing bowl combine the almond flour, oat flour, and salt., Add in the maple syrup, melted coconut oil, and vanilla extract and combine., Add the mixture to a greased or lined 8×8 baking dish and evenly flatten. Set aside., Then for the berry layer add the berries, maple syrup, and water to a pot., Heat the berries on low to medium heat. Once the berries start to soften mash with a potato masher or fork to eliminate any large chunks. Add the corn starch and let the berries simmer and thicken for 5-10 minutes., Once the berries have thickened, remove from the heat. I recommend transferring to a bowl and placing in the fridge to thicken further., Lastly for the crumble topping combine the oats, oat flour, almond flour, and salt., Then add in the melted coconut oil, maple syrup, and vanilla extract and combine. Set aside., Remove the berry mixture from the fridge and pour on top of the base. Spread evenly., Top with the crumble topping. It helps to squeeze chunks of the crumble topping between your fingers to combine/flatten and then place on top of the berry layer., Bake for 25 minutes., Let cool, cut into squares, and enjoy!
Friendly guidance for each part (without changing the steps):
- Oven and timing: Preheating to 350°F is the sweet spot for this recipe — hot enough to set the base and brown the crumble without burning the topping. If your oven runs hot, check at 20 minutes.
- Base texture: After you press the base into the pan, it should look compacted and even. If it looks too dry and crumbly, a teaspoon more of melted coconut oil will help. If it’s glossy or too soft, you pressed too firmly or added too much liquid; that’s okay — the bake time helps it firm up.
- Watching the berry pan: Cook the berries on low to medium so they soften gently. Use a sturdy spoon or a potato masher and you’ll get a jammy texture without needing a blender. If your berries look watery after simmering, the cornstarch may need an extra minute — clarity comes as it cools.
- Cooling and slicing: Cooling fully before cutting is important; the bars set up as they cool, and early slicing can give you sloppier squares. Chill at room temp or pop the pan in the fridge for twenty minutes if you’re impatient.
- Crumble placement: Pinching the crumble into medium-sized clumps helps create a mix of crunchy and softer bits when baked. Pressing it down too much will reduce the contrast between crumble and filling.
Why families love this dish
These bars feel like the kind of homemade baking most parents want in their homes: familiar, not fussy, and easy to portion. The flavors are uncomplicated — sweet maple, juicy berries, and a nutty oat base — which is exactly what kids respond to. Adults appreciate the thoughtful texture contrasts and the fact that the bars aren’t overly sweet or rich.
They’re versatile, too: serve warm with a scoop of dairy-free yogurt or keep them room temperature for lunchboxes. Because the ingredients are common and the steps straightforward, even the least confident home cooks can produce a reliable tray of bars that disappears quickly at the breakfast table or after dinner.
Smart substitutions and simple variations
Keeping the recipe reliable is key, so swap sensibly:
- Berries: Use any berry mix — strawberries, raspberries, blueberries, or a mix. Frozen is a great backup and keeps the recipe on-hand year-round.
- Flours: If oat flour isn’t available, blitz rolled oats in a blender to make a quick oat flour replacement. Stick to the same weight or volume to maintain texture.
- Oil: If you don’t have refined coconut oil, a neutral oil like light olive or avocado oil will work, though the texture may vary slightly.
- Sweetener: Maple syrup adds that full flavor; if you prefer, use agave or a mild liquid sweetener in the same amount, keeping in mind flavor differences.
- For picky eaters: If they’re not fans of chunky fruit, mash the filling more thoroughly or press it through a sieve after cooking for a smoother jam layer.
These swaps keep the method and timing intact while letting you adapt to what’s already in your pantry.
Pairing ideas for a complete, satisfying meal
These bars are flexible — here are a few minimal-effort ways to round them into a meal or snack:
- Breakfast tray: Offer squares alongside Greek-style yogurt (or plant-based yogurt) and a handful of nuts for a balanced morning.
- Brunch spread: Pair with scrambled eggs and a simple green salad for adults; add mini pancakes for kids. For a seasonal pairing that keeps the berry theme going, try serving alongside warm Blueberry Maple Pancakes.
- Snack pack: Wrapped individually, the bars travel well with a piece of fruit and a small container of nut butter for dipping.
Keep sides simple — a crisp apple or a bowl of cottage-style texture (yogurt or cottage cheese) rounds things without extra time.
Make-ahead tips, leftovers, and storage
These bars are forgiving for make-ahead: you can bake them and store them in an airtight container at room temperature for up to two days, or in the fridge for up to five. Chilling actually helps the filling set, so if you bake them a day ahead they’ll slice cleaner the next morning.
Freezing works well: wrap individual squares in plastic wrap and place them in a freezer bag for up to three months. Thaw on the counter or microwave in short bursts; a quick warm-up in a 325°F oven for 5–7 minutes refreshes the crumble’s crunch.
Leftovers make great lunchbox treats or afternoon snacks, and a small square with a protein-rich element (cheese stick, yogurt) makes for a more balanced plate if you’re sending these with kids to school.
Common questions home cooks ask about this recipe
Q: My berry layer was too runny — what happened?
A: The most common cause is not simmering long enough or not giving the cornstarch time to activate. Let the berries simmer gently an extra minute or two after adding cornstarch, and chill the mixture briefly so the filling firms up before you add the crumble.
Q: The base fell apart when I cut the bars. How can I fix that?
A: Press the base firmly and evenly into the pan and let the bars cool fully before slicing. If you need immediate slicing, pop the cooled pan into the fridge for 20–30 minutes to help everything set.
Q: Can I scale this recipe up or down?
A: Yes. For a larger crowd double the ingredients and use a 9×13 pan; baking time may increase by 5–10 minutes. For a smaller portion halve the recipe and use a loaf pan or a smaller square pan, keeping an eye on baking time as it may be slightly shorter.
Q: How crisp should the crumble be?
A: The crumble should be browned in spots and have a crunchy exterior with tender bits inside. If it’s too soft, give it a few extra minutes of bake time, watching carefully so it doesn’t burn.
These are the small troubleshooting questions families ask when they want predictable, repeatable results. Once you’ve made the bars twice, the timing becomes second nature.
Final thoughts from Sarah
If you’re looking for a no-fuss recipe that feels homemade and reliably pleasing to both kids and adults, these Vegan Berry Crumble Bars deserve a spot in your recipe box. They’re simple enough for weeknight baking, portable for playdates and lunches, and flexible enough to accommodate what you already have in your pantry. Trust the structure — a sturdy base, a gently thickened fruit layer, and a clumpy crumble — and you’ll pull out predictable, comforting results every time.
Baking with children? Let them sprinkle the crumble — it’s an easy job that makes them feel part of the process. And if you ever need a quick, family-friendly dessert, this recipe answers the call without drama.
Warmly,
Sarah Collins
Conclusion
If you want to compare notes or try closely related versions, the Domestic Gothess has a helpful take on a similar Berry Crumble Bars (Vegan) – Domestic Gothess that shows different berry combinations. For another clear, home-cook-friendly berry bar method, see the recipe at Vegan Berry Crumble Bars – Wellness by Kay. If raspberries are your favorite, Rainbow Plant Life’s Vegan Raspberry Crumble Bars – Rainbow Plant Life is a lovely riff with helpful tips. And for a crumble-style blueberry bar with more oat-forward crumble, take a look at Blueberry Pie Bars with Oatmeal Crumble (vegan & gluten free) for inspiration.
Vegan Berry Crumble Bars
Ingredients
Method
- Set the oven to 350°F (175°C).
- For the base layer, in a mixing bowl combine the almond flour, oat flour, and salt.
- Add in the maple syrup, melted coconut oil, and vanilla extract and mix until combined.
- Transfer the mixture to a greased or lined 8×8 baking dish and evenly flatten the top. Set aside.
- In a pot, add the berries, maple syrup, and water.
- Heat on low to medium. Once softened, mash with a potato masher or fork until no large chunks remain.
- Add the cornstarch and let the mixture simmer and thicken for 5 to 10 minutes.
- Once thickened, transfer to a bowl and chill in the fridge briefly.
- Combine the oats, oat flour, almond flour, and salt in a bowl.
- Add in the melted coconut oil, maple syrup, and vanilla extract; mix until clumpy.
- Set aside.
- Remove the berry mixture from the fridge and pour it on top of the base, spreading evenly.
- Top with the crumble mixture by pinching it into medium clumps and placing it evenly over the berry layer.
- Bake for 25 minutes.
- Let cool, cut into squares, and enjoy!