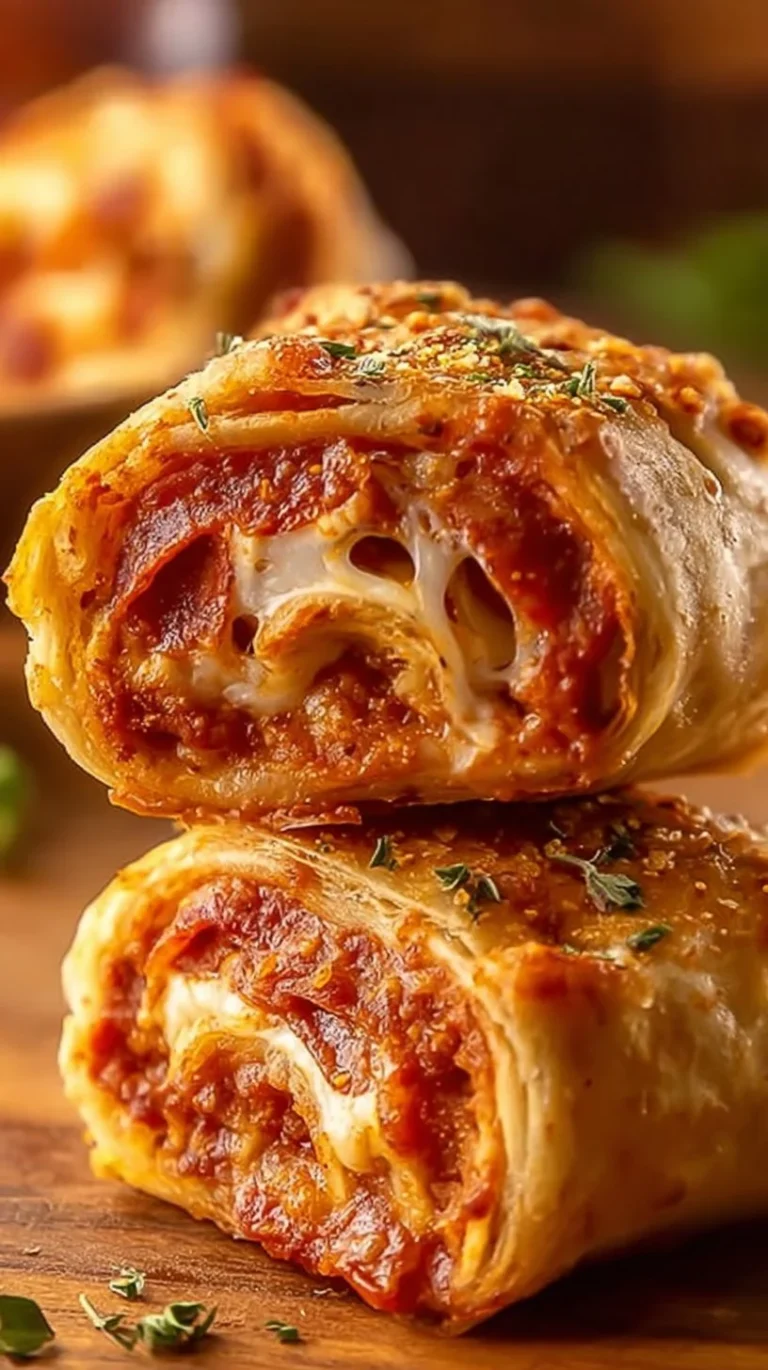
Cheesy Pepperoni Pizza Bombs
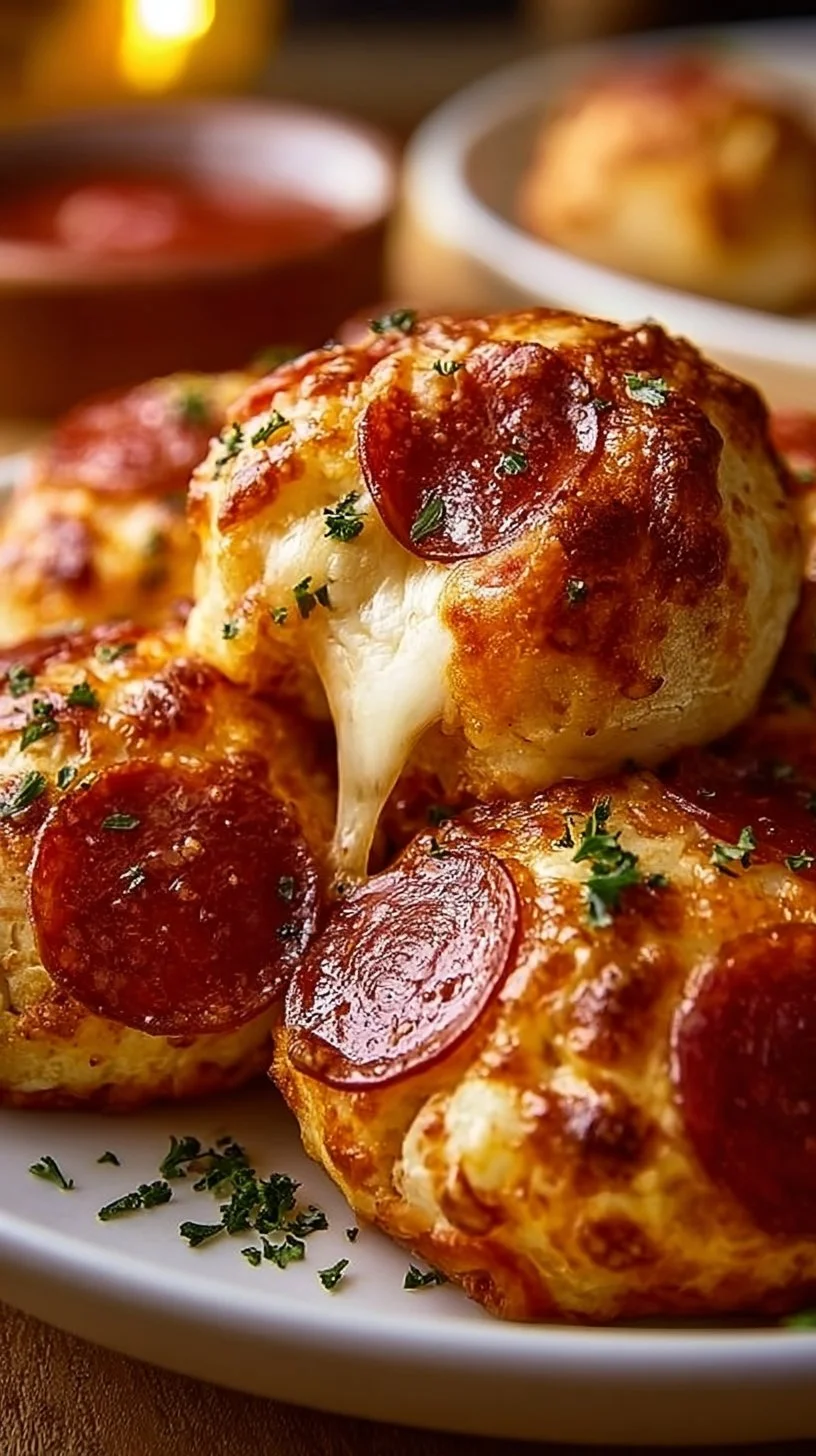
If your weeknights need a little rescue and your family likes the comfort of classic pizza without the fuss, these Cheesy Pepperoni Pizza Bombs are the kind of recipe that quietly becomes a favorite. They take familiar flavors—melty mozzarella, savory pepperoni, a hint of garlic and oregano—and wrap them in a tender, golden dough that kids can hold in one hand and adults can enjoy bite by bite. Because everything here feels familiar, they’re easy for picky eaters to accept and easy for parents to prep quickly between school pickup and bedtime routines.
This recipe is useful for so many moments: a busy weeknight where everyone’s hungry at slightly different times, an after-school snack that doubles as dinner, or a casual gathering where people like to graze. They also travel well and reheat nicely, so they’re a practical make-ahead option for lunches or busy mornings. If you like pizza but want something that’s portable and ready in under 30 minutes, these are your go-to. For more quick pizza-style ideas that fit a family schedule, I often pair this kind of recipe with other simple favorites like a quick chicken crust pizza, which keeps weeknights fast and satisfying without sacrificing flavor.
From a home-cook perspective, what makes these reliable is how forgiving the dough is and how straightforward the assembly becomes with a little routine. Once you’ve folded a few, the motion is quick and consistent. You don’t need fancy tools, and you won’t find any tricky timing that derails dinner. That predictability is a relief when time is short and appetites are long.
How to make Cheesy Pepperoni Pizza Bombs
Think of this as a simple assembly line that moves from prep to oven quickly. First, you’ll preheat the oven so it’s ready when the bombs are assembled. Unrolling the dough and cutting it into squares is the main hands-on part; that’s where working on a floured surface helps. Filling each square with a spoonful of cheese, a slice or two of pepperoni, and a pinch of Parmesan is straightforward—think of it like making a tiny pizza. Folding the corners together and sealing each ball takes a little practice; this is where beginners should slow down and be intentional so the filling stays inside while baking.
Once they’re sealed and brushed with olive oil, the oven does the rest. They bake quickly, puff up, and turn golden in minutes, so don’t walk away too far. Let them cool slightly before serving so the cheese sets a little; warm, not molten-lava-hot, is the sweet spot for family-serving stability. If you want to keep things even faster, pre-shredded cheese and pre-sliced pepperoni are fine—sometimes the best shortcut is the one that keeps dinner moving without adding stress. For a variation that leans into a higher-protein route while keeping the process the same, you might enjoy the concept behind a warm bowl-style pizza like this easy high-protein cottage cheese pizza bowl—same comforts, different format.
Ingredients
1 can refrigerated pizza dough, 1 cup shredded mozzarella cheese, 1/2 cup sliced pepperoni, 1/4 cup grated Parmesan cheese, 1 teaspoon garlic powder, 1/2 teaspoon dried oregano, 1 tablespoon olive oil, 1/4 cup marinara sauce (for dipping)
Each ingredient here plays a clear role in the finished bite. The refrigerated pizza dough is the structure—soft, pliable, and quick to work with so you don’t have to knead or proof anything. Shredded mozzarella is the melty heart of the bomb; it’s what gives that irresistible pull when someone takes a bite. Pepperoni brings saltiness and familiar pizza flavor that most kids and adults love. A little grated Parmesan adds a sharper, nutty note to cut through the richness and give the interior more depth.
Garlic powder and dried oregano are pantry staples that give the filling the “pizza” flavor without having to measure out fresh herbs; they’re reliable and consistent. Olive oil brushed on top helps the surface brown and develop a pleasant sheen and mouthfeel—egg wash is an alternative, but olive oil keeps the flavor neutral and simple. Finally, the marinara sauce is the dipping partner: a small bowl of sauce brings moisture, acidity, and a place for people to customize each bite.
If you’re juggling picky eaters, keep these ingredients on hand in small containers so each person can assemble their own if that makes dinner smoother. And if you like to shop once and use ingredients in multiple ways, these items are very kitchen-friendly—cheese and pepperoni show up in sandwiches, pastas, and snack plates throughout the week. For another kid-friendly handheld with similar flavors and ease of assembly, I often recommend trying a batch of high-protein pizza hot pockets when you want to switch things up without changing how you cook.
Directions
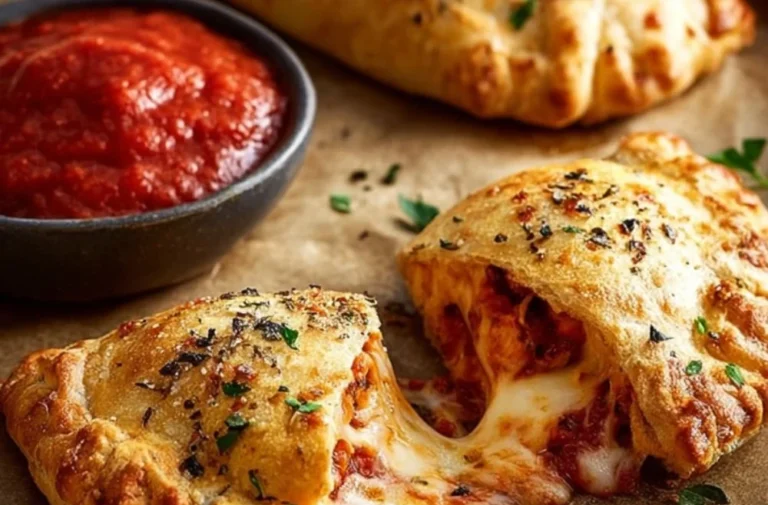
Preheat your oven to 375°F (190°C). , Open the can of refrigerated pizza dough and unroll it onto a clean surface. , Cut the pizza dough into squares, about 2 inches on each side. , Sprinkle a small amount of flour on the surface to prevent the dough from sticking. , Take the shredded mozzarella cheese and place a heaping tablespoon in the center of each dough square. , Add a slice or two of pepperoni on top of the cheese in the center of each square. , Sprinkle a pinch of grated Parmesan cheese over the pepperoni and mozzarella. , Dust a light pinch of garlic powder and dried oregano over the cheese and pepperoni. , Carefully fold the corners of each dough square in toward the center, sealing the filling inside to form a ball. , Gently roll each dough ball between your hands to ensure it’s fully sealed and round. , Arrange the dough balls on a baking sheet, leaving a little space between them. , Brush the tops of the dough balls with olive oil using a pastry brush. , Place the baking sheet in the preheated oven and bake for about 12-15 minutes or until the pizza bombs are golden brown and puffed up. , While the pizza bombs are baking, pour the marinara sauce into a small dipping bowl. , Once the pizza bombs are done, remove them from the oven and allow them to cool slightly before serving. , Serve the cheesy pepperoni pizza bombs warm with the marinara sauce for dipping.
A few friendly notes while you follow those steps: when you cut the dough into squares, try to keep them fairly even so the filling portion is consistent and cooks at the same rate. The flour sprinkled on the surface should be light—just enough to keep the dough from sticking. When you add fillings, don’t overfill; a heaping tablespoon of mozzarella is plenty because cheese expands as it melts. Sealing the corners well is the trickiest part—pinch firmly and give the ball a gentle roll between your palms to catch any small gaps. If a ball looks loose, fold and pinch the top a second time rather than squeezing too hard and risking tearing the dough.
In the oven, look for even golden color. If one side of your baking sheet seems to brown faster, rotate it once halfway through to keep things even. Let them rest a few minutes after baking; the cheese firms up slightly and the marinara won’t scald. If a child-sized impatience is a factor, give each person a small plate and encourage a five-minute pause—often that’s all it takes to avoid a molten-cheese mishap.
Why families love this dish
There’s comfort in predictability: these pizza bombs taste like the pizza everyone already knows and likes, but they’re easier to manage for little hands and they feel special without extra work. Kids love the compact shape and the fun of dipping. Adults appreciate that the flavors are straightforward and that the recipe is scalable—make a dozen or two for a family, or a big tray for a crowd. They’re also flexible: they work as a main, a snack, or an appetizer, which is exactly the versatility busy households need.
The texture combination—soft bread exterior, molten cheese center, slightly crisp surface from the olive oil—hits familiar comfort notes. And because the fillings are basic and widely accepted, these are a good bridge for introducing small tweaks later on if you want to sneak in extra veggies or different cheeses.
Smart substitutions and simple variations
If you want to keep the recipe reliable while switching things up, do that in a small way. Swap the mozzarella for provolone or a mild cheddar for a slightly different, family-friendly flavor. Use turkey pepperoni to lower the sodium a touch while keeping the same look and feel. Add a small basil leaf inside each ball if you like a fresh-herb note, or a few chopped olives for adults who enjoy briny bites. Remember: these are suggestions for variations—you don’t have to change a thing that’s listed in the recipe to get a great result.
For picky eaters, you can separate fillings before sealing so each bomb is customized: some with pepperoni, some with just cheese. That simple system makes the meal more peaceful and keeps everyone happy without complicating the process.
Pairing ideas for a complete, satisfying meal
Keep sides simple so you’re not spending more time than necessary. A crisp green salad with a quick vinaigrette, raw carrot and cucumber sticks, or a bagged coleslaw all pair nicely. To round things out with minimal effort, a store-bought rotisserie chicken or a bowl of cut fruit works well. If you want to lean into the casual-plate idea, set out a few extra dipping sauces—garlic butter, ranch, or a spicier arrabbiata—so family members can personalize their plate without any extra cooking time.
Make-ahead tips, leftovers, and storage
These hold up nicely in the fridge for 2–3 days when stored in an airtight container. For longer storage, freeze them on a baking sheet until firm, then transfer to a freezer bag for up to a month. To reheat from refrigerated, a quick 8–10 minutes at 350°F (175°C) in a preheated oven will restore a pleasant crust while keeping the inside gooey; from frozen, add a few extra minutes. If you’re short on time in the morning, these can become a hearty lunch—pack with a small container of warmed marinara and a side of raw veggies.
For ideas on other make-ahead handhelds that fit the family schedule and travel well, I also like to keep a rotating list of family favorites like a simple BBQ chicken pizza—same ease, different and welcome flavors.
Common questions home cooks ask about this recipe
Q: How long do they take to make start to finish?
A: Expect about 20–30 minutes. Most of that is oven time, but allow a few extra minutes if you’re sealing new-to-you dough.
Q: My bombs burst open in the oven. What went wrong?
A: Usually that’s from overfilling or not sealing the top edges well enough. Pinch firmly and smooth any seams. A small tear can be patched by folding a little extra dough over and pinching.
Q: Can I scale this up?
A: Yes—double or triple the batch without changing baking temperature, but give them space on the pan or use two pans so they bake evenly.
Q: How do I keep the bottoms from getting soggy?
A: Make sure the dough squares aren’t too large for the amount of filling so juices absorb into the dough, not pool. A light coating of oil on the baking sheet or a parchment layer helps with even browning.
Q: Will kids like them?
A: In my experience, yes—especially because they’re fun to hold and dip. Let kids pick their dipping sauce for added buy-in.
Final thoughts from Sarah
These Cheesy Pepperoni Pizza Bombs are the kind of recipe that earns a regular spot in a busy household because they’re predictable, quick, and universally satisfying. They give you that classic pizza flavor in a package that’s portable, easy to reheat, and forgiving if life gets in the way during prep. Keep the ingredients simple, trust the steps, and once your family sees how fast dinner can be with a little routine, this will become one of those small, reliable wins that make weeknights calmer.
Give them a try on a busy evening and notice how quickly they become a favorite—then feel free to adapt the little details to match what your family loves. Enjoy the warm, cheesy comfort, and remember that cooking to keep your life moving smoothly is a skill worth practicing. Warmly, Sarah Collins
Conclusion
If you want another take on the same concept with step-by-step inspiration, I like the clear guide at Sizzling Eats’ Easy Pizza Bombs recipe for ideas on presentation and dipping options. For an alternative family-tested version to compare techniques and serving ideas, see the helpful recipe and tips at Allrecipes’ Pizza Bombs recipe.

Cheesy Pepperoni Pizza Bombs
Ingredients
Method
- Preheat your oven to 375°F (190°C).
- Open the can of refrigerated pizza dough and unroll it onto a clean surface.
- Cut the pizza dough into squares, about 2 inches on each side.
- Sprinkle a small amount of flour on the surface to prevent the dough from sticking.
- Take the shredded mozzarella cheese and place a heaping tablespoon in the center of each dough square.
- Add a slice or two of pepperoni on top of the cheese in the center of each square.
- Sprinkle a pinch of grated Parmesan cheese over the pepperoni and mozzarella.
- Dust a light pinch of garlic powder and dried oregano over the cheese and pepperoni.
- Fold the corners of each dough square in toward the center, sealing the filling inside to form a ball.
- Gently roll each dough ball between your hands to ensure it’s fully sealed and round.
- Arrange the dough balls on a baking sheet, leaving a little space between them.
- Brush the tops of the dough balls with olive oil using a pastry brush.
- Place the baking sheet in the preheated oven and bake for about 12-15 minutes or until the pizza bombs are golden brown and puffed up.
- Once done, remove them from the oven and allow them to cool slightly before serving.
- Serve the cheesy pepperoni pizza bombs warm with the marinara sauce for dipping.