Baked Cottage Cheese Chips
Introduction
If you’re looking for a small, satisfying snack that’s gentle on the budget and simple to make, Baked Cottage Cheese Chips are for you. I’m Carla Carter, Founder & Recipe Developer of RecipesCabin, and I love recipes that welcome beginners and quietly teach useful kitchen skills. This little recipe is an excellent first step into baking snacks from scratch: the ingredient list is short, the technique is straightforward, and the result is a crunchy bite you can feel proud of making.
This recipe is approachable whether you’ve barely turned an oven on or you’re getting back into cooking after some time away. If you’ve tried other cottage cheese ideas on my site, you might enjoy comparing textures — try my take on baked cottage cheese eggs for another simple protein-packed option: baked cottage cheese eggs. I’ll guide you through what to watch for at every step so you can feel calm and capable in the kitchen.
Why this recipe is easy to get right
There are a few reasons Baked Cottage Cheese Chips are forgiving. First, the ingredient list is tiny, so there’s little room to overcomplicate things. You’re essentially mixing, portioning, and baking — three tasks that are easy to practice and repeat. Second, the recipe tolerates small variations: a slightly thinner or thicker spread simply changes crispness a bit, but won’t ruin the whole batch.
You can also adapt your timing at the oven without fear. If your chips need a little longer to brown, that extra few minutes will usually help them reach the crisp edge you want; if one or two chips brown faster, pull them out and let the rest finish. For another cottage-cheese-bake idea with a cozy flavor twist, take a peek at my apple cinnamon cottage cheese bake to see how simple tweaks create different results: apple cinnamon cottage cheese bake.
Because the steps are basic and the outcomes are visible and measurable (color, texture), this is a recipe that builds confidence quickly.
How to make Baked Cottage Cheese Chips
At a glance, the process is: preheat, mix, portion and shape, bake, and cool. Here’s what happens in each stage and where to pay attention.
- Preheat: Give your oven time to reach 400°F (200°C). An oven that’s fully up to temperature helps the chips set quickly and get that golden edge.
- Mix: You’ll combine cottage cheese, flour, and seasonings into a single mixture. You’re not aiming for a perfectly smooth batter — you just want the ingredients to be evenly distributed so each chip bakes the same.
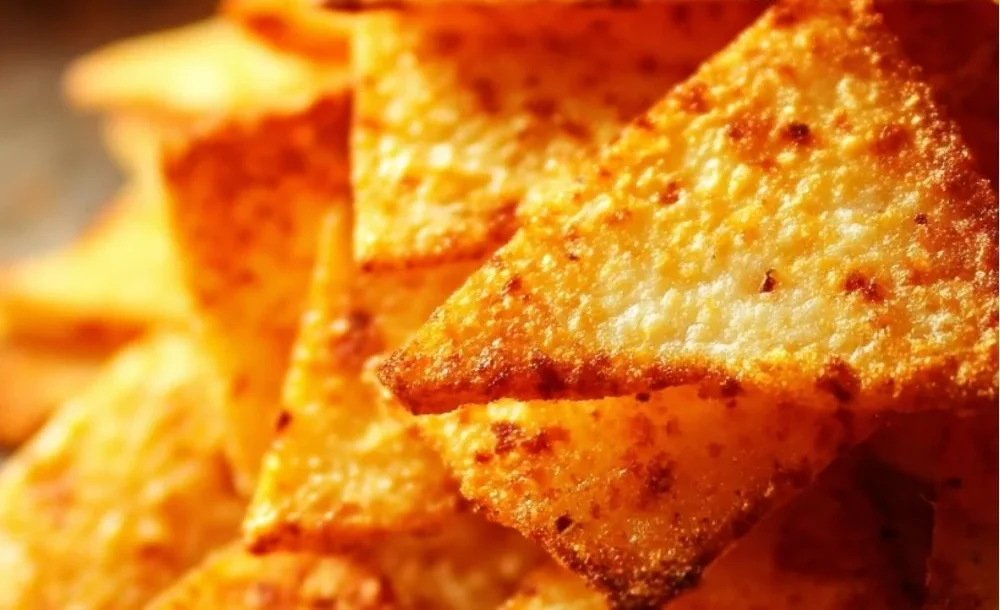
- Portion and shape: Spoon small dollops onto a parchment-lined tray and gently spread them into thin circles. The thickness you make here determines crispiness: thinner spreads become crispier. Beginners should slow down here and take the time to spread evenly so chips cook uniformly.
- Bake: Watch for golden edges and an overall dry, crisp surface. Ovens vary, so use look and touch rather than the clock alone.
- Cool: Let them rest on the tray — they firm up as they cool. This is the final transformation from fragile baked dollop to sturdy crisp.
If you enjoy cottage cheese in different formats, you might find inspiration in how cottage cheese behaves in other recipes, like my blueberry cottage cheese breakfast bake for different textures and contexts: blueberry cottage cheese breakfast bake. Practicing these simple steps here will make you more comfortable with many other small-batch bakes.
Ingredients
1 cup cottage cheese, 1/4 cup all-purpose flour, 1/2 teaspoon garlic powder, 1/2 teaspoon onion powder, Salt to taste, Pepper to taste, Cooking spray
Every ingredient here has a clear job, and none are intimidating.
- 1 cup cottage cheese: This is the base — it supplies moisture, protein, and a mild tang. As the chips bake, the cottage cheese releases moisture that combines with the flour to create structure. Small curds are normal; they help form a slightly textured surface on the chips.
- 1/4 cup all-purpose flour: Flour absorbs some moisture and helps the chips hold together and crisp. You’re not making a dough; you’re giving enough structure so the baked rounds set rather than spreading into puddles.
- 1/2 teaspoon garlic powder and 1/2 teaspoon onion powder: These powdered aromatics add savory depth without extra prep. They blend into the mixture and flavor each chip evenly.
- Salt to taste: Salt highlights the natural tang of cottage cheese and pulls flavors together. A light hand is fine — you can always add more to taste after they bake.
- Pepper to taste: Freshly ground or pre-ground, pepper adds a gentle background warmth.
- Cooking spray: This helps prevent sticking so the chips lift cleanly from the parchment. If you prefer, a light swipe of neutral oil with a paper towel works the same way.
None of these ingredients require special technique, and they work together predictably: cottage cheese provides moisture and flavor, flour provides structure, and the seasonings make each bite pleasing.
For another easy cottage-cheese-based wrapper-style idea that uses similar pantry staples, you might like my cottage cheese wraps post: cottage cheese wraps.
Directions
- Preheat your oven to 400°F (200°C).
- In a mixing bowl, combine cottage cheese, flour, garlic powder, onion powder, salt, and pepper.
- Line a baking sheet with parchment paper and lightly spray with cooking spray.
- Spoon small dollops of the mixture onto the baking sheet, spreading them out into thin circles.
- Bake in the preheated oven for 15-20 minutes, or until they are golden and crispy.
- Remove from the oven and let them cool before serving.
A little practical guidance for each step:
- Step 1 — Preheat: Wait until the oven actually reads 400°F. If your oven runs hot or cold, an inexpensive oven thermometer can help. The goal is even heat so the chips set and brown evenly.
- Step 2 — Combine ingredients: Stir until the flour and spices are distributed. The mixture will be somewhat loose — that’s fine. You’re not aiming for a dry dough. If curds are visible, that’s normal; they’ll bake into crispness.
- Step 3 — Prepare the sheet: Parchment and a light spray prevent sticking and make cleanup easy. If your parchment is wrinkled, press it flat so the chips sit evenly.
- Step 4 — Portion and spread: Use a teaspoon or small spoon to make uniform dollops. Gently press each into a thin circle — about the diameter of a quarter to a half-dollar is a good guide. Aim for consistent thinness so chips bake at the same rate.
- Step 5 — Bake: Keep an eye on them between 12 and 20 minutes. You’ll look for golden edges and a surface that appears dry and slightly blistered. If they’re pale, they might need another 2–4 minutes. If edges are darkening quickly, rotate the pan or pull out the darker chips early.
- Step 6 — Cool: Chips crisp as they cool. Let them rest 5 minutes on the tray; if you try to move them too soon they may break. Once cooled, they should lift off easily and feel firm.
Remember: small imperfections like uneven browning or slightly irregular shapes are normal and do not affect taste. The kitchen is a place for learning, not perfection.
Key techniques you’ll practice in this recipe
This recipe is a great practice ground for several fundamental skills:
- Measuring and combining: Accurate, simple measures help you see how ingredients interact. Practice stirring just enough to combine without overworking.
- Portioning for uniformity: Making dollops that are a similar size helps everything bake evenly — a skill useful when making cookies, fritters, or pancakes.
- Visual doneness cues: Learning to read color and texture in the oven replaces the need to time everything by minutes alone. Watch for golden edges and a dry surface.
- Cooling to finish: Recognizing that some things set as they cool (not immediately on removal) is a small but important lesson in baking.
These techniques are widely transferable — once you’re comfortable with them, you’ll notice better results in many other recipes.
Common mistakes and how to avoid them
Even simple recipes come with common hiccups. Here’s what I see most often and how to handle them calmly.
- Mistake: Dollops are very different sizes. Result: uneven baking; some chips burn while others are pale. Fix: take an extra minute to make them uniform. Use a measuring spoon if it helps.
- Mistake: Spreading too thick. Result: chips stay soft in the middle. Fix: gently press each dollop thinner before baking; aim for even, thin circles.
- Mistake: Pulling chips off the parchment too soon. Result: they break or feel floppy. Fix: allow 4–6 minutes of cooling on the tray — they’ll firm up as they cool.
- Mistake: Overbaking in a too-hot oven. Result: rapid browning or burning. Fix: check at the lower end of the time range; if edges brown quickly, rotate the sheet and reduce time.
- Mistake: Under-seasoning. Result: chips taste flat. Fix: taste one cooled chip and sprinkle a tiny pinch of salt if needed.
If something goes off track a bit, don’t panic. Adjust timing, use visual cues, and view each batch as a learning opportunity. You can also rescue a batch that’s a little soft by returning them to the oven for a few more minutes on lower heat until they dry and crisp.
How to adjust confidently without changing the recipe
You may want to scale the batch or tweak flavor intensity without altering the given ingredients or steps. Here’s how to approach that conceptually:
- Portion scaling: If you double the recipe, use two baking sheets or bake in batches so the oven air circulates properly. Overcrowding the pan leads to uneven baking.
- Flavor preference adjustments: Rather than changing ingredients, adjust how much of each seasoning you add within “to taste.” Start lighter if you’re unsure, then add a pinch more next time.
- Texture tweaks: The main texture control is thickness at the shaping stage. Spread thinner for crisper chips; leave slightly thicker for a chewier center. You can also lightly press the centers with the back of a spoon to make them uniformly thin.
These conceptual adjustments let you experiment while keeping the original, reliable recipe intact.
Serving, storage, and reheating made simple
Serving:
- These chips shine as a snack on their own, paired with a creamy dip, or as a crisp element on a salad. Present them in a shallow bowl so air can circulate and they stay crisp.
Storage:
- Store cooled chips in an airtight container at room temperature for up to two days. If the air is humid, they lose their snap faster; place a piece of parchment between layers to help.
- For longer storage, freeze in a single layer on a sheet tray until firm, then transfer to a freezer-safe bag. Thaw briefly at room temperature — they’ll be best eaten soon after thawing.
Reheating:
- To revive a few chips that have softened, a brief return to a 325°F (160°C) oven for 3–5 minutes on a baking sheet will crisp them right up. Avoid microwaving; it makes them soft and limp.
These small habits — cooling completely before storing and using short reheats — keep your chips tasty without fuss.
Questions new cooks often ask about this recipe
- How thin should I spread the dollops? Aim for about 1/8 to 1/4 inch thickness. If you’re unsure, a gentle press with a spoon gives a reliable, even thickness.
- My chips browned on the edges but stayed soft in the center — why? Most likely they were too thick or the oven temperature was uneven. Make thinner rounds and check for even oven heat. Rotating the tray halfway through baking helps.
- Can I make these ahead for a party? Yes — bake, cool completely, and store in an airtight container. Refresh briefly in a warm oven before serving for best texture.
- What equipment matters? You only need a bowl, spoon, baking sheet, and parchment. No fancy tools are required. A flat spatula helps lift delicate chips if you’re nervous about breaking them.
- Is it normal for cottage cheese curds to be visible? Absolutely. Those curds contribute to the finished texture and flavor. They won’t harm the final crisp.
If something feels uncertain while you’re cooking, slow down, look at the visual cues, and remember you can always make small adjustments for the next batch.
Final encouragement from Carla
Cooking is a practice, not a test. Each time you make these Baked Cottage Cheese Chips you’ll notice small improvements: more even spreads, better timing, and a keener eye for those golden edges. Celebrate progress — even imperfect chips still taste good and teach you something. If you’re nervous, remember: the steps are simple, and you’re allowed to learn as you go. Keep baking, keep tasting, and keep enjoying the process. Warmly, Carla Carter — Founder & Recipe Developer of RecipesCabin
Conclusion
If you enjoy experimenting with cottage cheese as I do, you might find it helpful to read other takes on cottage-cheese-based chips and how people adapted the simple idea. For a related, single-ingredient approach that inspired many home cooks, see Kirbie’s Cravings 1-Ingredient Cottage Cheese Chips, and for a personal account of trying the viral cottage cheese chip trend, check out this write-up on Allrecipes: Allrecipes: I Tried the Viral 1-Ingredient Cottage Cheese Chips.