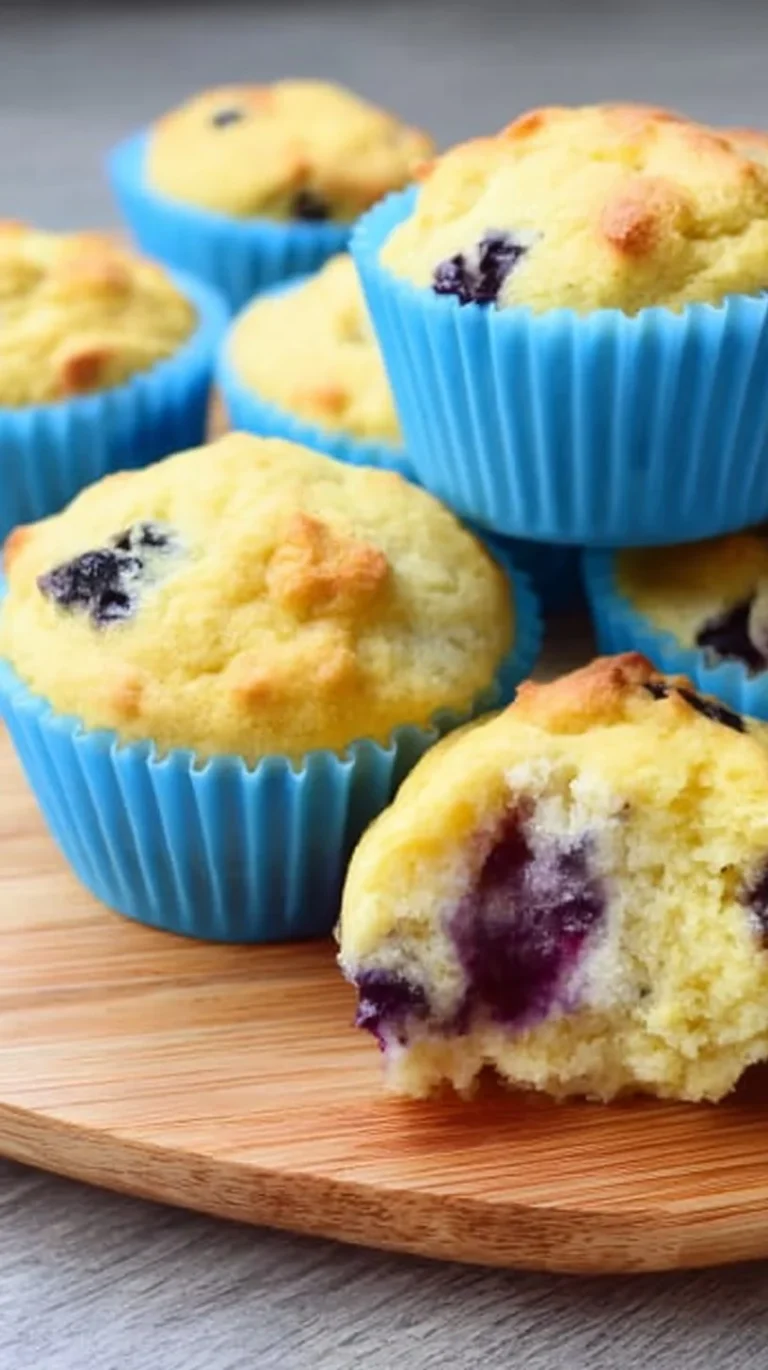
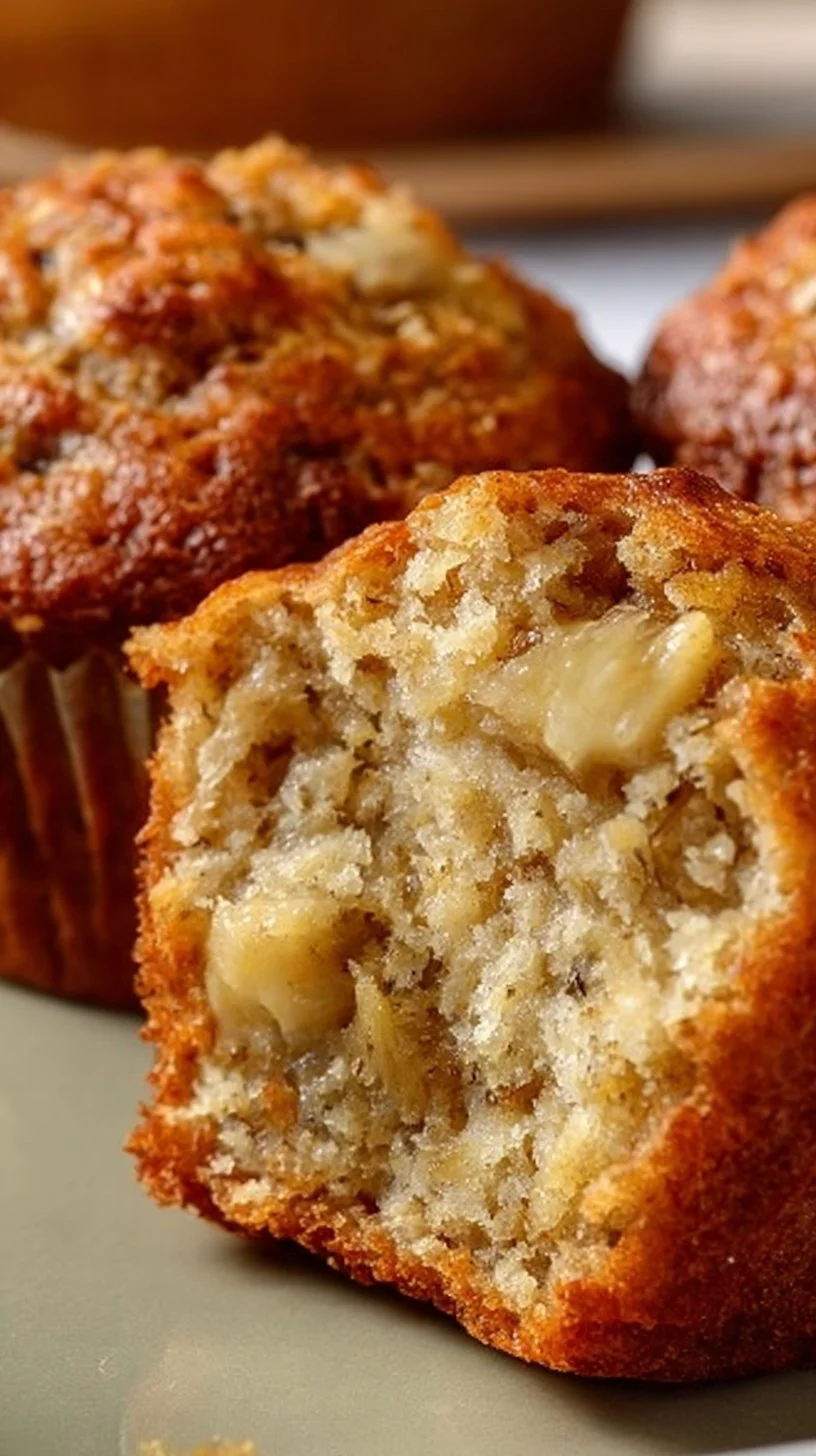
Healthy Greek Yogurt Banana Muffins, Bake a Dozen!
If you’re balancing school drop-offs, work calls, and the evening soccer practice, you want food that’s dependable, quick, and liked by everyone at the table. These Healthy Greek Yogurt Banana Muffins, Bake a Dozen! are one of those recipes I return to again and again for that very reason. They have the cozy, familiar flavor of banana muffins — the kind of treat kids grin about — but with a little extra everyday goodness that makes them smart for busy family life: a scoop of Greek yogurt for creaminess, ripe bananas for natural sweetness, and a simple batter that comes together in one go.
I love that these muffins work in so many parts of a week: pop a few into lunchboxes for school, tuck one into your own coffee cup as a tidy prep-and-go breakfast, or bring a plate to a neighbor’s gathering where both kids and adults will happily reach for seconds. They’re the kind of recipe you can trust to behave — this batter is forgiving, and the muffins bake up reliably even if you’re half-distracted by a homework emergency. When I’m prepping snacks ahead, I often pair them with something chilled from the freezer for a balanced mini-meal; for a quick idea, try a ready-made frozen yogurt bite like the frozen Greek yogurt peanut butter bites I sometimes keep on hand.
Throughout this post I’ll walk through what to expect at each stage, the small things to watch for, and the ways these muffins fit into real family routines — not as a precious, rare dessert, but as a reliable, everyday recipe you’ll feel confident making.
How to make Healthy Greek Yogurt Banana Muffins, Bake a Dozen!
Making these muffins is straightforward: mash, mix, combine, bake — and you’ll have a dozen ready before the kids finish one show. Here’s the simple arc you can expect and where a little attention helps.
Start by prepping your bananas and measuring ingredients so you’re not juggling sticky bowls and buzzing timers. Mash the bananas first; that gives you a sense of texture right away and prevents overmixing later. Mixing the yogurt, honey, egg, and vanilla into the mashed bananas forms the wet base that keeps these muffins tender — it’s quick and forgiving, so you don’t need to fuss.
In a separate bowl, whisking the dry ingredients gets the baking soda distributed evenly. Once the wet and dry are combined, fold gently. This isn’t a meringue or a delicate cake batter where you’re trying to keep air in: you’re aiming for a homogenous mixture without rubbery gluten development, so a few streaks are fine. If you like, fold in chocolate chips or nuts at the end for variety.
If you’re new to muffins, slow down when you’re filling the cups — it helps to use an ice cream scoop or a large spoon to portion evenly so every muffin bakes within the same time. Bake until the tops are set and a toothpick comes out cleanish with a few moist crumbs; overbaking dries them out, and underbaking leaves them too gummy.
For busy families who love to keep things simple, these muffins are a great platform for small swaps and tweaks without compromising the basic method. If you want to pair them with other ready-to-serve yogurt treats for snack time, I often keep simple frozen bakes nearby like this high-protein frozen peanut butter Greek yogurt bite recipe idea in the freezer for a quick combo plate.
Ingredients
2 ripe bananas, 1 cup Greek yogurt, 1/4 cup honey, 1 egg, 1 teaspoon vanilla extract, 1 1/2 cups all-purpose flour, 1 teaspoon baking soda, 1/2 teaspoon salt, Optional: chocolate chips or nuts
Each ingredient in this list is playing a straightforward role, and that’s one reason this recipe is so reliable.
- Bananas: They bring natural sweetness, moisture, and banana flavor — and ripe ones are easier to mash and mix in evenly. If the bananas have dark flecks or spots, that’s perfect; they’ll be sweeter and more aromatic.
- Greek yogurt: It adds moisture and a little tang, and helps keep the crumb tender even without adding much fuss. Yogurt also reacts gently with the baking soda to give a good rise.
- Honey: This supplies sweetness and a touch of sticky richness that warms up the banana flavor without needing refined sugar.
- Egg: The egg binds the batter and gives structure so the muffins rise with a soft, reliable crumb.
- Vanilla extract: Small but important — it lifts the flavors and makes the muffins smell homey and familiar.
- All-purpose flour: The backbone of the muffins. It gives structure but the recipe isn’t doing anything fancy with the proteins, so the texture stays soft.
- Baking soda: The leavening that reacts with the yogurt and banana to help the muffins rise quickly.
- Salt: Balances the sweetness and enhances the overall flavor.
- Optional chocolate chips or nuts: Completely optional, but a small handful of chocolate chips adds joy for kids, while nuts add a subtle crunch and a grown-up note.
If you enjoy making other simple yogurt-based treats, you’ll find the same pantry staples show up again and again — for instance, I make chocolate-strawberry yogurt clusters as an easy after-school nibble that uses similar ingredients and a few minutes in the freezer (chocolate-strawberry yogurt clusters).
Directions
Preheat your oven to 375°F (190°C).
Mash bananas in a bowl.
Mix in yogurt, honey, egg, and vanilla.
In a separate bowl, whisk together flour, baking soda, and salt.
Combine wet and dry ingredients.
Fold in chocolate chips or nuts, if using.
Fill muffin cups.
Bake for 18-20 minutes.
Let cool before eating.
Those are the exact steps, kept simple so you can read them at a glance. Now a little practical color for each line so you know what “right” looks like.
- Preheat your oven to 375°F (190°C). — Always preheat before you start mixing so the oven is ready the moment your batter is filled. A hot oven helps the muffins rise well.
- Mash bananas in a bowl. — You can use a fork or the back of a spoon; aim for mostly smooth bananas with a few small chunks if you like texture. Overly chunky banana pieces can create wet pockets, but a few bits are fine.
- Mix in yogurt, honey, egg, and vanilla. — This forms a uniform, pourable wet mixture. The honey may sit on the surface at first; stir until it’s dissolved into the yogurt and banana.
- In a separate bowl, whisk together flour, baking soda, and salt. — Whisking keeps the baking soda from clumping and ensures even rise.
- Combine wet and dry ingredients. — Stir until the flour is no longer streaky. Small lumps are okay; don’t overmix.
- Fold in chocolate chips or nuts, if using. — Add last to avoid drawing out flour’s gluten. If using chocolate chips, tossing them in a teaspoon of flour first can prevent sinking.
- Fill muffin cups. — Use an ice cream scoop or tablespoon; even portions make for even baking. Line the pan or grease well to prevent sticking.
- Bake for 18-20 minutes. — Start checking at 18. A toothpick inserted should come out with a few moist crumbs but not wet batter.
- Let cool before eating. — They taste better when slightly cooled; the crumb firms up and slices cleanly.
If anything goes sideways — the muffins seem overly wet or dense — the usual culprits are underbaking, too-large banana chunks, or overmixing. Gentle handling and timed baking usually fix those problems. For a chocolate-forward family, I sometimes pair these muffins with a stash of simple brownies made with Greek yogurt to balance out sweetness and pack a bit more texture (Greek yogurt brownies).
Why families love this dish
These muffins hit a few practical sweet spots for family cooking. First, the flavors are familiar: banana and a hint of vanilla are universally comforting, and the honey makes them sweet without being cloying. Kids recognize the taste and adults appreciate the modest ingredient list.
They’re also versatile. Serve them warm from the oven with a smear of butter for weekend breakfasts, or cool them and pack two into lunchboxes with a piece of fruit. They double as a late-afternoon pick-me-up that feels like a treat without needing a lot of prep time. Because the batter is forgiving, less experienced cooks can make them confidently — which is important when you don’t have the luxury of trying a new technical recipe on a school night.
Another reason families reach for this recipe often is that it’s adaptable. The optional add-ins let you accommodate preferences without changing the base: chocolate chips for the kids, chopped nuts for adults, or keep them plain for picky eaters. Those simple choices make the muffins fit many appetites without complicating the process.
Make-ahead tips, leftovers, and storage
One of my favorite things about this recipe is how well the muffins behave off the oven rack. They store nicely and are friendly to be prepped ahead.
- Short-term storage: Keep muffins in an airtight container at room temperature for up to two days. They’ll stay soft and pleasant — just don’t keep them exposed to air, or they’ll dry out.
- Refrigeration: If you want to extend them a little, refrigerate for up to five days. Let them come to room temperature or warm gently before serving so they’re not too firm.
- Freezing: These muffins freeze very well. Wrap individual muffins in plastic wrap or place them in a freezer bag, and they’ll keep for up to three months. Thaw overnight in the fridge or at room temperature for a couple of hours. For a quick warm snack, microwave a thawed muffin for 15–20 seconds.
- Reheating without drying: If you’re reheating from the fridge or freezer, a brief microwave zap covered with a slightly damp paper towel keeps moisture in. Alternatively, pop them into a 325°F oven for 5–8 minutes to restore a just-baked texture.
For school lunches, I often freeze a batch flat in a single layer, then transfer to a bag — that way I can pull out just the number I need and the rest stays fresh. They’re great paired with a yogurt cup, a small salad, or simple cheese and fruit for a balanced snack.
Common questions home cooks ask about this recipe
Q: My muffins came out too dense. What went wrong?
A: The most common reasons are overmixing the batter, not preheating the oven, or using oversized bananas that add too much moisture. Stir just until combined and follow the baking time closely.
Q: Can I use a different sweetener instead of honey?
A: You can, but remember the recipe’s balance depends on the honey’s moisture and flavor. Maple syrup or a mild liquid sweetener will work similarly, though it may slightly alter the taste.
Q: How do I scale the recipe up or down?
A: This batter scales well. If you want half the batch, halve each ingredient. If you double, bake in two pans and rotate them in the oven to keep the bake even. Keep an eye on baking time — larger batches sometimes need a minute or two more.
Q: Can I make these gluten-free or use whole wheat flour?
A: Those are reasonable swaps, but they’re not part of the original ingredient list. If you try a 1:1 gluten-free flour, expect a slightly different crumb; whole wheat will make the muffins heartier and may need a touch more moisture.
Q: How ripe should the bananas be?
A: The riper, the better. Brown-spotted bananas are sweeter and mash easily, giving better flavor and texture.
Q: My muffins sank after coming out of the oven. Why?
A: That usually means the oven temperature was too low, or the batter was overfilled. Make sure the oven is fully preheated and fill cups about two-thirds full.
These are practical, fixable issues — nothing a little practice won’t smooth out. The recipe was designed to be approachable, so you can make these on a weekday evening without stress.
Final thoughts from Sarah
If you’re building a collection of family-friendly recipes, these Healthy Greek Yogurt Banana Muffins deserve a regular spot. They’re quick, forgiving, and comforting — and they let you be a little flexible around busy schedules without sacrificing the feeling of a warm, homemade bite. Keep some bananas on the counter for ripening, and you’ll always have an easy go-to for breakfast or snacks.
I hope you give them a try this week — and if you do, tuck a few in the freezer so you can grab-and-go when mornings get hectic. From one busy cook to another: simple recipes like this make a real difference in day-to-day life, and they’re kind to everyone at the table.
Warmly,
Sarah Collins
Conclusion
For another take on this idea, you might enjoy trying a similar version found in Creme De La Crumb’s Greek Yogurt Banana Muffins recipe, which highlights the same homey flavors. If you’re curious about small-batch options and different ways to keep muffins lighter for a week of snacks, see this Healthy Banana Muffins (Small Batch) write-up for ideas on scaling and ingredient tweaks. And for inspiration on how Greek yogurt can shift the texture in quick breads, take a look at this Greek Yogurt Banana Bread variation.
Healthy Greek Yogurt Banana Muffins
Ingredients
Method
- Preheat your oven to 375°F (190°C).
- Mash bananas in a bowl until mostly smooth.
- Mix in yogurt, honey, egg, and vanilla until combined.
- In a separate bowl, whisk together flour, baking soda, and salt.
- Combine wet and dry ingredients, stirring until flour is no longer streaky; small lumps are okay.
- Fold in chocolate chips or nuts, if using.
- Fill muffin cups evenly with the batter.
- Bake for 18-20 minutes or until a toothpick inserted in the center comes out with a few moist crumbs.
- Let muffins cool before eating.