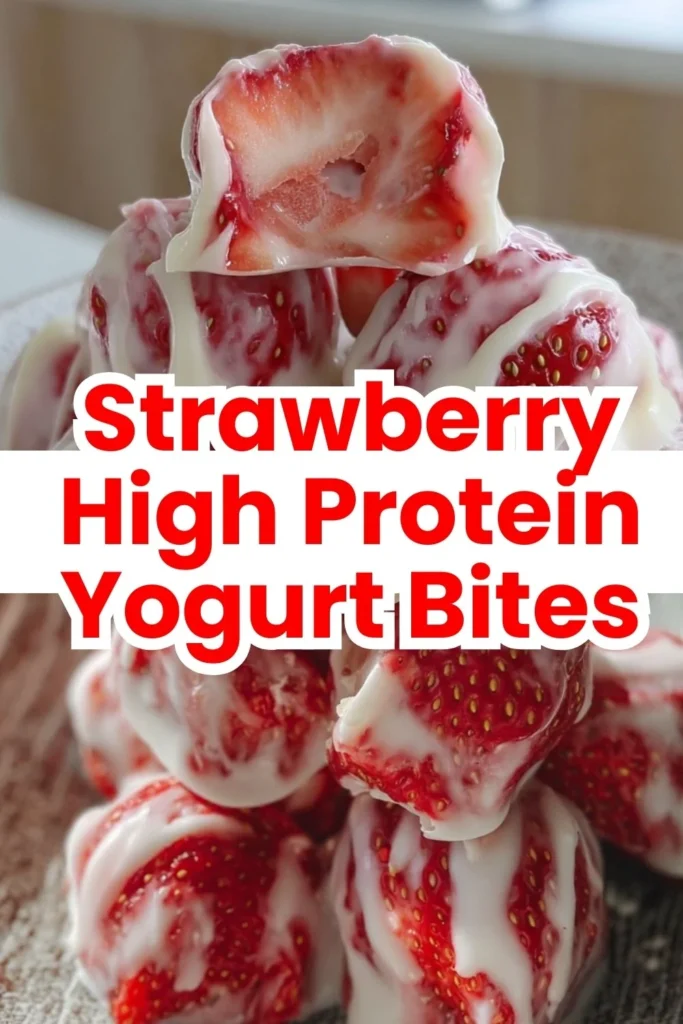
Strawberry High Protein Yogurt Bites

Introduction
This little recipe for Strawberry High Protein Yogurt Bites is exactly the kind of snack I love to teach: simple, friendly, and forgiving. It’s for anyone who wants a healthy, grab-and-go treat without complicated equipment or a long ingredient list. If you’re new to the kitchen, coming back after a break, or worried about “messing it up,” this is a great place to rebuild confidence — the steps are short, the results are quick, and small imperfections won’t ruin the snack.
What makes this recipe approachable is that you can see everything as you go — creamy yogurt, bright chopped strawberries, a touch of sweetness — and each step is obvious when you pay attention. I’ll walk you through why each action matters, what to watch for, and how to get consistent results the first time.
Why this recipe is easy to get right
This recipe is forgiving for several reasons. First, it uses familiar ingredients that don’t react in tricky ways — yogurt, fruit, a little sweetener, and optional add-ins. There’s no heat to manage, no timing-sensitive rising or caramelizing, and no complicated mixing techniques. You’ll mostly be combining, spooning, and freezing.
Second, the recipe tolerates variation. If your strawberries are chunkier or your yogurt a touch runnier, you’ll still get tasty bites. The freezer stage solidifies the texture, so small differences at the mixing stage become less noticeable. Finally, the tools are simple — a bowl, spoon, and silicone molds or ice cube trays — so you aren’t overwhelmed by unfamiliar gadgets.
These aspects mean that your first try is likely to succeed. The key is to slow down at three checkpoints I’ll point out below: mixing until smooth, folding in fruit gently, and making sure the bites are fully frozen before unmolding.
How to make Strawberry High Protein Yogurt Bites
Overall process: first you mix the base, then you fold in the fruit, you fill molds, add any crunchy topping, freeze, and finally enjoy. Each stage is short, but each has a purpose.
- First: Combine the yogurt, honey (or maple syrup), and vanilla. This creates a slightly sweet, scented base that will hold the strawberries and set up well in the freezer. When you mix, you’re aiming for an even, creamy texture so that every bite has the same flavor.
- Next: Fold in the chopped strawberries. Folding — rather than vigorous stirring — keeps the fruit pieces intact and distributes them evenly without crushing them into pulp. You’ll see glimpses of pink in the white yogurt; that’s perfect.
- Then: Spoon into molds. Use silicone molds or a tray with defined wells. You’re packing a small scoop into each cavity, smoothing the surface a bit so the bites freeze uniformly.
- After that: Top with granola or nuts if you’re using them. This gives a contrasting crunch and visual appeal. A light sprinkle is all that’s needed — too much can freeze hard and make the bites harder to eat.
- Finally: Freeze long enough for the centers to be solid, then pop out and enjoy.
Where beginners should slow down: take your time mixing the yogurt so there are no streaks of sweetener or vanilla. When folding the strawberries, use a gentle lift-and-fold motion so the fruit keeps its shape. When filling molds, work on a flat surface so each cavity fills evenly.
Ingredients
1 cup Greek yogurt, 1 cup fresh strawberries, chopped, 2 tablespoons honey or maple syrup (optional), 1/2 teaspoon vanilla extract, 1/4 cup granola or nuts (optional)
Each ingredient plays a small but important role:
- 1 cup Greek yogurt: This is the base. Greek yogurt is thicker and higher in protein than regular yogurt, so it freezes into a creamy, satisfying bite instead of a slushy mess. Its tang balances the sweetness of the berries and honey.
- 1 cup fresh strawberries, chopped: Fresh strawberries add natural sweetness, texture, and color. Chopping them lets you control how chunky the bites will be — smaller pieces create a smoother texture, larger pieces give more fruit in every bite.
- 2 tablespoons honey or maple syrup (optional): This soft sweetening is optional because strawberries and yogurt may already be sweet enough for you. Adding sweetness adjusts the flavor to your taste and helps the frozen bites feel more dessert-like. Honey and maple syrup dissolve easily into the yogurt.
- 1/2 teaspoon vanilla extract: Vanilla lifts the flavor profile and makes the bites taste a little more like a treat. It’s small in quantity but helps everything taste rounded.
- 1/4 cup granola or nuts (optional): This adds crunch and contrast. Since nuts and granola don’t soften in the freezer, they give a pleasant bite to the frozen pieces. Use them sparingly as a topping, not mixed in as the primary ingredient.
None of these ingredients are intimidating — they’re pantry- and fridge-friendly, easy to measure, and you can see exactly how they’re working together as you prepare the mixture.
Directions
- In a bowl, mix Greek yogurt, honey, and vanilla extract until well combined.
- Fold in the chopped strawberries.
- Spoon the mixture into silicone molds or ice cube trays.
- Top with granola or nuts if using.
- Freeze for at least 2-3 hours or until solid.
- Pop the bites out of the molds and enjoy as a healthy snack!
Supportive guidance around these steps:
- Step 1: When you mix the Greek yogurt, honey, and vanilla extract, aim for a uniform, pale pink or white mixture depending on how much you stir. Use a spatula or spoon and scrape the sides of the bowl so there aren’t pockets of honey or vanilla. The mixture should look smooth and glossy — that visual means the flavors are evenly distributed.
- Step 2: Folding in the strawberries means gently combining the fruit with the yogurt. Use a folding motion: scoop from the bottom, bring the mixture over the fruit, and turn the bowl as you go. You’ll see streaks of pink develop where the strawberry juices meet the yogurt — that’s normal. Stop folding when the fruit is distributed evenly; you don’t need to mash the berries.
- Step 3: Spoon the mixture into silicone molds or ice cube trays. A small cookie scoop or spoon works well. Fill each cavity nearly to the top but not overfull — a little space lets the mixture expand as it freezes. If you’re using a hard plastic tray, you may want to line it with plastic wrap and press the mixture gently to make removal easier.
- Step 4: If you add granola or nuts, sprinkle them lightly on top. Press them in very gently with the back of the spoon so they stick when frozen but don’t sink and clump.
- Step 5: Freeze for at least 2-3 hours or until solid. The exact time depends on your freezer and the size of the bites. Smaller molds can set faster; larger wells will need more time. You’re aiming for a firm center that doesn’t give when you press it.
- Step 6: Pop the bites out of the molds and enjoy as a healthy snack! Silicone molds usually release easily — gently push from the bottom. If they resist, let them sit at room temperature for a minute or run the bottom of the mold briefly under cool water (not warm) to help release them.
If the bites don’t look perfectly shaped or the topping is a little uneven, that’s okay — they’ll still taste great. Small surface imperfections often disappear after a few minutes at room temperature.
Key techniques you’ll practice in this recipe
Though simple, this recipe reinforces a few useful kitchen techniques:
- Mixing to an even consistency: learning to mix thoroughly without overworking ingredients is a useful habit. You’ll get better at noticing smooth textures and even color.
- Folding fruit into a base: this gentle mixing method preserves texture and prevents fruit from turning to mush — useful for making fruit-filled batters, salads, or delicate sauces.
- Portioning into molds: practicing controlled spooning or scooping helps with consistent portion sizes and presentation.
- Freezer timing and unmolding: you’ll learn how freezer time varies by size and how to ease frozen items out of molds without damage.
Each of these steps is straightforward, but getting comfortable with them transfers directly to other no-bake or freezer-friendly recipes.
Common mistakes and how to avoid them
A few small missteps can pop up, especially for new cooks. Here’s how to handle them without stress:
- Mistake: Honey or vanilla isn’t fully mixed and you get a sweet pocket. Fix: Take an extra 10–15 seconds to scrape the bowl and stir until the mixture is uniform. Honey can sit in a sticky bead if not combined well.
- Mistake: Fruit pieces are too large and hard to bite when frozen. Fix: Chop the strawberries a bit finer next time — think about the size you’d like in your mouth when cold. If the batch is already frozen, let bites sit for 2–3 minutes at room temperature before eating; they soften quickly.
- Mistake: Bites are stuck in the mold and tear when you pull. Fix: Warm your hands slightly and push from the bottom of silicone molds, or set the mold on the counter for a minute to loosen. Avoid hot water — hot will melt the yogurt.
- Mistake: Granola or nuts sink to the bottom. Fix: Add crunchy toppings after filling molds, pressing lightly on top so they sit on the surface instead of being mixed in.
- Mistake: Uneven freezing (solid edges, soft center). Fix: Ensure bites are fairly even in size and your freezer isn’t overloaded with warm items at the same time. Rotate the tray once during the first hour if your freezer has uneven cold spots.
If something goes off track, remember there’s usually an easy fix that doesn’t require starting over: stir a bit more, chop a bit more, or give the bites a few extra minutes in the freezer.
How to adjust confidently without changing the recipe
You asked for flexibility while keeping ingredients and steps unchanged — here’s how to think about adjustments conceptually:
- Portion scaling concepts: To make more bites, double the quantities in your head (two bowls or a larger bowl helps). Freeze in batches so the freezer can chill each tray quickly. For fewer bites, halve the mixture and use a single mold.
- Flavor preference adjustments: If you prefer sweeter bites, use the full 2 tablespoons of honey or maple syrup; if you like tartness, stick with less or omit it. Vanilla gives warmth; if you love it, ensure it’s evenly mixed rather than adding more.
- Texture tweaks — conceptually only: Chop strawberries finer for a creamier feel, or keep them chunkier for more fruit texture. Add the granola or nuts sparingly for a light crunch. Remember that any added crunch will stay crunchy frozen, so consider how that will feel when chilled.
These adjustments don’t change the ingredients or steps, but they help you dial the recipe to your household’s tastes confidently.
Serving, storage, and reheating made simple
Serving: Serve straight from the freezer as a cold, refreshing snack. Let a plate sit at room temperature for a minute if you want the bites just a touch softer. They pair well with a cup of tea, a smoothie, or as a small dessert after a meal.
Storage: Store the frozen bites in their molds in the freezer for short-term storage. For longer storage, place the frozen bites in an airtight container or a resealable freezer bag in a single layer or separated by parchment to prevent sticking. Properly stored, they should keep well for up to 2-3 weeks, though best flavor and texture are within the first week.
Reheating: These are best eaten frozen — there’s no reheating necessary. If you want them softer, let them sit at room temperature for a couple of minutes or pop a few into the refrigerator for 20–30 minutes to thaw slightly. Avoid microwaving, as yogurt can separate and lose the intended texture when quickly heated.
Questions new cooks often ask about this recipe
- How long exactly should I freeze them? At least 2–3 hours is the guideline, but small molds may firm up sooner. The simplest check: press the surface gently — it should feel firm and not leave an indentation.
- Can I use flavored yogurt? Yes, but keep in mind flavored yogurts add sweetness and additional flavors that will change the final taste. The texture will freeze similarly.
- What if my molds are plastic and the bites stick? For plastic molds, try lining the cavities with plastic wrap or place a sheet of parchment over the tray and press the mixture into wells. Silicone is easiest for unmolding.
- Is it normal if some bites have more fruit than others? Yes — small inconsistencies are normal. Aim for even scoops when filling molds to minimize this.
- Can children help? Absolutely. This recipe is a great kitchen activity for kids — they can mix, spoon into molds, and sprinkle toppings under supervision.
If a result feels off, pause and ask what specifically looks different: texture, firmness, or flavor. Most issues have simple fixes that don’t require starting over.
Final encouragement from Carla
You don’t need perfect tools or perfect measurements to make this recipe work. The steps are short, forgiving, and teachable. If your first tray looks a little imperfect, remind yourself that the taste is what matters — and that’s usually excellent. Each small attempt builds your kitchen confidence: you’ll learn what consistency to look for, how to fold without squashing fruit, and how long your freezer needs to set a bite.
Keep this recipe in your rotation as a low-stakes way to practice simple techniques. Celebrate the wins — even a little batch that looks rustic is still a wholesome snack you made yourself. Cooking is about repetition, friendly curiosity, and forgiving yourself when things aren’t textbook-perfect. You’re doing great.
Warmly,
Carla Carter
Founder & Recipe Developer, RecipesCabin
Conclusion
If you’re curious about a chocolate-strawberry twist that uses similar freezing ideas, this take on Chocolate Strawberry Yogurt Clusters (Viral Recipe!) shows how a melted chocolate layer can be combined with berry-flavored yogurt for a different texture. For another straightforward walk-through of frozen strawberry yogurt bites you can make in minutes, see this practical guide to Frozen Strawberry Yogurt Bites in Under 10 Minutes.
Strawberry High Protein Yogurt Bites
Ingredients
Method
- In a bowl, mix Greek yogurt, honey, and vanilla extract until well combined.
- Fold in the chopped strawberries gently to preserve their shape.
- Spoon the mixture into silicone molds or ice cube trays.
- Top with granola or nuts if using.
- Freeze for at least 2-3 hours or until solid.
- Pop the bites out of the molds and enjoy as a healthy snack!