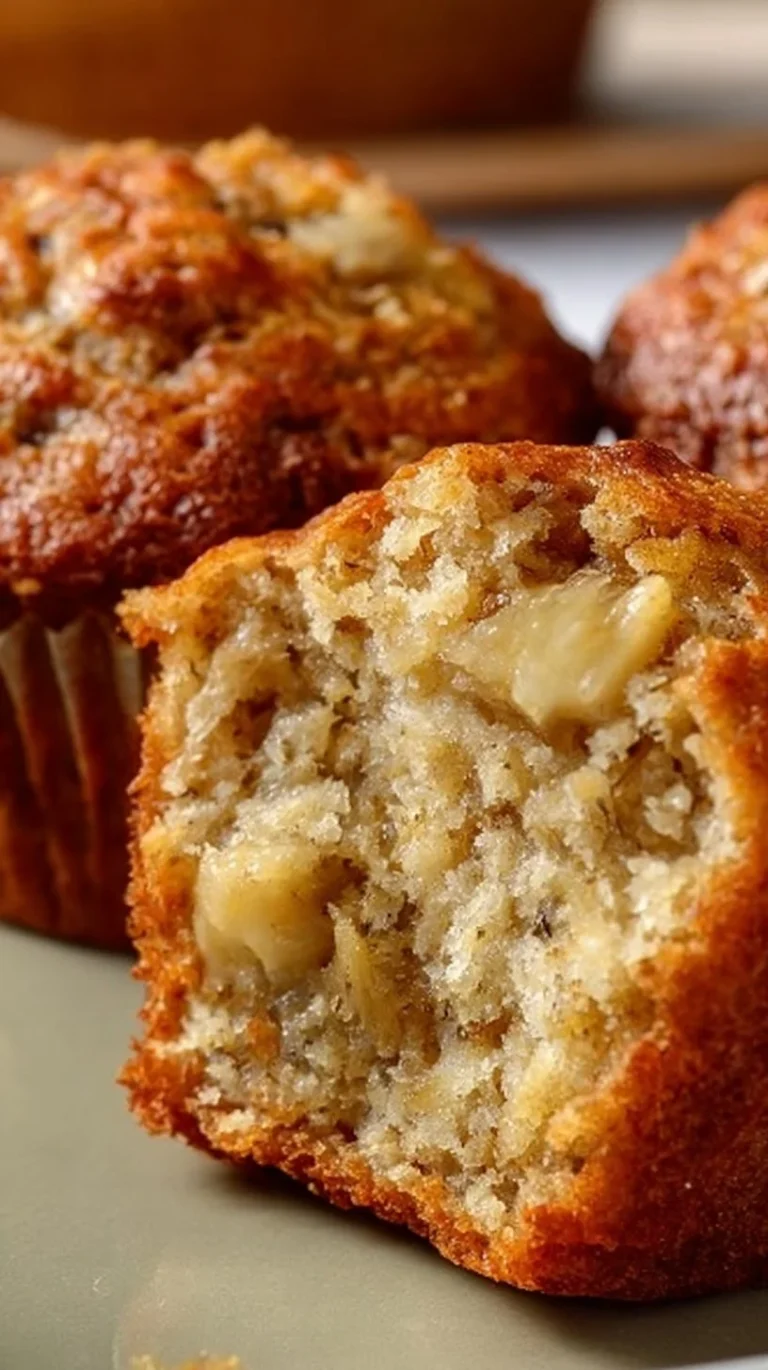
High-Protein Chocolate Banana Bread

Hi — I’m Sarah Collins. If your week is anything like mine, you need recipes that are honest, comforting, and easy to fold into a busy family rhythm. High-Protein Chocolate Banana Bread is one of those quietly brilliant recipes: it takes a handful of pantry staples and ripe bananas, turns them into something warm and familiar, and gives everyone a little more staying power between meals. The chocolate-banana combo feels like a treat to kids, while the protein boost helps adults feel satisfied without fuss. It’s a real go-to for breakfasts, after-school snacks, or a quick dessert after dinner.
This recipe works in lots of practical ways. Make it on a weekend afternoon while the kids are playing, or pull it together during nap time — it won’t demand much hands-on fuss. It’s forgiving if your bananas are a touch less ripe than ideal, and it’s kind to busy ovens: 30–35 minutes and you’re mostly done. If you like recipes that lead to friendly, predictable results, you’ll appreciate how this one behaves across different kitchens and schedules. If you enjoy other comforting chocolate recipes, you might also like a simple chocolate spice cake I often turn to for special occasions chocolate spice cake that uses similar pantry-friendly thinking.
I’ll walk you through what to expect at every stage, the small mistakes worth avoiding, and how to make this fit into a real family’s week without drama.
How to make High-Protein Chocolate Banana Bread
Think of this as a three-part process: prepare, mix, and bake. First, get the pan ready and set your oven temperature so the rest of the work is smooth. Second, mash the bananas and combine the dry and wet ingredients into one batter — no complicated folding or tempering. Third, bake and cool. The result is a chocolatey loaf that slices well and travels well.
At the "prepare" stage, it’s mostly about being organized: preheat the oven, line the loaf pan, and have your ingredients measured. That set-up habit saves time and keeps things calm — especially useful when there’s a curious little helper nearby.
During the "mix" stage, you want an even, homogenous batter. You’re not trying to aerate like when making a cake—just aim for everything incorporated. Overmixing here isn’t catastrophic, but mixing just until combined avoids a tough crumb.
In the "bake" stage, trust your oven and watch for the toothpick test. Ovens vary, so check around the lower end of the suggested time if your oven runs hot, and add a few minutes if needed. Cooling is part of the success: slicing too soon can make the loaf fall apart or feel gummy. Let it rest long enough to set — patience here gives you neat slices that hold up in lunchboxes.
Where beginners should slow down: measuring flour substitutes, checking the loaf for doneness, and allowing a proper cool-down. Where shortcuts exist: using a bowl and spoon instead of a stand mixer, or lining the pan with parchment instead of greasing heavily. These small choices keep the recipe simple and reliable.
Ingredients
3 ripe bananas, 1 cup cocoa powder, 1 scoop protein powder, 1 cup almond flour, 1/2 cup honey or maple syrup, 1 teaspoon baking soda, 1 teaspoon vanilla extract, Pinch of salt
Here’s what each ingredient brings to the party in plain home-cook terms:
- 3 ripe bananas: They’re the backbone of flavor and moisture. Riper bananas are sweeter and easier to mash, which helps the loaf hold together and taste rich without extra sugar. If the peels are heavily spotted, even better — they add sweetness and depth.
- 1 cup cocoa powder: This gives the bread its chocolate identity. Use unsweetened cocoa for the most flexible flavor — it lets the banana and the sweetener balance the loaf naturally.
- 1 scoop protein powder: Adds extra protein and body. It helps the crumb feel a little more substantial, which is great for morning slices that need to last until lunch. Flavored or unflavored powders will shift the taste slightly; I’ll mention swaps later.
- 1 cup almond flour: Almond flour contributes tenderness and a gentle, slightly nutty flavor. It makes the bread moist without needing as much liquid, and it keeps the texture pleasantly dense rather than cakey.
- 1/2 cup honey or maple syrup: This is the sweetener. Honey gives a warmer, floral sweetness; maple syrup offers a rounded, caramel-like note. Either keeps the bread tender and helps with browning.
- 1 teaspoon baking soda: A little lift so the loaf isn’t flat. With the acid in ripe bananas and some sweeteners, baking soda helps create a light rise without a big dome.
- 1 teaspoon vanilla extract: Small but important — vanilla rounds and highlights the chocolate and banana.
- Pinch of salt: Salt sharpens and balances sweetness; don’t skip it, even in sweet quick breads.
These are all common pantry items that combine into something reliable and comforting. If you keep a few ripe bananas in the freezer, this bread becomes even more of a handy weeknight or weekend solution.
Directions
- Preheat your oven to 350°F (175°C) and line a loaf pan with parchment paper., 2. In a mixing bowl, mash the ripe bananas until smooth., 3. Add the cocoa powder, protein powder, almond flour, honey or maple syrup, baking soda, vanilla extract, and salt to the mashed bananas., 4. Mix until all ingredients are well combined., 5. Pour the batter into the prepared loaf pan and smooth the top., 6. Bake for 30-35 minutes, or until a toothpick inserted into the center comes out clean., 7. Allow to cool before slicing. Enjoy your high-protein chocolate banana bread!
Here’s the friendly guidance to go with those steps:
- Step 1: Preheat and line. Make sure your oven reaches 350°F before the loaf goes in. Lining with parchment saves time later and ensures easy release — no need to fuss with greasing and scraping.
- Step 2: Mash the bananas. Use a fork or potato masher; you want them mostly smooth with a few small lumps that add texture. If your bananas are colder from the fridge or freezer, let them warm briefly so they mash easily.
- Step 3: Add the rest. Sprinkle the dry items in and the wet ones too; they’ll come together quickly. If you’re using a flavored protein powder, don’t be surprised if the batter smells richer or a bit different — that won’t harm the loaf.
- Step 4: Mix gently. Stir until there aren’t any large streaks of almond flour or cocoa. A few tiny streaks are fine; overmixing can make the bread tougher.
- Step 5: Smooth top. Tap the pan gently on the counter once or twice to settle air bubbles. A smooth top bakes more regularly.
- Step 6: Bake and test. The toothpick test is your friend: if it comes out clean or with a few moist crumbs, the loaf is ready. If there’s wet batter, give it another 3–5 minutes and check again.
- Step 7: Cool before slicing. Cooling on a rack for at least 20–30 minutes helps the crumb set. If you slice too soon, it may be sticky; a little patience gives the best-looking slices.
Common small mistakes to avoid: baking at the wrong temperature because the oven wasn’t preheated; overmixing the batter; or slicing while too warm. These are fixable and not worth fretting over — the loaf still tastes good even if it’s a touch imperfect.
Why families love this dish
Families gravitate toward this bread for a few comforting reasons. First, chocolate and banana are familiar, nearly universal flavors — kids smile when they see it, and adults appreciate the nostalgia. Second, it’s portable: slices fit into lunchboxes and backpacks, and it travels well for picnics or potlucks. Third, the texture is forgiving — not too dense, not too fragile — making it acceptable for little hands and busy mornings.
It’s also versatile across meal moments. Serve it warm with a smear of peanut butter for protein and fat to round a morning snack. Slice it thin for a quick dessert portion after dinner or stack thick slices for a family brunch. Because the loaf isn’t overly sweet or fussy, everyone can find a way to enjoy it.
Parents like that it’s made from ingredients that most households already have, and it doesn’t require special equipment. It’s satisfying, reliable, and kind of soothing — the kind of recipe that reduces decision fatigue on busy days.
Smart substitutions and simple variations
You asked about swaps — smart ones won’t upset the recipe’s balance:
- Protein powder: If you don’t have a scoop of protein powder, you can use a little extra almond flour in a pinch, though the texture will be slightly different. Flavored powders (chocolate or vanilla) will make the loaf richer; if using an especially sweet powder, you could reduce the sweetener slightly, but this recipe is forgiving.
- Almond flour: If someone in your family prefers a different texture, fine oat flour can be used, keeping in mind it will absorb moisture differently. Start by swapping half and see how the batter feels — it may need a touch longer in the oven.
- Sweetener: Honey or maple syrup are both listed; use whichever you have. If you prefer a less sweet loaf, you might try reducing to 1/3 cup, but the loaf will be less glossy and slightly drier.
- Bananas: If your bananas aren’t ripe enough, gently microwave them for 20–30 seconds to soften, or roast them in a 375°F oven for 10–15 minutes until the skins turn dark for an extra-deep banana flavor.
- Add-ins (optional): While the base recipe is unchanged, families often like stirring in a handful of chocolate chips or chopped nuts. These are kid-friendly additions that don’t complicate the core recipe.
For picky eaters, keep slices plain at first; once they warm to the flavor, small changes like a smear of nut butter or yogurt on the side make the loaf feel new without changing the base recipe.
Pairing ideas for a complete, satisfying meal
This loaf can stand alone as a snack or be part of a simple plate. For breakfast, pair a slice with a hard-boiled egg or a spoon of Greek yogurt and fruit for balanced satiety. For an after-school treat, serve with apple slices and a handful of almonds.
If you want a savory-sweet evening pairing that’s quick, consider a simple green salad dressed with olive oil and lemon to balance the loaf’s richness, or a container of cottage cheese and veggies for a protein boost. For a weeknight family combination that’s both easy and filling, a quick high-protein cottage cheese pizza bowl pairs surprisingly well with a slice of something sweet like this loaf easy high-protein cottage cheese pizza bowl — both are quick to assemble and pleasing to a range of tastes.
Keep sides simple: fresh fruit, chopped raw veggies, or a small handful of nuts let everyone create a plate that suits their appetite.
Make-ahead tips, leftovers, and storage
This bread travels well through time. Cool completely, then wrap tightly in plastic wrap or store in an airtight container at room temperature for 2–3 days. For longer storage, slice and freeze wrapped pieces for up to 2 months; thaw at room temperature or warm briefly in a toaster oven.
To reheat without drying out: microwave a single slice for 10–15 seconds, or warm at low heat in a 300°F oven for 5–7 minutes. If you plan to use it for lunchboxes, a frozen slice tucked into a lunchbox in the morning will be nicely thawed and ready by lunchtime.
Leftover ideas: crumble a slice into yogurt for a quick parfait, or toast and top with nut butter for a sturdier snack. The bread’s chocolate-banana flavor pairs nicely with plain or vanilla yogurt and fresh berries for an ad-hoc dessert.
Common questions home cooks ask about this recipe
Q: My loaf was gummy in the middle — what went wrong?
A: Most likely it wasn’t baked long enough or the oven temperature was slightly low. Check with a toothpick and allow extra minutes if the test shows wet batter. Also ensure bananas weren’t overly watery from thawing.
Q: Can I double the recipe?
A: Yes, double it and bake in two loaf pans for even baking. If you try a single large pan, baking time will increase and density may change, so two loaves keep things predictable.
Q: Can I use regular flour?
A: Regular all-purpose flour will work differently — it will absorb liquid differently and give a lighter crumb. If swapping, start with a half-and-half mix and watch batter consistency; baking time may be slightly longer.
Q: How firm should the final texture be?
A: Expect a moist but sliceable loaf — not cakey light, not heavy brick. If you prefer a firmer loaf, allow a few extra minutes in the oven; if moister, reduce by a minute or two.
Q: My kids aren’t fans of almond flavor — any tips?
A: Try subtly topping slices with peanut butter or a thin spread of cream cheese. Those familiar flavors help transition picky children toward the loaf itself.
These are the small, practical concerns I hear most, and they’re easy to solve with a little timing and observation.
Final thoughts from Sarah
This High-Protein Chocolate Banana Bread is one of those recipes that quietly makes family life easier. It’s simple to make, forgiving when life gets busy, and flexible enough to fit into breakfasts, snacks, and easy desserts. Keep a few ripe bananas in your freezer, and this loaf becomes a reliable back-pocket recipe that always delivers comfort and satisfaction.
If you give it a try, remember to let it cool a bit before slicing — that little moment of patience makes a big difference in appearance and texture. I hope it becomes one of your dependable kitchen staples.
Warmly,
Sarah Collins
Conclusion
If you’d like another take on chocolate banana bread that includes protein powder and a slightly different method, check out Easy Chocolate Banana Bread with Protein Powder – Liv B. for inspiration. For a family-friendly recipe with a similar flavor profile and practical tips, see this Chocolate Protein Banana Bread – Still Busy Baking version. And if you’re curious about a gluten-free, double-chocolate protein banana bread approach, take a look at this Gluten Free Protein Double Chocolate Banana Bread Recipe for ideas that stay in the same comforting neighborhood.

High-Protein Chocolate Banana Bread
Ingredients
Method
- Preheat your oven to 350°F (175°C) and line a loaf pan with parchment paper.
- In a mixing bowl, mash the ripe bananas until smooth.
- Add the cocoa powder, protein powder, almond flour, honey or maple syrup, baking soda, vanilla extract, and salt to the mashed bananas.
- Mix until all ingredients are well combined.
- Pour the batter into the prepared loaf pan and smooth the top.
- Bake for 30-35 minutes, or until a toothpick inserted into the center comes out clean.
- Allow to cool before slicing.