Sweet Potato Toast
If you’re someone who wants a simple, satisfying breakfast or light meal that feels both wholesome and a little playful, Sweet Potato Toast is for you. I’m Carla Carter, founder and recipe developer at RecipesCabin, and I love recipes that build confidence quickly — this one does just that. It’s approachable, uses just a handful of familiar ingredients, and gives you a clear sense of achievement in under an hour. Whether you’re new to cooking, returning after a long break, or someone who’s worried you’ll “mess it up,” this recipe is designed to be kind to you while teaching useful, transferrable kitchen skills.
You can think of this as a launching pad — once you understand the gentle rhythm of roasting a sweet potato to the right tenderness, you’ll find many other dishes become easier. If you want more inspiration for sweet potato breakfasts or ways to serve roasted sweet potatoes later in the day, I often point readers to helpful ideas like these breakfast sweet potato ideas that pair well with what you learn here.
Why this recipe is easy to get right
Sweet Potato Toast is forgiving in a few lovely ways. First, the ingredient list is short and forgiving — sweet potatoes tolerate a range of roasting times and still come out tasty. Second, there’s flexibility in toppings: mashed avocado and an egg are classic, but small variations won’t ruin the base. Third, the method relies on gentle, visible signs (color, tenderness) rather than precise timing alone, so you can rely on your senses.
Where this recipe allows flexibility: the exact thickness of the sweet potato slices can vary a little without a major effect on the result, and a slightly shorter or longer bake time just means you’ll adjust for more crispness or more tenderness. Where it matters: being mindful of how the slices are arranged on the baking sheet so they roast evenly, and flipping halfway through so both sides cook consistently. Those are small checkpoints that make a big difference in the finish.
How to make Sweet Potato Toast
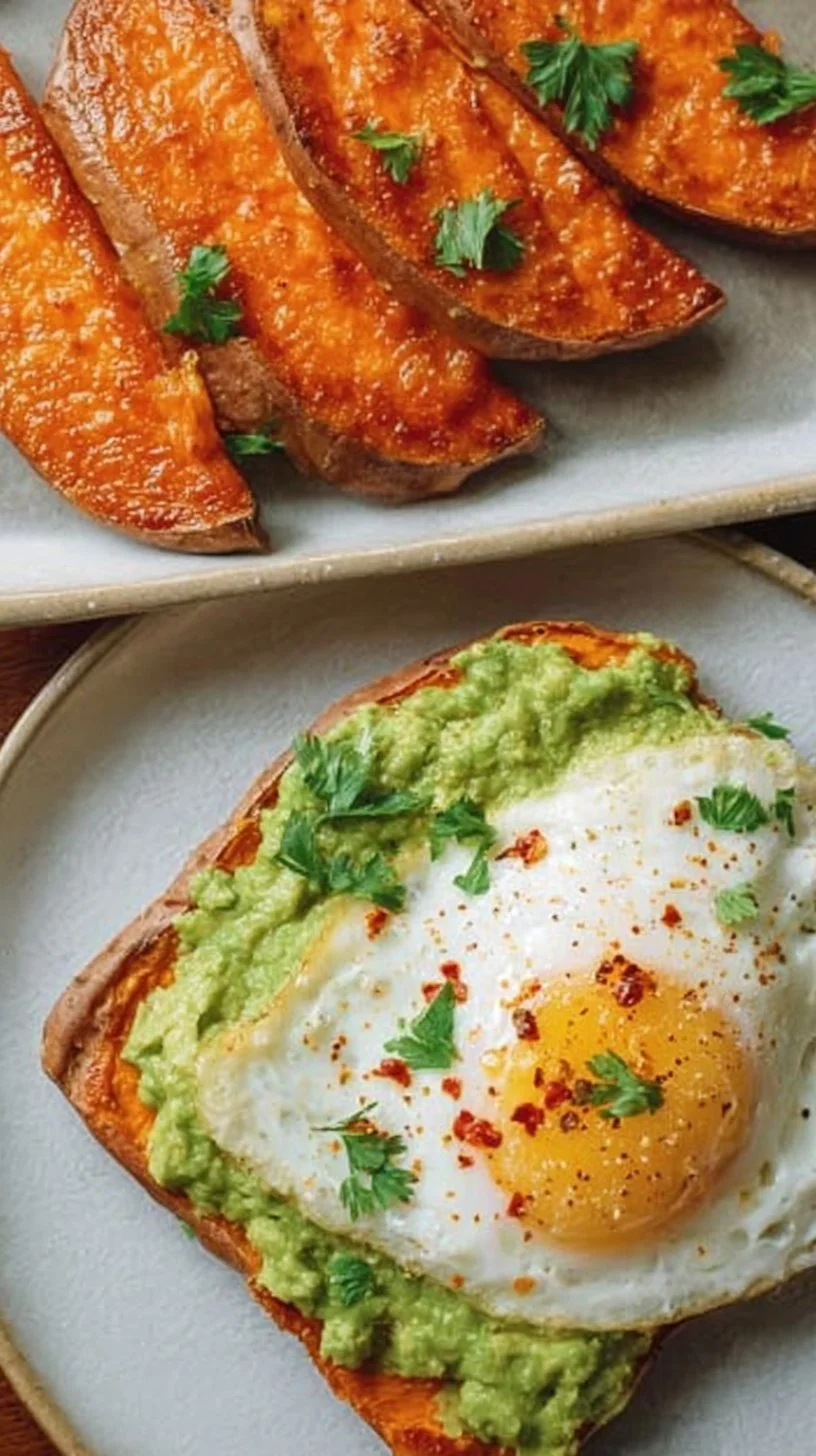
At a glance the process moves in three stages: prepare the sweet potato slices, roast them until tender with a lightly caramelized surface, then assemble with mashed avocado and a fried egg. Here’s what happens and what to watch for at each stage.
First: Preheat and slice. Preheating the oven gives you a steady, hot environment so the slices roast rather than steam. Slicing into roughly 1/4-inch pieces gives a good balance between structure and tenderness — thinner will crisp quickly, thicker will stay softer in the center. When slicing, use a steady hand and a stable cutting board; don’t worry if slices vary slightly, that’s normal.
Next: Oil, salt, and roast. A light brush of oil helps the sweet potato make contact with heat and encourages gentle browning. Arrange the slices without overcrowding so hot air circulates around each piece; this is the difference between floppy and nicely roasted. Flipping halfway ensures both sides develop similar color and texture. You’ll see edges darken and the centers yield when pierced with a fork — those are your visual cues.
Finally: Top and serve. Mash your avocado until it’s creamy but still a little textured, and fry an egg to your preferred doneness. Place the mashed avocado and egg on the warm sweet potato “toasts” so everything melds together. If a slice isn’t perfectly uniform, that’s okay — the dish is about comfort and nourishment, not perfection. For more ideas that build on the roasted sweet potato technique, you might enjoy this savory variation like a BBQ chicken sweet potato bowl which uses similar roasting skills.
Beginners should slow down when slicing and when checking tenderness with a fork. These moments guide the rest of the recipe and give confidence early on.
Ingredients
Sweet potatoes, Olive oil, Salt, Mashed avocado, Egg
- Sweet potatoes: The star. They provide a naturally sweet, sturdy base that crisps at the edges and becomes tender inside when roasted. They’re forgiving because their sugars help with browning even if the oven runs a little hot or the slices are slightly thicker.
- Olive oil: A light brush of oil promotes even browning and prevents sticking. It also adds a gentle, familiar flavor that complements both savory and creamy toppings without overpowering them.
- Salt: A small sprinkle enhances the sweetness and brings out the natural flavors. Salt applied before roasting helps the surface develop nicer color and a more pronounced taste, while a pinch at the end brightens the whole bite.
- Mashed avocado: Adds creaminess and a cooling contrast to the warm toasted slices. Its smooth texture pairs well with the tender sweet potato and helps the egg sit securely on top.
- Egg: Provides richness and a comforting protein boost. A runny yolk becomes a natural sauce that brings all the elements together, while a fully set yolk adds a different, firmer texture. Both are delicious — choose what makes you feel comfortable.
None of these ingredients are complicated. They’re pantry- and fridge-friendly, and they work together to create balance: sweet, salty, creamy, and a touch of fat for satisfaction.
Directions
- Preheat the oven to 400°F (200°C)., 2. Slice sweet potatoes into 1/4 inch thick slices., 3. Brush both sides with olive oil and sprinkle with salt., 4. Arrange slices on a baking sheet and bake for 20-25 minutes, flipping halfway through, until tender., 5. Remove from the oven and top with mashed avocado and a fried egg before serving.
Supportive guidance around the steps:
- Step 1 — Preheating: Set your oven early so it reaches temperature before the slices go in. You want a consistent 400°F (200°C) so the exterior browns while the interior softens. If your oven takes a few extra minutes, that’s okay — give it time to stabilize.
- Step 2 — Slicing: Aim for roughly 1/4 inch thickness. If some slices are a little thicker, they’ll need more time; slightly thinner pieces will crisp sooner. A visual cue is the cut surface: it should look smooth and even, not torn or jagged.
- Step 3 — Oil and salt: Brush each slice lightly on both sides. You’re looking for a thin sheen, not a puddle. The salt should be a light, even sprinkle; too much can dominate the sweet potato’s natural flavor.
- Step 4 — Baking: Arrange slices so they’re not touching or stacked. At 20–25 minutes total, flipping at about 10–12 minutes ensures each side gets direct heat. When the flip time arrives, the top side will show more color; use a thin spatula to turn gently. You’ll know they’re ready when the centers are fork-tender and the edges look slightly caramelized. If a slice resists the fork, give it a couple more minutes rather than overbaking everything.
- Step 5 — Topping: Mash the avocado with a fork until it’s creamy but still slightly textured — smooth enough to spread, but with a little bite. Fry your egg in a well-heated pan so the white sets evenly; if you prefer a runny yolk, keep the heat moderate so the white cooks through without the yolk solidifying. Place the mashed avocado first, then the egg. If something doesn’t look picture-perfect — maybe one slice is darker or slightly misshapen — that’s absolutely fine. The flavors will still be excellent.
Key techniques you’ll practice in this recipe
- Even slicing: Getting comfortable slicing to near-uniform thickness will improve roasting and carry over to salads and gratins.
- Roasting and visual doneness: Learning to read color and tenderness instead of relying only on a timer trains your senses for many oven-based dishes.
- Light oiling and seasoning: Knowing how much oil and salt to use is a small habit that makes a big difference across countless simple recipes.
- Gentle flipping: Turning items halfway through cooking helps create consistent browning — a simple motion that boosts confidence for other baked or roasted preparations.
- Quick pan-fry egg: Frying an egg to your liking — runny or set — is a small skill that elevates many meals and builds comfort handling heat and timing on the stovetop.
These are foundational skills. Once you’ve tried them here, you’ll notice them showing up in other recipes with pleasure, not intimidation.
Common mistakes and how to avoid them
- Slices too thin or too thick: If slices are paper-thin they can become brittle; thicker slices can be undercooked at 20 minutes. Solution: aim for roughly 1/4 inch and check a few slices at flip time.
- Overcrowding the baking sheet: When slices touch, they steam instead of roast. Use two sheets if needed or space them out — air circulation is important.
- Too much oil: A heavy puddle prevents browning and creates sogginess. You want a light brush, not a drizzle. Wipe off excess if you accidentally add too much.
- Undercooked centers: If a fork doesn’t slide in easily, return to the oven for a few more minutes. Don’t crank the oven; gentle additional time is kinder and scales better.
- Egg cooked improperly: Too-high heat can brown the egg white before the center cooks. Keep your pan medium-low to medium and watch the white set slowly for even results. If you like, cover the pan briefly to help the top set without flipping.
If something goes off track — say a batch seems uneven — don’t throw it away. Reheat the firmer pieces briefly under the broiler for a minute to add caramelization, or use a fork to flatten and crisp them in a dry skillet for a minute or two. Recovery is usually a small fix.
How to adjust confidently without changing the recipe
Portion scaling: If you want more servings, scale up by making more slices and roasting in batches or on multiple sheets. Keep the same oven temperature and watch the spacing. The key is not crowding the pan, not the exact number of slices.
Flavor adjustments: You can think conceptually about adding flavors without changing the recipe structure. For example, a light sprinkle of ground pepper or a squeeze of lemon over the avocado adds brightness; a tiny pinch of smoked paprika can add warmth. These are small adjustments that don’t alter steps or ingredients — they’re about how you finish the dish.
Texture tweaks: If you prefer a crispier base, slice a bit thinner and roast toward the longer end of the suggested time, watching closely at the end. For a softer, toast-like bite, keep the 1/4 inch thickness and err slightly shorter on time. These are conceptual approaches — the recipe steps and ingredients remain the same; you’re just tuning the finish.
Serving, storage, and reheating made simple
Serving: Arrange the warm sweet potato slices on a plate, spread mashed avocado, and top with a fried egg. Serve immediately so the textures — warm sweet potato, cool avocado, and egg — contrast nicely. A simple garnish like a few flakes of salt or a twist of black pepper is all you need.
Storage: If you have leftovers, store the roasted sweet potato slices in an airtight container in the refrigerator for up to 3–4 days. Keep mashed avocado and cooked eggs separate; avocado darkens quickly and eggs change texture in the fridge.
Reheating: For best texture, reheat slices in a preheated oven at 350°F (175°C) for 6–10 minutes or in a toaster oven until warmed through and edges re-crisp. A quick reheat in a dry skillet over medium heat works, too — it brings back a bit of crispness. Avoid microwaving if you want to preserve texture; it can make the slices soft and a little watery. For pairing ideas using roasted sweet potatoes in different meals, try this Southwestern ground beef sweet potato skillet which illustrates another way to use roasted sweet potatoes.
Questions new cooks often ask about this recipe
- How do I know the sweet potato is done? A fork should slide into the thickest part of a slice without much resistance, and the edges will show light caramelization. If the center still feels firm, give it a few more minutes.
- What if my slices are different sizes? That’s okay. Remove the thinner slices earlier if they look done; leave thicker ones a little longer. It’s fine to have some variation.
- Can I make this gluten-free or paleo? Yes — the base is naturally gluten-free and paleo-friendly. You’re working with whole ingredients that suit many diets.
- Do I have to use an egg? No — if eggs make you nervous, try a dollop of Greek yogurt or a sprinkle of toasted seeds for protein. The egg is a classic for richness but not required.
- Is it normal if the potatoes darken unevenly? Yes. Slight unevenness in color doesn’t affect taste. Just aim for tenderness and a pleasant surface color.
- I’m worried I won’t get the egg right. Start by frying over moderate heat and tilt the pan to spoon hot oil (or butter) over the white to help it set without overcooking the yolk. Practice makes this comfortable quickly.
Final encouragement from Carla
If this feels like a small victory, that’s exactly the point. Sweet Potato Toast is a gentle recipe to practice basic kitchen habits that build confidence — slicing, roasting, timing, and finishing. Small imperfections are part of learning, and the flavors won’t judge. Keep notes on what you liked about the texture and timing so the next batch will feel even more intentional. You’re learning steadily, and each simple success counts.
Conclusion
If you’d like to see another simple method and meal-prep ideas for sweet potato toast, this guide on How to Make Sweet Potato Toast (Meal Prep!) is a good companion. For alternate topping ideas and a straightforward approach to the same base, check out this Sweet Potato Toast recipe. If you enjoy seeing a few ways to build on the same base technique, this page showing Sweet Potato Toast: 3 Ways offers creative variations. And for another savory take that leans on simple ingredients, have a look at this Savoury Sweet Potato Toast (Two-Ways).

Sweet Potato Toast
Ingredients
Method
- Preheat the oven to 400°F (200°C).
- Slice sweet potatoes into 1/4 inch thick slices.
- Brush both sides of the sweet potato slices with olive oil and sprinkle with salt.
- Arrange the slices on a baking sheet without overcrowding.
- Bake for 20-25 minutes, flipping halfway through, until tender.
- Remove from the oven and top each slice with mashed avocado and a fried egg.
- Serve immediately.