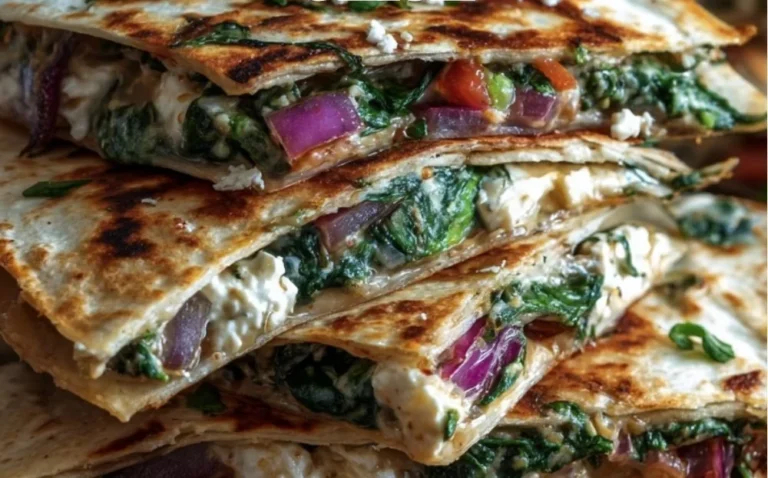
Mediterranean Quesadillas with Spinach, Feta, Mozzarella, and Red Onion

Introduction
If your weeknights look anything like mine — a little rushed, a lot of hungry kids, and a desire to serve something warm and familiar — Mediterranean Quesadillas with Spinach, Feta, Mozzarella, and Red Onion will become one of those quietly reliable recipes you turn to again and again. This is a simple comfort-food mash-up: tortilla meets melty cheese, with familiar Mediterranean flavors that aren’t fussy but feel special enough for a small gathering. The ingredients are straightforward, the technique is forgiving, and the result is a crunchy, cheesy hand-held meal that both kids and adults enjoy.
I love that this recipe works in many real-life rhythms: it’s quick enough for a busy weeknight, adaptable for a make-ahead snack at a playdate, and easy to scale for a casual get-together. If you’ve ever made a basic quesadilla and thought, “How can I make this more interesting without spending extra time?” — this is the answer. For families who enjoy swapping things in and out of the pantry, this dish plays well with others (I often pair it with sides from recipes like my best BLT wraps with secret sauce when we want to stretch a meal into lunch or dinner for more people).
I’ll walk you through why the recipe works, what to expect at each stage, and little tips that help it come out reliably every time. Think of this as the kind of recipe you can make on autopilot — satisfying, humble, and consistently enjoyed.
How to make Mediterranean Quesadillas with Spinach, Feta, Mozzarella, and Red Onion
This is a straightforward assembly-and-cook recipe with three main stages: mix the filling, assemble the tortillas, and crisp them in a skillet. Expect a few easy steps and one quick pan-cooking phase that produces reliably golden, melty quesadillas.
Stage 1 — Mixing the filling: You’ll combine the cheeses, spinach, tomato, red onion, and black pepper. This can be done by hand in a bowl in about two minutes. The goal here is an even distribution of cheese so every bite melts and tastes balanced. Beginners should slow down when chopping the spinach and tomato — even pieces help the filling warm evenly.
Stage 2 — Assembling: Spoon a controlled portion of filling onto half of each tortilla and fold. Using roughly equal portions makes cooking predictable so nothing pours out of the tortilla during searing. This is also a great moment for kids to help — folding and pressing are simple tasks they can do.
Stage 3 — Skillet crisping: A hot non-stick skillet and a little olive oil are all you need. Cook each side for about 3–4 minutes until golden and crispy. If your pan is too hot, the outside will brown faster than the cheese melts; if it’s too cool, the tortilla becomes soggy. Aim for medium heat and let the skillet do the work.
If you’re short on time, you can mix the filling ahead and keep it refrigerated. For a faster clean-up, use one spatula and a non-stick pan — the little oil keeps the quesadillas from sticking and helps build that appealing crunch.
I often pair these quesadillas with a warm rice dish when we want a heartier weeknight spread; a favorite, creamy companion for a busier night is my creamy chicken and rice, which makes the meal feel more substantial without extra fuss.
Ingredients
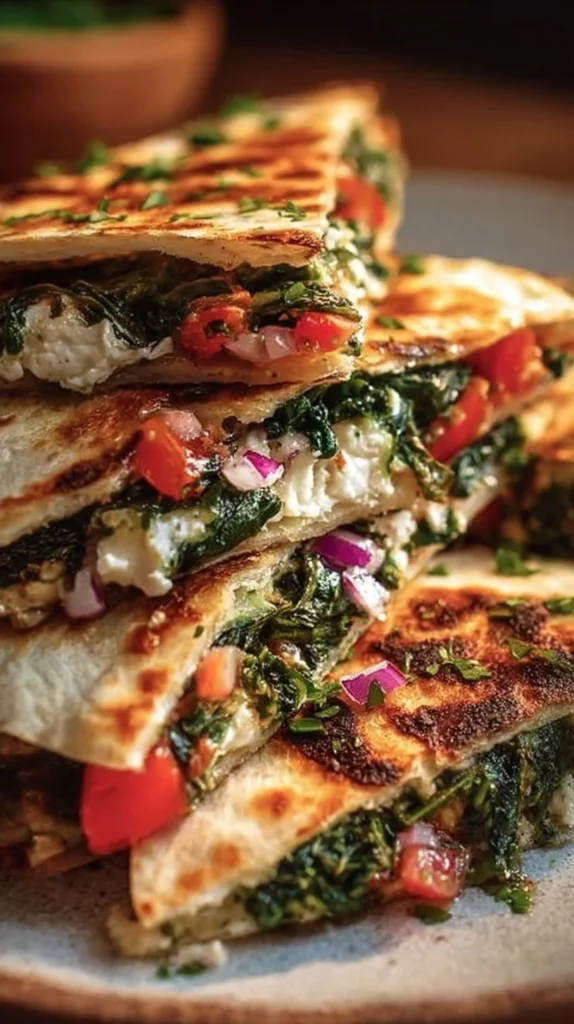
4 flour tortillas, 1 cup fresh spinach (chopped), 1/2 cup shredded mozzarella cheese, 1/2 cup crumbled feta cheese, 1 small tomato (diced), 1/4 cup red onion (thinly sliced), 1 tablespoon olive oil, Black pepper (to taste)
Let’s look at what each ingredient brings to the party, in plain home-cook terms.
- Flour tortillas: These are the neutral, flexible shell that crisps nicely and holds everything together. They brown evenly and fold without tearing, which is why they’re the preferred choice here.
- Fresh spinach: Adds a mild green flavor, a little color, and a soft texture when warmed. Chopping it keeps it from pooling in one bite and ensures it warms through quickly.
- Shredded mozzarella: The “melty” cheese. Mozzarella gives that stretchy, gooey texture kids love and helps bind the filling as it heats.
- Crumbled feta: Brings the Mediterranean note — salty and tangy — that balances the mellow mozzarella. A little goes a long way, and the contrast makes the quesadilla taste more layered.
- Small tomato: Freshness and slight acidity. Diced tomato brightens the filling so it doesn’t feel one-note.
- Red onion: A gentle onion bite that pairs well with the feta. Thin slices soften when warmed, losing any harshness but keeping a pleasant texture.
- Olive oil: Adds a little crisping power and flavor on the skillet surface. It helps achieve that golden exterior we all look for.
- Black pepper: A simple seasoning that ties everything together; season to taste.
If you’re putting together a weekly plan, these amounts are small but easy to scale. The ingredient list is also pantry-friendly — most households keep these basics on hand or within a quick store run.
I find it useful for family meal planning to pair this with a simple vegetable bake when I want extra veg on the table; a reliable option is the high-protein veggie bake with cottage cheese which complements warm, cheesy mains nicely.
Directions
In a mixing bowl, combine the mozzarella cheese, feta cheese, spinach, tomato, red onion, and black pepper. Mix well., Lay one tortilla flat and place one-fourth of the filling mixture on half of the tortilla. Fold it over to cover the filling., Heat a non-stick skillet over medium heat and add olive oil., Place the filled tortilla in the skillet and cook for about 3-4 minutes until golden brown., Flip carefully and cook for another 3-4 minutes until both sides are crispy., Remove from heat, slice into wedges, and serve warm.
A few friendly notes to help these steps feel even more manageable:
- When combining the filling, you want an even mix—no big clumps of feta or piles of spinach. Use your hands or a spoon to break and distribute the cheese so it melts more uniformly.
- Portioning: Splitting the filling into four equal parts keeps the quesadillas thin enough to crisp through and thick enough to be filling. If you overfill, the tortilla may not fold cleanly and the filling can spill out while cooking.
- Heat control matters: Medium heat is the sweet spot. Too hot and the tortilla will burn before the cheese melts; too cool and it gets greasy and soft. Give the pan a minute to come up to temperature before adding the oil.
- Flipping: Use a thin spatula and a confident, steady flip. If the first side is golden and the cheese is beginning to melt, the flip will go smoothly. Resist the urge to press down hard — a gentle press is fine to help contact with the pan.
- Timing: 3–4 minutes per side is a good guideline, but ovens and stoves vary. Look for golden brown color and a little crispness along the edge as your cue that it’s done.
These little checkpoints — consistent portioning, even mixing, correct pan temperature — are what make the dish reliable night after night.
Why families love this dish
This quesadilla hits many of the family-friendly notes I talk about: familiar flavors, easy hands-on elements, and minimal stress.
- Familiar flavors: Cheese, mild greens, a touch of tomato and onion — there are no surprising or challenging ingredients, which makes it an easy sell for kids and picky eaters. The feta’s tang is subtle when mixed with mozzarella, so it usually reads as a “cheesier” quesadilla rather than an assertively Mediterranean dish.
- Comfort factor: Warm, melty cheese tucked inside a crisp tortilla has universal comfort appeal. It’s the kind of thing everyone leans into, especially on evenings when you want something uncomplicated but satisfying.
- Kid-friendliness: Kids can help mix the filling, fold tortillas, or press them into the pan (under supervision). Because the flavors are straightforward, you can adapt easily for smaller preferences without remaking the whole meal.
- Versatility: Serve it as a main, slice it up for a snack, or make extra for a packed lunch. It plays well with sides and can be adjusted for heartier appetites by serving with a simple grain or salad.
This is a recipe that fits family life not because it’s elite cooking, but because it’s forgiving, quick, and consistently enjoyed.
Smart substitutions and simple variations
I’ll emphasize upfront: don’t feel like you need to swap anything in the original list to enjoy this. But if you want gentle changes for tastes or what you have in the fridge, here are safe swaps that keep the recipe reliable.
- Cheese swaps: If you’re out of mozzarella, a mild cheddar can replace it for the melty texture. Keep the feta for that tang if you can, or use a milder crumbly cheese if some family members find feta too salty.
- Greens: If you don’t have spinach, baby arugula (used sparingly) or thinly sliced kale, massaged briefly, will work. The idea is a tender green that warms quickly.
- Tomato/onion adjustments: For picky eaters who dislike raw tomato or onion, try halving the amount or lightly sautéing them first to soften the bite. Another quick trick is to remove the seeds from the tomato so it’s less juicy.
- Olive oil alternatives: A light brush of butter gives a richer flavor and a faster-looking brown crust if you prefer it.
- Add protein without fuss: Serve with a simple side of rotisserie chicken or a scoop of beans for a heartier plate.
These changes keep the spirit of the dish while allowing small personalization. They don’t complicate the process, which is the point — keeping it easy and reliable.
Pairing ideas for a complete, satisfying meal
One of the joys of this recipe is how easy it is to round out the meal with minimal extra work.
- Fresh salad: A simple cucumber-and-yogurt or mixed green salad brightens the plate. For a familiar, family-friendly option, a cool cucumber salad pairs naturally with the warm, cheesy quesadillas — try the quick and creamy textures in this creamy cucumber salad with bacon and cheese when you want something more substantial.
- Quick grains: A pot of plain rice or couscous cooks while you assemble and adds staying power for hungrier household members.
- Veggie sides: Roasted carrots or a quick sauté of bell peppers take little effort and add color. A simple bagged slaw dressed with lemon and olive oil is another fast choice.
- Dips and extras: Serve with a small bowl of extra crumbled feta, a mild salsa, or plain Greek yogurt for dipping. These let people customize their bites without any extra cooking.
The aim is a balanced, uncomplicated plate — one warm main, one quick veg or salad, and perhaps a grain if you need to feed more mouths.
Make-ahead tips, leftovers, and storage
This recipe stores and reheats well if you follow a couple of simple rules.
- Make-ahead: Mix the filling up to 24 hours ahead and keep it refrigerated in an airtight container. When it’s time to cook, assemble from the chilled filling; the cheese will take a bit longer to melt but the result is just as good.
- Storing leftovers: Keep cooked quesadillas in an airtight container in the fridge for up to 3 days. If you’re stacking them, separate layers with parchment to avoid sticking.
- Reheating without drying out: The oven or a toaster oven is best — reheat at 350°F (about 175°C) for 8–10 minutes to crisp back up. A skillet over medium-low heat with a quick cover for a minute will refresh them too. Avoid microwaving unless you’re in a real hurry, because it can make the tortilla soft and the filling rubbery.
- Lunchbox uses: Slice leftover wedges and pack with a small container of yogurt or a mild dip; it’s a convenient, hand-held lunch that’s usually a hit with school-age kids.
These tips keep the texture as close as possible to fresh, and they make life easier when you’re working around school runs, practices, and meetings.
Common questions home cooks ask about this recipe
Q: My tortillas get soggy — what am I doing wrong?
A: Soggy tortillas usually mean the pan isn’t hot enough or the filling is too wet. Make sure the skillet is at medium heat and that your filling isn’t overly juicy (drain excess tomato liquid or pat diced tomato dry).
Q: How do I scale this recipe for more people?
A: It scales easily — double or triple the filling and just cook the quesadillas in batches. Keep finished ones warm in a low oven (200°F/90°C) while you finish the rest.
Q: The feta tastes too strong for my kids — any fixes?
A: Use a little less feta, or rinse and pat dry crumbled feta to tone it down. You can also mix it with a little extra mozzarella to mellow the tang.
Q: Can I freeze these?
A: You can freeze assembled, uncooked quesadillas on a tray until firm, then transfer to a bag. Cook from frozen in a skillet, adding a bit more time to each side. Cooked quesadillas can be frozen but may lose some crispness on reheating.
Q: How do I know when the cheese is fully melted?
A: Peek at the edge after the first side is golden; you should see the cheese beginning to ooze slightly from the seam. That’s the cue to flip and finish the second side.
These are the kind of practical questions that come up in busy kitchens, and once you’ve tried the few checkpoints above, you’ll have a routine that works every time.
Final thoughts from Sarah
This Mediterranean quesadilla recipe is the kind of dependable weeknight option I keep coming back to because it’s simple, tasty, and adaptable. It hits the comfort-food sweet spot without being overly complicated, and it works for both small families and larger, casual gatherings. The flavor is familiar enough for kids, interesting enough for adults, and flexible enough to accommodate what’s in the fridge.
If you’re building a rotation of meals that are easy to execute and hard to mess up, this dish belongs on that list. Give it a try on a busy night, and you’ll likely find yourself reaching for it again — especially when you want something warm, cheesy, and quick that still feels like a little kitchen win. Happy cooking, and enjoy the simplicity of a meal that brings people to the table with very little fuss.
Conclusion
For another take on this idea with similar ingredients and helpful notes, check out this recipe on Easy Mediterranean Quesadillas – Tasty Oven, which echoes the same family-friendly approach. If you’d like to explore budget-friendly variations and cost-conscious swaps, this Mediterranean Quesadillas – Budget Bytes post offers solid ideas. For a gluten-free spin that incorporates hummus alongside feta, see the flavor-minded version at Mediterranean Quesadillas with Hummus and Feta (Gluten-Free).
Mediterranean Quesadillas
Ingredients
Method
- In a mixing bowl, combine the mozzarella cheese, feta cheese, spinach, tomato, red onion, and black pepper. Mix well.
- Lay one tortilla flat and place one-fourth of the filling mixture on half of the tortilla. Fold it over to cover the filling.
- Heat a non-stick skillet over medium heat and add olive oil.
- Place the filled tortilla in the skillet and cook for about 3-4 minutes until golden brown.
- Flip carefully and cook for another 3-4 minutes until both sides are crispy.
- Remove from heat, slice into wedges, and serve warm.