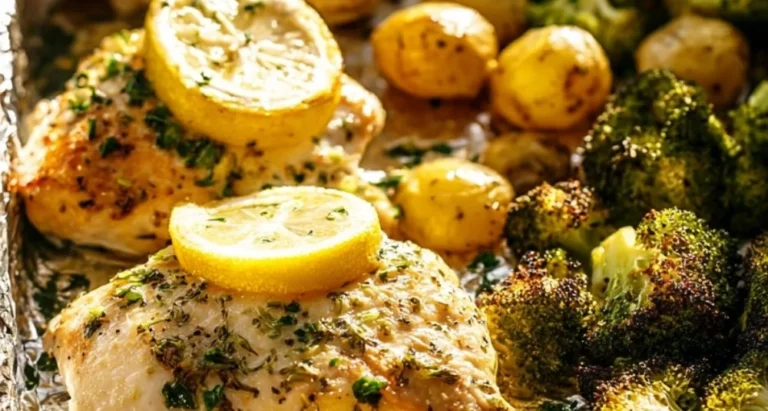
Spinach Stuffed Chicken Breasts – a healthy low carb dinner option!

Introduction
If you’re looking for a healthy low-carb dinner that feels a little special without being fussy, this Spinach Stuffed Chicken Breasts recipe is for you. I’m Carla Carter, founder and recipe developer at RecipesCabin, and I create recipes that help you feel capable in the kitchen — even if you’ve had a few dinner disasters in the past. This dish is approachable, forgiving, and teaches a handful of useful skills you’ll use again and again.
Many people enjoy recipes like this for weeknight dinners or a simple weekend meal. If you want more ideas in the same spirit, I recommend browsing through other easy dinner recipes — they’re curated to be straightforward and satisfying. As we walk through this dish together, I’ll explain why each step matters and what to watch for so you feel calm and confident at the stove.
Why this recipe is easy to get right
There’s a lot to love about stuffed chicken breasts when you’re learning to cook. First, the ingredients are simple and familiar — nothing exotic that will make you nervous. Second, the recipe builds in forgiving moments: stuffing holds its shape even if it isn’t perfect, and a little extra cooking time won’t ruin the meal as long as you watch for dryness.
What makes it forgiving:
- The stuffing (usually spinach and cheese) helps add moisture and flavor, so small differences in cooking time aren’t disastrous.
- Browning the outside is visible and tactile — you can see and feel when the chicken has developed a nice color.
- Internal temperature is a clear checkpoint: aim for a safe reading rather than guessing.
Where you can be flexible:
- If your chicken breasts are slightly larger or smaller, the recipe tolerates a bit of variation — I’ll explain how to adjust cooking time conceptually later.
- Seasoning can be tuned to your taste without changing the structure of the dish.
This is a recipe that rewards attention but doesn’t require perfection. If you’ve been nervous about stuffed chicken, this is a great one to try first.
How to make Spinach Stuffed Chicken Breasts – a healthy low carb dinner option!
Overall, the process breaks down into three clear stages: prepare the stuffing, assemble the breasts, and cook them until tender and cooked through. At each stage you’ll rely on visual and tactile cues rather than precise technique, which makes it especially good for newer cooks.
First: prepare the stuffing. You’ll wilt the spinach and mix it with whatever cheese and seasonings the recipe calls for. What you’re aiming for is flavorful but not watery filling — cooked spinach loses volume and becomes soft and moist, the textures that help it meld with the chicken.
Next: assemble the breasts. That means creating a pocket or slicing to make an opening, spooning in the filling, and securing it. Focus on even distribution: you want the filling to sit comfortably inside the meat without bulging so much that it forces the chicken open while cooking.
Last: sear or bake the breasts. Searing in a pan gives a golden exterior and builds flavor; baking finishes the cooking evenly. Look for a golden-brown color and then use a thermometer as your final check. The moment when the juices run clear and the thermometer reaches the safe zone is your green light.
Where beginners should slow down:
- Take your time when creating the pocket and stuffing — rushing here is when tears and uneven cooking happen.
- Watch the pan while searing; it goes from golden to too-dark faster than you expect.
- Check the internal temperature rather than relying on time alone, especially if your breasts vary in size.
Ingredients
Every ingredient in this dish has a clear job and none are meant to intimidate. Here’s how they work together in plain terms:
- Chicken breasts: The main structure. They provide a neutral, tender canvas for the filling. If your breasts are a bit uneven in thickness, you can gently press them for a more even cook.
- Spinach: Adds color, moisture, and a fresh flavor. When cooked, spinach wilts and concentrates, so it mixes well with cheeses and seasonings.
- Cheese: Brings creaminess and helps bind the filling. It melts and creates a pleasant contrast with the lean chicken.
- Seasonings (salt, pepper, garlic, herbs): Small amounts make a big difference. They build flavor so every bite tastes intentional.
- Olive oil or butter: Used for searing and adding richness. A light coat on the outside encourages browning without sticking.
None of these are complicated or expensive. They work together by balancing texture (tender chicken, creamy filling) and flavor (savory seasoning with a pop of spinach). If you want inspiration for simple side dishes that pair well, my guide to quick sautéed vegetables offers approachable options that keep the meal light and balanced.
Directions
I won’t change the steps you have, but I will walk you through what to look for at each moment so the written directions feel manageable and friendly.
Before you start: have everything ready. This means the stuffing is mixed, the chicken is laid out, and your pan or oven is preheated. Cooking moves more smoothly when everything is within reach.
When cooking the spinach: watch for the leaves to wilt and give up some moisture. You want them soft and glossy — not dry or mushy. Remove them from heat once they’ve shrunk and squeezed out any excess liquid gently with a spoon or in a colander if the recipe calls for it.
When assembling: the pocket should be roomy enough for the filling without stretching the meat too thin. If a little filling peeks out, that’s okay — small imperfections won’t ruin the dish. Secure the opening with a toothpick or tuck the seam under the chicken if the recipe suggests that.
When searing the breasts: listen for a steady sizzle when the chicken hits the pan. That’s the sound of flavor being built. After a minute or two, peek — you should see a light to deep golden color. If it’s browning too quickly, lower the heat slightly; too-high heat will darken the outside before the inside cooks.
When baking or finishing in the oven: the chicken will continue to cook after leaving the pan. Visual cues include juices running clear and the surface feeling slightly springy. If you have a thermometer, aim for the safe internal temperature recommended in your directions — it’s the best way to be sure without overcooking.
If things don’t look perfect at first: that’s normal. Maybe the filling settles, or the chicken colors unevenly. Adjust your heat, tent the dish with foil to prevent excess browning, or give it a few extra minutes in the oven. Small fixes keep you moving forward without stress.
Key techniques you’ll practice in this recipe
This recipe is a great practice ground for a few foundational cooking skills:
- Sautéing wilted greens: You’ll learn how quickly leafy greens reduce in volume and how to remove excess moisture. This helps in many dishes, from omelets to pastas.
- Creating a pocket in meat and stuffing: It’s a gentle, precise movement that builds confidence handling raw meat safely and neatly.
- Pan-searing for color and flavor: Searing teaches you how heat changes food — how surface browning adds a caramelized flavor without a complicated technique.
- Finishing in the oven: Combining stovetop and oven cooking is a common approach for even results and helps with thicker cuts of meat.
Practicing these techniques here pays off in many other recipes. You’ll use wilting, stuffing, searing, and finishing again and again.
Common mistakes and how to avoid them
Here are the typical missteps and easy fixes so you don’t get stuck:
- Overstuffing the chicken: If the pocket is bulging, the filling will escape during cooking. Fix: use slightly less filling or press the seams gently shut with a toothpick and tuck the ends.
- Chicken too thick in one spot: Thick areas take longer to cook and can dry out. Fix: even out thickness with gentle pressure or make shallow slashes to help heat reach the center more quickly.
- Searing at too-high heat: Burned exterior, raw interior. Fix: reduce heat and allow a slower, more even browning.
- Watery stuffing: If the spinach isn’t well-drained, the filling becomes soggy. Fix: squeeze excess moisture from cooked spinach before mixing with cheese.
- Relying on time alone: Ovens and pan temperatures vary; timing is a guideline. Fix: use visual clues and a thermometer for certainty.
If something goes off track — say the chicken is slightly overdone — don’t panic. Slice it thin and serve with a moist sauce or extra dollop of the filling; presentation and a confident attitude turn small mistakes into delicious meals.
How to adjust confidently without changing the recipe
You can tune this dish to fit different needs without altering the ingredient list or directions. Think of adjustments as conceptual:
- Portion scaling: If you’re cooking more or fewer breasts, keep the same steps but cook in batches so pieces aren’t crowded. Crowding lowers pan temperature and prevents good browning.
- Flavor preferences: If you like a stronger herb presence, sprinkle more on top before baking; if you prefer milder flavors, reduce the aromatic seasoning by a small amount. These are surface-level changes that don’t alter the method.
- Texture tweaks: If you want a creamier filling, consider mixing the filling ingredients more thoroughly so the cheese melts uniformly; if you’d like a firmer bite, use less cheese or press the filling compactly into the pocket.
These conceptual tweaks let you personalize the outcome while keeping the recipe intact and reliable.
Serving, storage, and reheating made simple
Serving: This dish pairs well with bright, simple sides that keep the meal balanced. A crisp salad or roasted vegetables complements the richness of the filling. For inspiration on a light veggie side, see my quick sauté guide healthy sautéed vegetables, which offers straightforward pairings.
Storage: Let cooked chicken cool slightly before storing. Place in an airtight container and refrigerate within two hours of cooking. Properly stored, it keeps well for 3–4 days. If you want to freeze, wrap tightly and use within a couple months for best texture.
Reheating: To keep the chicken from drying, reheat gently. Oven or toaster oven at low temperature (around 300°F / 150°C) covered with foil works well — it brings the internal temperature back up without over-browning. A quick microwave on medium power with a damp paper towel can work for single portions, but check frequently to avoid rubbery texture. Adding a small splash of broth or a light sauce can restore moisture if needed.
Questions new cooks often ask about this recipe
Q: How long should I expect this to take from start to finish?
A: Plan for about 30–45 minutes total, depending on whether you’re searing first and how big your breasts are. The active prep time is short; much of the timing is hands-off while the oven finishes the dish.
Q: Do I need any special equipment?
A: No. A sharp knife, a skillet that’s oven-safe if you plan to transfer to the oven, and a meat thermometer are the most helpful tools. A thermometer isn’t mandatory, but it’s the easiest way to be confident the chicken is cooked safely.
Q: Is it normal for the filling to leak a little?
A: Yes. A small amount of filling peeking out doesn’t mean the dish is ruined. It may brown in spots, which adds flavor. If it’s leaking significantly, reduce the amount of filling next time or use toothpicks to secure the seam.
Q: What if my chicken is already golden but not done inside?
A: Lower your stovetop heat and finish in the oven. That allows the interior to reach the right temperature without burning the exterior.
Q: Can I prep this ahead?
A: Yes — you can prepare and stuff the breasts up to a day ahead, covered in the fridge. When ready, bring them toward room temperature for 15–20 minutes before cooking to help them cook more evenly.
Final encouragement from Carla
If this is your first time making a stuffed chicken breast, be gentle with yourself. Cooking is a skill that grows with practice, and this recipe teaches practical steps that build confidence quickly. Focus on the checkpoints I mentioned: wilted spinach, a neat pocket, a golden sear, and an internal temperature check. Small imperfections are normal; even experienced cooks end up with slightly uneven seams or browned edges sometimes.
I love recipes like this because they reward attention without requiring perfection. Take your time with the stuffing and searing, trust your senses, and remember that a delicious meal is about more than flawless technique. You can do this — and each attempt will get easier and more satisfying.
Conclusion
If you want another take on stuffed chicken with a low-carb focus, this Spinach Stuffed Chicken Breasts – a healthy low carb dinner option! highlights similar ideas with helpful photos, and this Keto Spinach Stuffed Chicken Breast with Cheese post offers a slightly different flavor profile you might enjoy exploring.

Spinach Stuffed Chicken Breasts
Ingredients
Method
- Preheat your pan or oven.
- Wilt the spinach in a pan and mix with cheese and seasonings until well combined.
- Squeeze any excess moisture from the spinach to keep the filling from being watery.
- Create a pocket in each chicken breast without cutting through completely.
- Stuff the filling into the pocket, ensuring even distribution.
- Secure the opening with toothpicks if necessary.
- Sear the stuffed chicken breasts in a hot pan until golden on the outside.
- Transfer to the oven if necessary, cooking until juices run clear and internal temperature reaches a safe level.