BBQ Chicken Pasta Salad

This BBQ Chicken Pasta Salad is for anyone who wants a satisfying, weeknight-friendly meal that doesn’t require a culinary degree. Whether you’re new to cooking, coming back after a kitchen mishap, or just looking for an easy dish to bring to potlucks, this salad is approachable and forgiving. I’ll walk you through each step so you can feel calm and capable from the moment you open the pasta bag to the first forkful.
If you like mixing bold flavors into simple bowls, you might also enjoy this BBQ chicken sweet potato bowl, which follows the same idea of combining comforting ingredients for an easy meal. Read on and you’ll learn why this recipe is so easy to make well, what to watch for, and how to feel confident even on your first try.
Why this recipe is easy to get right
This salad is forgiving for a few reasons. First, the structure is simple: cooked pasta, cooked chicken, canned beans, shredded cheese, a creamy dressing, and a few mild aromatics. Nothing in this recipe needs precision timing like a delicate sauce or a perfect sear. The mix-and-chill nature of the salad lets flavors settle and gives you room to adjust.
Where it allows flexibility: the dressing can be ranch or a BBQ-flavored creamy dressing, and the cheese choice is optional between cheddar or Monterey Jack. If something is slightly overcooked or under-salted, the dressing and mix-ins help balance the final dish. That’s why this is a great recipe for beginners — you can learn technique without fearing a total flop.
If you like hearty, mixed salads, try comparing techniques in a different grain-based salad like this grilled chicken orzo salad to see the same principles applied to a different pasta shape.
How to make BBQ Chicken Pasta Salad
At a glance, the process is three parts: cooking the pasta, combining the ingredients, and chilling to let flavors marry. Start by boiling the pasta — that’s the only part with heat that requires attention. After the pasta is cooked and cooled, you’ll combine it with the prepared chicken and pantry items, then dress and chill.
What happens first: cooking the pasta according to the package instructions. Visual cue: watch for the pasta to be tender with a slight bite (al dente), but don’t worry if you prefer it softer — this salad is forgiving. Once cooked, drain and let it cool so the dressing sticks without melting the cheese.
Next: combining. Toss the cooked pasta with the chicken, black beans, cheese, and green onions. You’ll get a good sense of balance here — the textures should look varied: soft pasta, firm beans, shredded cheese, and bright little green flecks from the onions.
Last: dressing and chilling. Drizzling the creamy dressing and tossing will coat everything. Chilling for at least 30 minutes lets the flavors meld and the dressing relax into the pasta and chicken. If you’re impatient, you can serve sooner, but the brief wait improves taste and texture.
If you’re practicing new skills, I recommend slowing down at the pasta-cooking stage and the final toss — those are where small adjustments make a big difference. For more ideas on building a protein-rich pasta salad, this high-protein cottage cheese pasta salad shows similar building blocks in action.
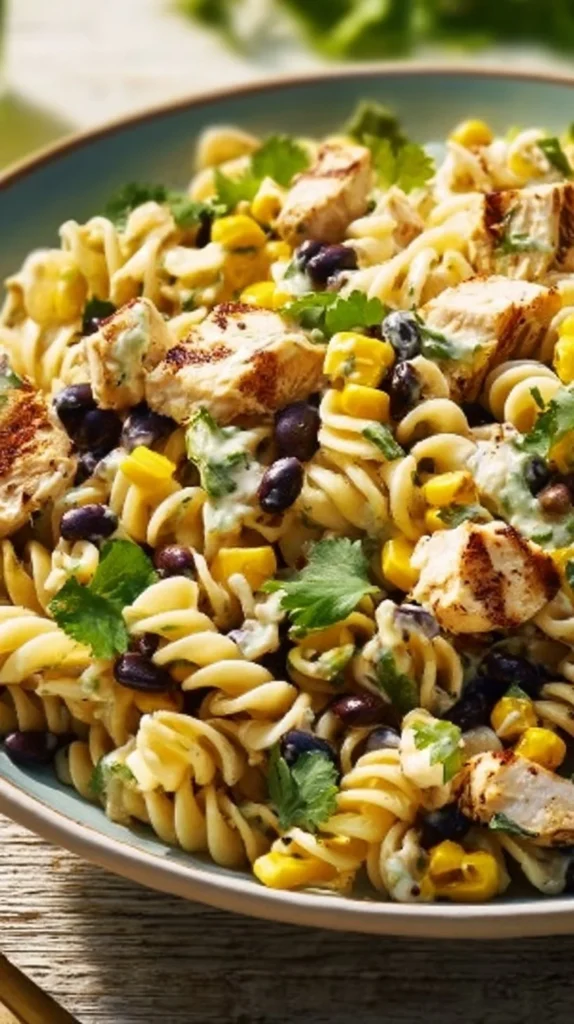
{image_template}
Ingredients
8 oz pasta, 1 cup grilled chicken, chopped, 1 can black beans, rinsed and drained, 1 cup shredded cheese (cheddar or Monterey Jack), 1/2 cup creamy dressing (ranch or BBQ), 1/4 cup green onions, chopped, Salt and pepper to taste
Each ingredient plays a clear role:
8 oz pasta: This is the base and bulk of the salad. It carries dressing and flavors, so the pasta shape should be one that holds sauce well — shells, rotini, or penne work nicely. It’s not intimidating; just cook until tender as described on the package.
1 cup grilled chicken, chopped: Adds protein and a smoky, savory flavor that pairs well with BBQ-style dressing. Using pre-grilled or leftover chicken keeps this recipe quick and approachable.
1 can black beans, rinsed and drained: Canned beans are one of the easiest shortcuts in cooking. They add texture, fiber, and a mild earthy flavor that contrasts the sweet or tangy dressing.
1 cup shredded cheese (cheddar or Monterey Jack): Cheese adds creaminess and a melty, slightly salty counterpoint. You don’t need to shred it perfectly — a quick pulse with a knife or a bag of pre-shredded cheese will do.
1/2 cup creamy dressing (ranch or BBQ): This ties the salad together. Ranch gives a tangy creaminess; BBQ dressing brings a sweet-smoky vibe. Either is simple and readymade, so there’s no need to make a complicated dressing from scratch.
1/4 cup green onions, chopped: They add freshness and a mild onion flavor without overpowering the salad. Chop them roughly; neat precision isn’t required.
Salt and pepper to taste: Small amounts of seasoning sharpen flavors. Taste before you add a lot — you can always add more, which is a key principle for new cooks.
These ingredients are familiar and found in most grocery stores. If you want inspiration for other salads that pair protein and veggies, check out this high-protein southwest chicken salad for ideas on how ingredients work together without complexity.
Directions
- Cook the pasta according to package instructions; drain and let cool.
- In a large bowl, combine the cooked pasta, grilled chicken, black beans, cheese, and green onions.
- Drizzle the creamy dressing over the salad and toss to combine.
- Season with salt and pepper to taste.
- Chill in the refrigerator for at least 30 minutes before serving.
Supportive guidance around the steps:
Step 1 visual cues: When the pasta looks plump and the water is just beginning to foam around it, taste one piece. It should feel tender but slightly firm in the center. If you like softer pasta, a few extra seconds is fine — the salad is forgiving.
After draining, spread the pasta on a tray or let it sit in the colander for a few minutes to cool. Warm pasta will make the cheese soften and the dressing thinner, which can change texture. A quick cool down makes the final salad hold together nicely.
Step 2 texture hint: As you combine the ingredients, notice contrast — the firmness of the beans, the shredded cheese softness, and the slightly fibrous chicken. Aim for a visually mixed bowl so every scoop includes a little of everything.
Step 3 toss technique: Drizzle the dressing in a few places and toss gently with a large spoon or your hands (clean hands are fast and effective). Tossing evenly distributes the dressing; you shouldn’t see big puddles of dressing, but rather a light, even coating.
Step 4 seasoning checkpoint: Taste a small spoonful before chilling. The cold will mute salt slightly, so season gently. Add a pinch of salt and a few cracks of pepper, then taste again.
Step 5 chilling reassurance: Thirty minutes in the fridge allows flavors to settle. If you’re serving immediately, the salad will still be tasty — chilling simply improves texture and melding of flavors.
If things look a bit off at any point (too dry, too wet, bland), small fixes can help: a splash more dressing if dry, a squeeze of lemon or a tiny extra salt if bland. No need to start over.
Key techniques you’ll practice in this recipe
This recipe reinforces several basic, transferable skills:
Cooking pasta to the right doneness: You’ll learn to judge tenderness by tasting rather than a strict timer. This skill applies to almost every pasta-based dish.
Cooling and handling hot ingredients: Letting pasta cool slightly prevents dressings from breaking down and keeps cheese texture pleasant.
Tasting and seasoning: You’ll practice seasoning in small increments and tasting as you go — a cornerstone of confident cooking.
Gentle tossing: Learning to toss without smashing ingredients preserves texture, a technique that helps with salads and mixed dishes.
These techniques matter because they build the habit of watching, tasting, and adjusting — which makes you a more capable cook across many recipes.
Common mistakes and how to avoid them
Overcooking the pasta: If pasta turns to mush, the salad becomes gluey. Avoid this by tasting a piece a minute or two before the package time recommends. If it’s slightly firmer than you want, it will relax while cooling.
Adding dressing while pasta is too hot: This can make cheese melt and dressing thin out. Let the pasta cool a bit first so the dressing clings and textures stay distinct.
Over-salting at the start: Salt concentrates as liquid reduces. Add small amounts, taste, then adjust after chilling.
Skipping the rinse on canned beans: Rinsing removes excess canning liquid that can taste metallic and dilute firmness. A quick drain and rinse in a colander fixes this.
Tossing too roughly: Be gentle to keep chicken pieces intact and to prevent cheese from turning into a paste. Use large, sweeping motions.
If something goes off track — say the salad is too dry — fold in a little extra dressing. If it’s too salty, add more pasta (if you have extra) or a few tablespoons of plain yogurt or sour cream to mellow it.
How to adjust confidently without changing the recipe
Portion scaling: If you want to make more, think in simple multiples. Double everything for a larger crowd, keeping the balance of pasta to chicken similar. For smaller portions, halve the ingredients. The salad scales well because it’s a mix of pantry and fresh items.
Flavor preferences: If you like it tangier, add a small splash of apple cider vinegar or a squeeze of lemon before chilling. If you want it sweeter, a touch more BBQ dressing can push that profile. These are conceptual tweaks — you’re not changing the recipe’s listed ingredients or steps, only the intensity of what’s already there.
Texture tweaks: To make it crunchier, serve with a side of crisp vegetables or add handheld toppings at the table like tortilla strips. To make it creamier, allow it to sit a bit longer so the dressing is absorbed more fully. These changes are about final texture, not altering the recipe.
When adjusting, make tiny changes and taste. Small shifts let you steer the flavor without losing control.
Serving, storage, and reheating made simple
Serving: Serve chilled as a main for lunch or a casual dinner. It pairs well with a simple green salad or a crusty roll. The salad is a good picnic or potluck option because it travels and holds up at room temperature for short periods.
Storage: Keep leftovers in an airtight container in the refrigerator for up to 3–4 days. Because the dressing absorbs into the pasta over time, the texture will change slightly, but the flavors usually deepen. If you know you’ll have leftovers, you can reserve a small amount of dressing to toss in later for freshness.
Reheating: This salad is best served cold, but if you prefer it warm, remove a portion and gently microwave in short intervals, stirring between bursts until it’s just warmed through. Heated cheese will change the texture, so warm only what you plan to eat immediately.
Simple storage tips: Label the container with the date and keep it on a main fridge shelf rather than in the door to maintain a consistent cold temperature.
Questions new cooks often ask about this recipe
How long will this take? From start to finish, including chilling, budget about 45 minutes. Active time is closer to 15–20 minutes.
Can I use rotisserie chicken? Yes — rotisserie or leftover grilled chicken works beautifully and saves time.
Is it okay to use pre-shredded cheese? Absolutely. Pre-shredded cheese works fine here and keeps the recipe faster.
My pasta stuck together after cooling. Is that normal? Slight sticking can happen if pasta cools tightly packed. Toss with a small drizzle of dressing or a splash of olive oil and separate pieces gently.
What if my dressing separates? If the dressing looks separated when you open the bottle, give it a good shake before use. If it separates after mixing, a gentle stir will usually bring it back together.
Is it normal for flavors to be milder after chilling? Yes — chill dulls flavors a bit, so you may want to adjust salt or pepper after it chills.
Each of these moments is normal; small adjustments are part of cooking and nothing to worry about.
Final encouragement from Carla
Cooking should feel like a practice, not a performance. This BBQ Chicken Pasta Salad is forgiving, quick, and teaches useful skills that will make you more confident in the kitchen. If your first attempt isn’t exactly like a photo, that’s okay — it will still taste great and you’ll learn something for next time. Keep tasting, keep adjusting gently, and celebrate the fact that you made a wholesome meal from simple ingredients.
Conclusion
If you’d like a slightly different take on the same idea, this Barbecue Chicken Pasta Salad – The Tipsy Housewife offers a similar crowd-pleasing preparation with its own twist, and this Smoky BBQ Chicken Pasta Salad – Rachael’s Good Eats explores a smokier flavor profile you might enjoy comparing to your finished salad.
BBQ Chicken Pasta Salad
Ingredients
Method
- Cook the pasta according to package instructions; drain and let cool.
- In a large bowl, combine the cooked pasta, grilled chicken, black beans, cheese, and green onions.
- Drizzle the creamy dressing over the salad and toss to combine.
- Season with salt and pepper to taste.
- Chill in the refrigerator for at least 30 minutes before serving.