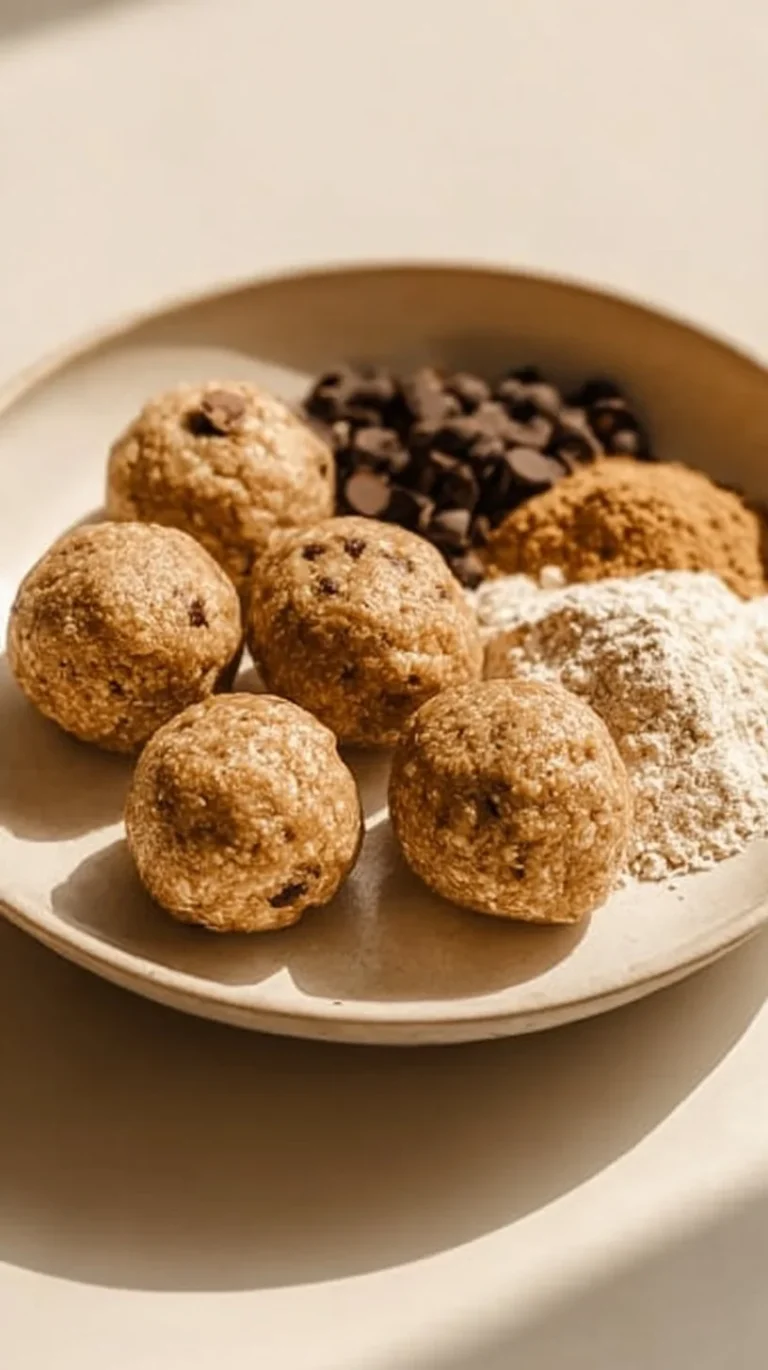
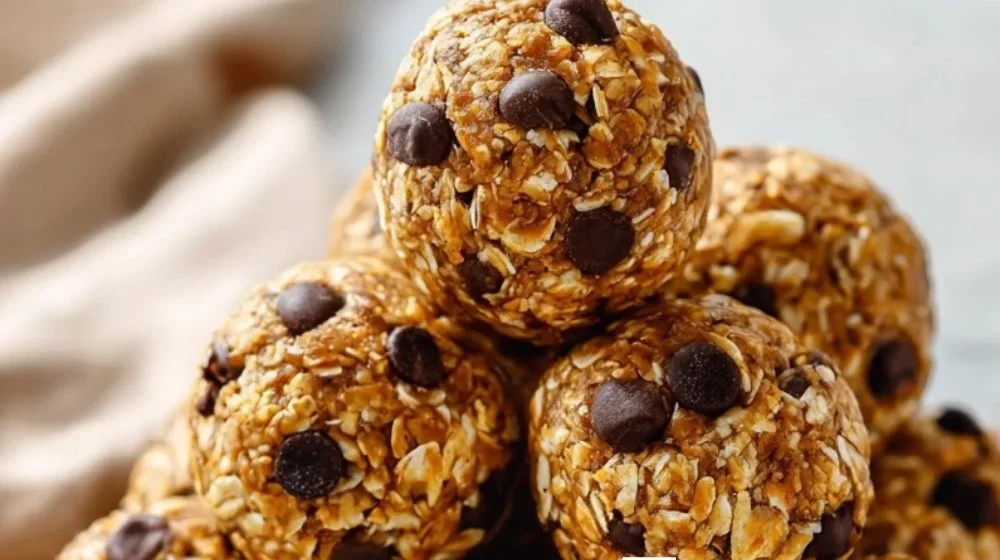
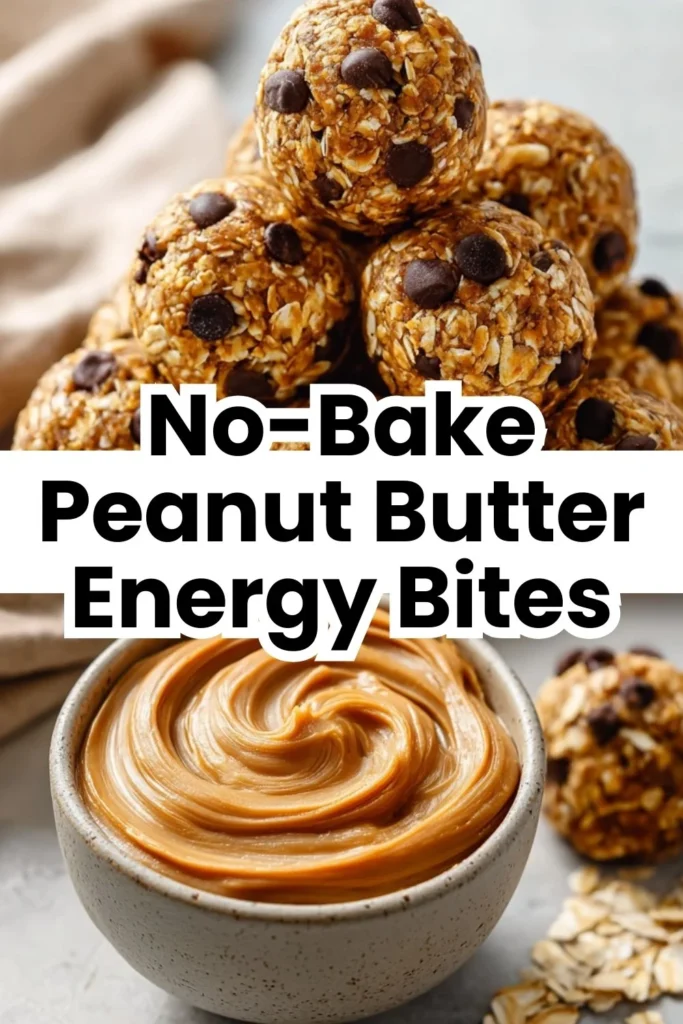
No-Bake Peanut Butter Energy Bites
Introduction
If you’re looking for a small, satisfying snack that’s quick, no-fuss, and hard to mess up, these No-Bake Peanut Butter Energy Bites are for you. They’re the kind of recipe that welcomes beginners, comforts anyone who’s felt intimidated in the kitchen, and gives you a reliable result every time.
This recipe is approachable because it uses just four familiar ingredients and one simple technique: mixing and rolling. There’s no oven involved, no timers to babysit, and no complicated tools. If you’ve ever felt unsure about a recipe or worried you’d “ruin” something, this is a perfect place to rebuild confidence — gently and successfully. If you want a visual nudge from another sweet, small-batch recipe, I often compare rolling and portioning to what you do when making macarons; I find it helps to think in small, even portions like when I follow guides for a buttercream macarons recipe — the idea of gentle hands and even portions is the same.
I’ll walk you through every step with clear explanations of what to watch for, what small variations are okay, and how to feel confident about the outcome.
Why this recipe is easy to get right
This recipe is forgiving in wonderful ways. First, the ingredient list is short and each component has a clear role: oats provide structure, peanut butter binds, honey adds sweetness and tackiness, and chocolate chips add texture and flavor. Because there are only four elements, mistakes tend to be simple and fixable.
Flexibility is baked into the process. If your peanut butter is a bit firmer, a warmer kitchen or a brief press with the spoon will bring it to a workable consistency. If your honey is thick, a small stir loosens it without changing the flavor. Since we’re not baking, you’re not racing the oven — you have the luxury of adjusting texture by hand until the mixture behaves like dough.
This dish suits all skill levels because it practices essential, low-pressure techniques: measuring, mixing, and rolling. If you’re new, treat it like a practice session — the goal is learning how the mixture should feel more than achieving perfect-looking balls. Small imperfections are normal and part of learning.
How to make No-Bake Peanut Butter Energy Bites
The process is three simple stages: combine dry ingredients, add binders and mix, then portion and roll.
First, you combine the oats and chocolate chips. Visually, you should see a dry, slightly speckled mixture where the chips stand out against the oats. This step separates the dry from the wet so that when you add the wet ingredients next, they coat everything evenly.
Next, add the peanut butter and honey. At this stage, the mixture moves from loose and dry to thick and clumpy. Use a sturdy spoon or spatula and stir until everything looks uniform — you want no large streaks of oats unattached to any peanut butter. The texture should be sticky enough to hold shape when pressed together, but not so wet that it slips through your fingers. If it’s too dry, press firmly while mixing to help the peanut butter warm and spread; if it’s too wet, chilling briefly will help it firm up.
Last, scoop and roll into 12 balls. Scoop a heaping teaspoon or small cookie scoop of mixture, press it together in your hands and roll between your palms into a compact ball. The balls don’t need to be museum-perfect — a slightly rustic look is perfectly fine. If the mixture sticks to your hands, pop them in the fridge for a few minutes to firm up or dampen your palms slightly so rolling is easier.
If you’re a beginner, slow down during the mixing stage. Make sure the peanut butter is evenly distributed and that the honey has been fully incorporated. A well-mixed base prevents crumbly bites and ensures each one tastes balanced.
I sometimes refer back to techniques I use on other small-batch recipes; if you want a visual comparison for portioning and rolling, this small tutorial on buttercream macarons portioning can help you translate those gentle motions to these bites.
Ingredients
½ cup quick oats, ¼ cup peanut butter, 2 tablespoons honey, ¼ cup mini chocolate chips
Each ingredient here is simple and familiar, and each plays an important role:
- ½ cup quick oats: These give the bites their body and chew. Quick oats absorb some moisture more quickly than old-fashioned oats, so they help the mixture come together faster. They’re not intimidating — they’re plain, wholesome, and easy to work with.
- ¼ cup peanut butter: The glue. Peanut butter adds fat, flavor, and binding power. I recommend a smooth peanut butter for the creamiest texture, but chunky works too if you enjoy more texture.
- 2 tablespoons honey: Honey adds sweetness and tackiness. It helps the mixture stick together and gives a pleasant chew. Its viscosity can vary by brand or temperature, but that’s okay because you can adjust by feel.
- ¼ cup mini chocolate chips: These add little pockets of chocolate and a fun texture contrast. Mini chips mix through the oats nicely and make each bite feel a little indulgent.
None of these are complicated or require special handling. Together, they produce a balance of nutty, sweet, chewy, and chocolatey — a combination that’s reliably pleasing and easy to pull off.
Directions
Combine oats and chocolate chips in a medium bowl., Add peanut butter and honey; stir until well combined., Scoop mixture into 12 balls and roll between your hands., Store in an airtight container at room temp or chilled.
Now I’ll add some supportive guidance for each of those exact steps so you know what to expect and how to respond to common small hiccups.
- Combine oats and chocolate chips in a medium bowl.
- Visual cue: the bowl should look dry with chocolate dots throughout. If the chips clump together, use your fingers or a fork to separate them so they’re evenly distributed.
- Add peanut butter and honey; stir until well combined.
- Texture cue: at first the mixture may look shaggy; after a minute of stirring it should hold together when pressed. If the peanut butter is cold and stiff, pressing it against the bowl with the back of the spoon or warming it briefly with your hands will help.
- Timing hint: about 1–2 minutes of stirring is often enough. You want the oats to be coated, not floating in a glossy pool.
- Scoop mixture into 12 balls and roll between your hands.
- Portioning tip: use a small cookie scoop or a tablespoon to keep sizes even. When rolling, press gently but firmly to compact the mixture.
- If the mixture sticks: cool the bowl in the fridge for 5–10 minutes and try again, or lightly dampen your palms. Don’t worry if they aren’t perfectly round — a slightly rustic shape is normal.
- Store in an airtight container at room temp or chilled.
- Storage note: at room temperature they’ll remain soft and chewy; chilled, they’re firmer and hold shape better. Decide based on how you like the texture.
If something looks a little off at any step, those visual and texture cues will usually tell you what to do: stir a bit longer, press more firmly, or cool briefly. You won’t need to start over.
Key techniques you’ll practice in this recipe
This recipe helps you practice a few fundamental kitchen skills that transfer to many other recipes:
- Measuring: Learning to eyeball and accurately measure small amounts builds trust. These small volumes make it easier to learn how much a quarter cup or two tablespoons look like.
- Mixing to texture: You’ll learn to stop relying exclusively on time and instead watch for visual and tactile cues — when oats are coated, when the mixture clumps, and when it holds shape.
- Portioning and rolling: Making even-size balls teaches hand control, pressure, and how to compact mixtures so they don’t fall apart. These skills are directly useful for cookies, truffles, and homemade energy bars.
- Temperature awareness: Learning how room temperature vs. chilled affects texture is a gentle introduction to how temperature changes ingredients’ behavior.
These simple techniques are the building blocks for confidence in the kitchen. They’re accessible and low-pressure, and you’ll notice the benefits in many other recipes.
Common mistakes and how to avoid them
Even with a forgiving recipe, a few mistakes can happen. Here’s what they look like and how to fix them without stress.
- Mixture too dry and crumbly:
- Cause: peanut butter may be too thick or not evenly mixed.
- Fix: press and stir more to warm the peanut butter with friction, or add a tiny drip of honey (very sparingly) and mix again. If the mixture stays crumbly, chill briefly and press firmly when forming balls.
- Mixture too wet and sticky:
- Cause: too much peanut butter or honey, or a very warm kitchen.
- Fix: pop the bowl in the fridge for 10–15 minutes to firm up, then try rolling. You can also add a tablespoon of oats to soak up excess moisture, but only if absolutely needed.
- Balls won’t hold shape:
- Cause: not compacted enough or ingredients not well mixed.
- Fix: press the mixture more firmly as you roll and make sure there are no loose pockets of oats. If needed, chill slightly and then form again.
- Chocolate chips melt into mixture:
- Cause: peanut butter was too warm.
- Fix: chill the bowl briefly before adding chips next time, or stir more gently to avoid friction heat. Small imperfections here are fine — flavor matters more than appearance.
These are easy, fixable situations. Don’t worry if you encounter them — adjust gently and keep going.
How to adjust confidently without changing the recipe
You asked for ways to adjust without altering ingredients or steps — that’s smart. Here’s how you can adapt conceptually:
- Portion scaling concepts:
- If you want more or fewer bites, scale by simple multiples. For double the amount, double the time spent mixing and slightly larger bowls. For half, work with smaller portions and you might find it easier to mix in a smaller bowl.
- Flavor preference adjustments (conceptual):
- Think about how you distribute flavor rather than changing measurements. For extra peanut butter flavor, mix a bit more thoroughly so the peanut butter coats the oats evenly. If you want a sweeter bite, press a little more honey into each ball as you roll so each one has a glossy, sweet surface.
- Texture tweaks — conceptually only:
- Firmer texture: chill the mixture longer before rolling and store chilled.
- Softer texture: let the bites sit at room temperature for a while before serving.
- For a chewier bite, press the mixture together more tightly as you roll.
Remember: these are conceptual ideas — don’t change the actual ingredient amounts or steps. Instead, use technique, chilling time, and how tightly you compact each ball to vary outcome while keeping the recipe unchanged.
Serving, storage, and reheating made simple
Serving:
- These bite-sized snacks are perfect on a small plate, in snack boxes, or tucked into a lunch. They pair well with a glass of milk, coffee, or tea. Present them in small clusters; uneven shapes look homey and inviting.
Storage:
- Store in an airtight container at room temperature for short-term snacking (a few days); they’ll stay soft and ready-to-eat. For longer storage or firmer texture, keep them chilled — they’ll last up to a week in the fridge. If you plan to keep them longer, freeze them layered between parchment for up to a month and thaw at room temperature for 10–15 minutes before enjoying.
Reheating:
- These bites do not need reheating. If you prefer a softer bite after refrigeration, let them sit for 10–15 minutes at room temperature. For a very soft result, a few seconds in the microwave (5–7 seconds) will soften them, but be cautious — chocolate chips can melt quickly.
Questions new cooks often ask about this recipe
- How long does this take from start to finish?
- Plan for about 10–15 minutes from bowl to bites. If you chill between mixing and rolling, add 10–15 minutes.
- What equipment do I need?
- A medium bowl, a spoon or spatula, and something to scoop (tablespoon or small cookie scoop). That’s it — no special tools required.
- Is it normal if the texture changes a bit each time?
- Yes. Variations in peanut butter brand, room temperature, and how firmly you roll will change texture slightly. That’s normal and fine.
- Can I make these for guests?
- Absolutely. They’re quick to make and easy to portion. Slight shape differences won’t bother guests — flavor and care matter more than perfection.
- I’m nervous about rolling — what if they’re messy?
- Messiness is okay. If you’re anxious, chill the mixture briefly so rolling is neater. Over time you’ll find a comfortable rhythm and your hands will learn the right pressure.
Final encouragement from Carla
You’ve chosen a recipe that helps you build confidence quietly and steadily. No-bake snacks like these are a great way to practice technique without fear. Small steps — mixing until the oats are coated, pressing the mixture so it holds, or chilling briefly to firm things up — add up to success and teach you skills that transfer across many kitchen tasks.
Cooking is about progress, not perfection. If your first batch looks a little rustic, that’s a win. Each time you make them you’ll notice small improvements, and those improvements are what build lasting confidence. Keep experimenting, be gentle with yourself, and enjoy the process. I’m cheering you on.
Conclusion
If you’d like to see a similar no-bake idea with a slightly different twist, No Bake Energy Bites | Gimme Some Oven is a great reference for inspiration. For another take on the classic no-bake format and extra tips, this No-Bake Energy Bites Recipe on Allrecipes provides helpful variations and user-tested notes.
No-Bake Peanut Butter Energy Bites
Ingredients
Method
- Combine oats and chocolate chips in a medium bowl.
- Add peanut butter and honey; stir until well combined.
- Scoop mixture into 12 balls and roll between your hands.
- Store in an airtight container at room temp or chilled.