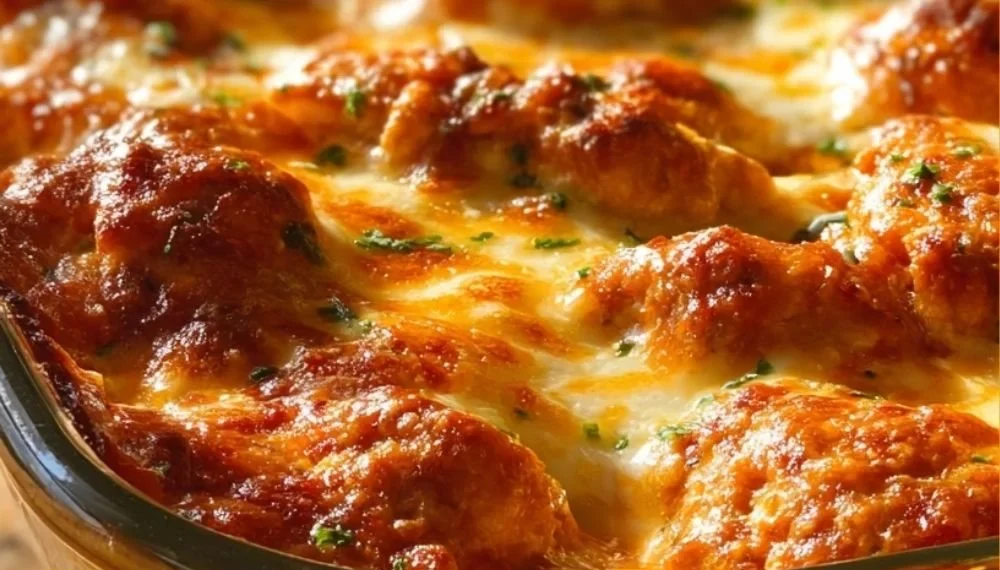
Cottage Cheese Chicken Parmesan Bowl
Introduction
This Cottage Cheese Chicken Parmesan Bowl is for anyone who wants the comforting flavors of chicken Parmesan without the fuss of breading and deep frying. If you’re new to cooking, coming back to the kitchen after a break, or someone who wants a reliable weeknight meal, this bowl is approachable and forgiving. It layers familiar elements — lean chicken, tangy marinara, creamy cottage cheese and melty parmesan — in a way that feels like a treat, not a challenge.
I like to reassure readers that simple recipes can teach you a lot. You’ll get practice with browning protein, handling a sauce, and assembling a balanced bowl that tastes like a restaurant version even on a busy night. If you enjoy easy, satisfying dinners, you might also appreciate the flavor approach from my take on a savory chicken pizza: my favorite BBQ chicken pizza method. That’s a gentle reminder that techniques repeat themselves across recipes — once you learn one, you’ll find the rest easier.
Why this recipe is easy to get right
There are a few reasons this bowl is forgiving. First, the cottage cheese adds creaminess and a cushion for textures, so small variations in cooking time for the chicken don’t ruin the final bite. Second, using a sauce like marinara is generous: if the sauce is a touch thin or a bit thicker than you wanted, it still blends beautifully with the cottage cheese and parmesan.
Flexibility is built in — if your chicken is slightly more done than planned, the sauce and cheese bring moisture back. If your sauce needs a lift, the cheese and a little fresh herb will brighten it. You don’t need precise timing or advanced techniques to succeed. Most errors here are small and fixable, which makes this recipe an excellent confidence builder.
How to make Cottage Cheese Chicken Parmesan Bowl
Think of this bowl in three broad stages: preparing the chicken, warming the sauce and cheese, and assembling the bowl. That simple roadmap keeps things calm and focused.
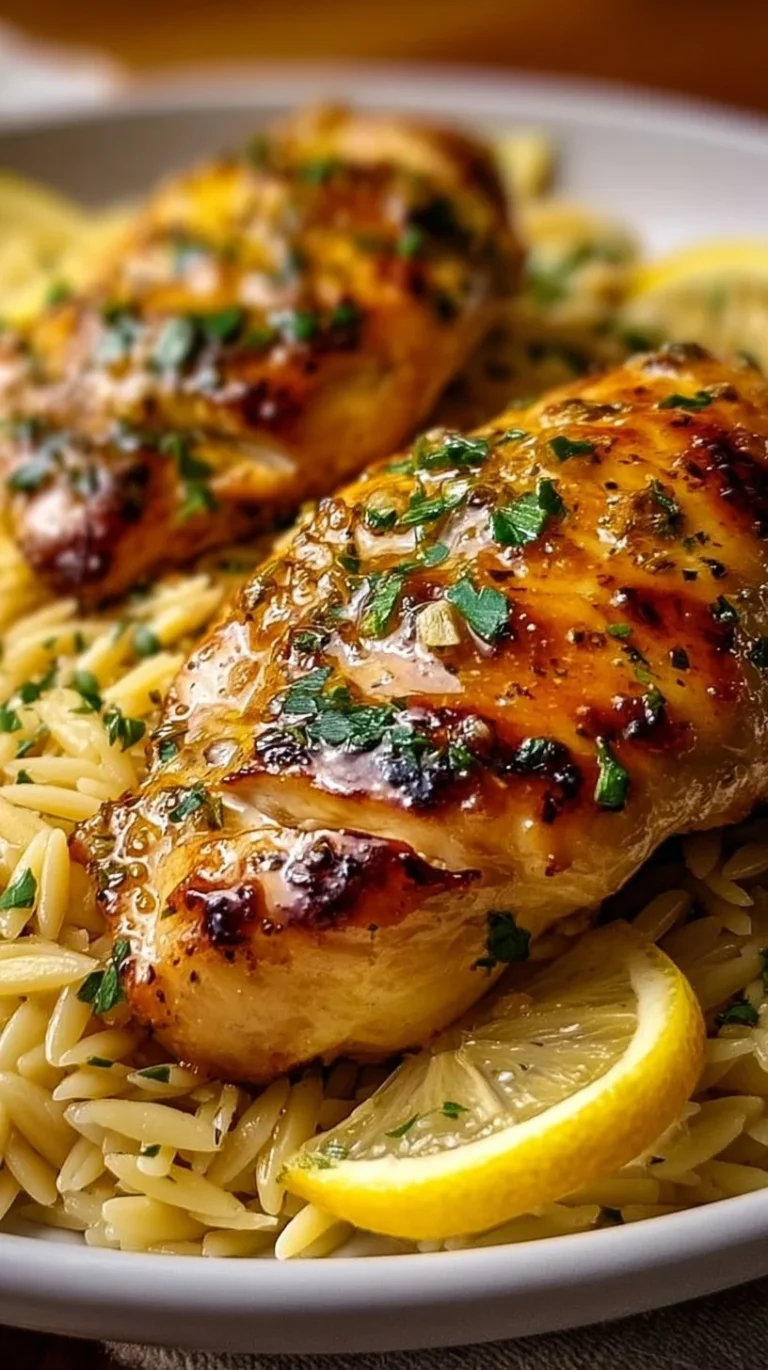
First: prepare and cook your chicken. The aim here is a nicely browned outside and fully cooked inside. Visual checks — golden edges, juices running clear if you gently press the thickest part — are your guides. If you’re nervous about doneness, use a thermometer; 165°F (74°C) is the safe target, but it’s fine to let the chicken rest a few minutes after cooking to redistribute juices.
Next: warm your marinara and get the cottage cheese and parmesan ready. You want a sauce that’s gently bubbling or steaming so it melds with the other elements. Cottage cheese doesn’t need cooking; its cool creaminess contrasts with the warm components. Sprinkle parmesan where you want melt and flavor — a little goes a long way.
Last: assemble the bowl. Layer the base (rice, pasta, salad greens, or simply the chicken), add the warm sauce, dollops of cottage cheese, a scatter of parmesan, and finish with fresh herbs or cracked pepper. The goal is balance: warm and cool, saucy and creamy, tender and slightly crisp.
Beginners should slow down while browning the chicken — give it space in the pan so it sears rather than steams. And when combining hot sauce with cool cheese, do so gently so textures stay pleasant. Small imperfections (a bit too much sauce in one spot, a less uniform cheese dollop) are normal and don’t affect the overall taste.
Ingredients
Even if you don’t have a long ingredient list, each component plays a clear role:
Chicken: The main protein and textural anchor. It brings savory meatiness and fills the bowl. A well-cooked piece should be firm but still juicy. If it looks dry while cooking, reduce heat and add sauce or a splash of water to rescue moisture.
Cottage cheese: This is the comforting, creamy element that keeps the bowl feeling indulgent without heavy cream. It adds tang and body, breaking up the heat of the marinara with cool, slightly lumpy creaminess that’s pleasant against warm chicken.
Marinara sauce: Provides acidity, tomato flavor and moisture. It’s the flavor bridge between chicken and cheese. If it’s very acidic or bland, small adjustments (a pinch of sugar, a pat of butter, or some fresh basil) can balance it quickly.
Parmesan: Adds salty, nutty depth and helps the bowl feel finished. A little grated parmesan melted over the top brings that classic chicken Parmesan note.
Herbs and seasonings (salt, pepper, optional basil or parsley): These lift and brighten everything. Fresh herbs at the end are where the dish gains freshness and color.
None of these ingredients are exotic or intimidating. They are pantry-friendly, and they work together by providing contrast: warm vs. cool, acid vs. cream, chewy vs. tender. That balance is what makes the bowl satisfying.
Directions
Rather than rewriting the recipe’s steps, I want to give supportive guidance that lets you follow them successfully and with confidence.
Visual cues for cooking the chicken: look for a golden-brown surface and edges that start to crisp slightly. If the chicken sticks when you try to flip it, give it another minute — it will release when the sear is ready. Cut into the thickest part if you’re unsure; the color should be opaque and juices clear.
For the sauce: heat it until it’s steaming and slightly bubbling at the edges. That tells you it’s hot enough to meld flavors and will warm the cottage cheese slightly when combined. If the sauce thickens too quickly, a tablespoon of water will loosen it; if it’s too thin, simmer a little while longer to reduce it.
Combining hot and cool components: spoon sauce over the chicken and add the cottage cheese in small dollops. It will soften where it meets heat, becoming creamy, but it won’t disappear. If the bowl looks uneven, gently fold a corner of chicken into the sauce to blend textures.
Timing hints: give the cooked chicken a short rest (3–5 minutes) before assembling; this helps juices settle. When melting parmesan, a brief time under a hot pan lid or a quick broil for 30–60 seconds is enough to warm the cheese without drying the chicken.
If something doesn’t look perfect right away — a sauce that’s slightly separated, or cottage cheese that hasn’t warmed through — remember small adjustments fix most issues. Stir gently, add a splash of liquid, or give it another 30 seconds of heat. You won’t need to start over.
Key techniques you’ll practice in this recipe
This bowl teaches a handful of techniques that are useful across many recipes:
Searing meat: Learning to get a golden surface without overcooking the inside translates to fish, pork chops, and steaks. You’ll learn how heat and time create flavor through browning.
Simmering sauce: Watching a tomato sauce move from cool to steaming teaches you control over consistency and flavor concentration. It’s the same skill you’ll use for soups and stews.
Assembling layers for texture contrast: Building a bowl trains you to think about temperature and texture — folding cool elements into hot ones without losing their character. That skill improves salads, grain bowls and more.
These techniques are low-stress to practice here because the bowl’s components hug imperfection. Once you’ve seen how a little heat changes cheese or how rest time affects meat, you’ll feel more confident trying similar steps in other dishes. If you want to compare how layered flavors work in a different context, I sometimes reference the textural play in my pizza recipes like my BBQ chicken pizza guide when I teach assembly.
Common mistakes and how to avoid them
A few issues pop up more often for new cooks, and they’re easy to fix:
Chicken dries out: This happens when heat is too high or the cook time is too long. To avoid it, give the pan a few minutes to get hot, then lower the heat slightly once a good color forms. If your chicken is already dry, a spoonful of sauce or an extra dollop of cottage cheese will add moisture and flavor.
Sauce is too thin or too thick: Thin sauce can be reduced by simmering a little longer; add a cover to speed things up if you want to avoid splattering. If it’s too thick, stir in a small bit of water or broth until it loosens. Taste as you go.
Cheese doesn’t melt or looks clumpy: Cottage cheese won’t melt like mozzarella — that’s part of its charm — but parmesan should soften. If the parmesan isn’t softening, give the assembled bowl a short, gentle heat under a lid or under the broiler for just a moment. Watch closely; cheese can go from melty to overdone quickly.
If something goes off-track, take a breath and see what can be adjusted. Cooking is iterative: small fixes often restore the dish. You rarely need to toss anything and start over.
How to adjust confidently without changing the recipe
You asked for ways to tweak the dish conceptually, and you can do that while keeping the original steps and amounts:
Scaling portions: Think in ratios. If you’re feeding more people, increase the protein and sauce roughly proportionally. For a single serving, reduce the protein and sauce amounts evenly. The key is keeping the balance between chicken, sauce, and cottage cheese.
Flavor preferences: If you prefer more tang, add extra cottage cheese or a twist of lemon zest at the end. For more herb flavor, increase fresh basil or parsley as a finishing touch rather than cooking it in, which keeps brightness.
Texture tweaks (conceptually): For crunch, add toasted breadcrumbs or a handful of raw greens on the side. For extra creaminess, let the cottage cheese sit at room temperature a few minutes before assembling so it softens. For a firmer bite, use denser grains or a thicker sauce.
These are conceptual changes — they don’t alter the recipe’s steps or measurements but let you make the final bowl feel more like your favorite version.
Serving, storage, and reheating made simple
Serving is straightforward: present the bowl warm with a final sprinkle of parmesan and fresh herbs. A wedge of lemon or a small drizzle of good olive oil brightens the whole dish. Pair it with a simple salad or some crusty bread for a more complete meal.
Storing leftovers: place cooled leftovers in an airtight container and refrigerate within two hours. Properly stored, the bowl should be good for 3–4 days. If you’ve assembled everything together, the cottage cheese will blend more with the sauce over time; that’s normal.
Reheating tips: warm gently. Microwave in short bursts (30–45 seconds), stirring between intervals, until heated through. Alternatively, reheat in a skillet over medium-low heat with a splash of water to loosen the sauce; cover for a minute to steam the bowl and then uncover to evaporate excess moisture. If you want to revive a bit of crispness on the chicken, finish under the broiler for a very short time, watching closely.
If the reheated bowl seems a little dry, add a spoonful of sauce or a fresh dollop of cottage cheese after heating.
Questions new cooks often ask about this recipe
How can I tell when the chicken is done? Visual cues help: an opaque center and clear juices mean it’s cooked. If you have a thermometer, aim for 165°F (74°C). Rest the meat briefly to let juices settle.
What equipment do I need? A good nonstick or stainless skillet for browning, a spoon for stirring sauce, and a bowl for assembling. No fancy tools required.
Is cottage cheese supposed to melt? No — cottage cheese keeps a cool creaminess and soft texture even when warmed slightly. That contrast is part of the charm. If you prefer a fully melted cheese, add a small amount of shredded mozzarella or let parmesan melt briefly under heat.
My sauce separated — is that normal? Tomato sauces can separate if overheated or if they have a high-fat content. A short whisk or a gentle stir over low heat fixes most separation. A splash of liquid can help bring it back together.
What if I don’t like cottage cheese texture? Try blending it briefly for a smoother consistency or swap a portion with ricotta for similar creaminess but a different mouthfeel.
These are all normal concerns. Small adjustments and observing visual cues will build your confidence quickly.
Final encouragement from Carla
Cooking is a series of little wins. With this Cottage Cheese Chicken Parmesan Bowl, you’re practicing searing, saucing, and assembly — skills that pay off again and again. If something doesn’t look textbook-perfect on your first try, that’s completely fine. Taste, adjust, and learn from each plate. Your kitchen skills grow one meal at a time, and this bowl is a gentle, rewarding step forward.
Conclusion
If you want to see a similar take on this idea or compare protein-packed variations, you can look at this helpful rendition on an external site for inspiration: Cottage Cheese Chicken Parm Bowl (46 Grams of Protein!) – Fit Healthy Macros.

Cottage Cheese Chicken Parmesan Bowl
Ingredients
Method
- Prepare and cook the chicken until browned and fully cooked, using visual cues for doneness.
- Warm the marinara sauce until it is gently bubbling. Prepare cottage cheese and parmesan for assembly.
- Layer your bowl with your base (rice, pasta, greens), add warm sauce, dollops of cottage cheese, a sprinkle of parmesan, and finish with fresh herbs.