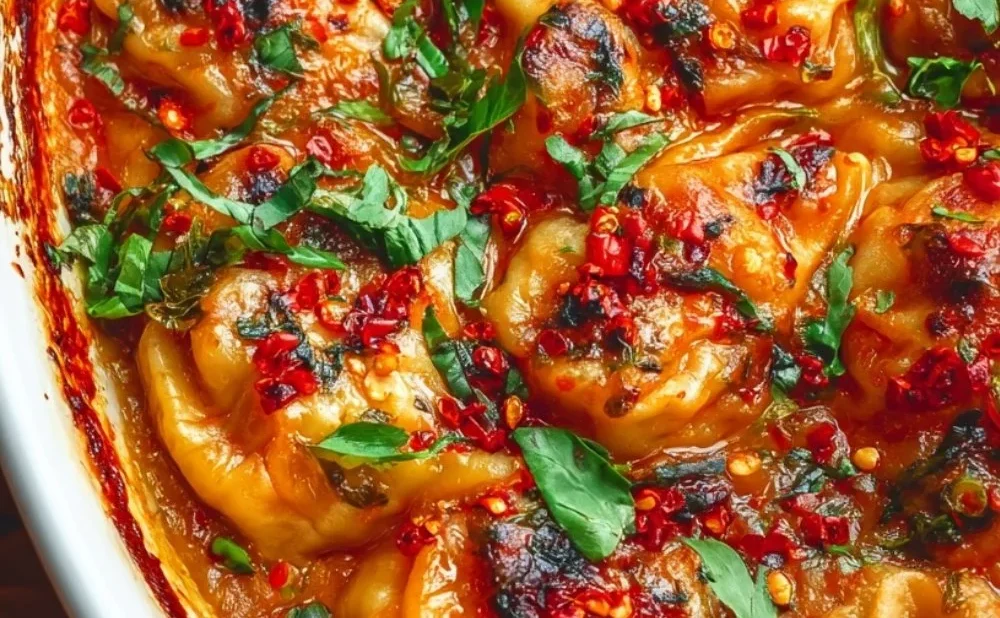
Vegan Baked Dumplings
Introduction
Hello — I’m Carla Carter, Founder & Recipe Developer of RecipesCabin. If you’re looking for a gentle, reliable way to make Vegan Baked Dumplings, you’re in the right place. This recipe is for anyone who wants the comfort of dumplings without fuss: home cooks who are new to dough, people returning after a kitchen mishap, and anyone who enjoys reliable, plant-based meals. I’ll walk you through each step, explain why it works, and help you feel calm and confident at the stove. This is approachable, forgiving food that rewards care more than perfect technique.
These dumplings are a great recipe to learn from because they combine simple dough work with a forgiving filling, and finishing them in the oven makes the process tidy. You don’t need special equipment, and small imperfections — uneven edges or imperfect pleats — won’t ruin the dish. I’ll point out the checkpoints that matter most so you can feel good about each part of the process.
Why this recipe is easy to get right
Vegan Baked Dumplings are forgiving for several reasons. First, the dough is a basic mixture of flour and water that tolerates a range of kneading effort — a slightly less smooth dough will still roll and hold filling. Second, the filling is flexible: vegetables and crumbled tofu bind together with flavoring, and small variations in chop size won’t break the recipe. Baking instead of steaming or frying reduces the chance of sogginess or burning; a clear visual cue — golden brown color — tells you when they’re done.
Where this recipe allows flexibility: you can adjust how finely you chop the vegetables, gently press the dumplings rather than perfect pleating, and brush with a light coating of oil for color instead of complicated egg washes. The key checkpoints are dough texture, filling moisture, and oven color — focus on those and you’ll succeed. If you’ve felt unsure about dough before, this recipe is an inviting way to practice without pressure.
How to make Vegan Baked Dumplings
At a glance, the process has three parts: make the dough, prepare the filling, and assemble + bake. Start with the dough so it can rest while you make the filling. Resting makes the dough easier to roll and less springy — that’s the first helpful trick.
Next, mix the filling: combine the vegetables, crumbled tofu, and seasonings. You’re looking for a mixture that feels cohesive but not soggy; that texture helps the filling hold together in the wrapper. As you mix, taste a tiny bit (if you like) to adjust salt and pepper — but don’t overdo it, because oven baking concentrates flavors slightly.
Finally, roll, fill, and bake. Roll the dough to an even thickness, cut circles, and place a spoonful of filling in each. Seal gently; a simple fold and press is fine. Lay them on a baking sheet, brush with oil for color, and bake until they’re golden brown. Watch the oven window — when the edges start to turn light brown and the tops develop a warm golden sheen, they’re done.
Beginners should slow down while rolling and filling. Take your time to keep the dough from sticking by dusting with flour lightly, and use a timer while baking so you don’t overcook. If things look a little different than you expected, that’s normal; small variations still make delicious dumplings.
Ingredients
2 cups of all-purpose flour, 1/2 cup of water, 1 cup of finely chopped vegetables (like cabbage, carrots, and mushrooms), 1/2 cup of firm tofu, crumbled, 2 tablespoons of soy sauce, 1 tablespoon of sesame oil, 1 teaspoon of garlic powder, Salt and pepper to taste
What each ingredient does and why none are intimidating
- 2 cups of all-purpose flour: This is the base of your wrapper. All-purpose flour creates a dough that is strong enough to hold filling but soft enough to roll. It’s a pantry staple and very forgiving — if your dough feels a little stiff, a touch more water can bring it to life.
- 1/2 cup of water: Water hydrates the flour and forms gluten, which gives the dough elasticity. The amount listed gives a workable dough that won’t be sticky. If your air is dry or your flour is older, you may notice small differences — that’s okay. The dough should come together without being tacky.
- 1 cup of finely chopped vegetables (like cabbage, carrots, and mushrooms): These provide texture, flavor, and moisture. Finely chopping them helps the filling stay together and ensures even cooking. Choose fresh vegetables, but there’s nothing complicated here — think simple, small pieces.
- 1/2 cup of firm tofu, crumbled: Tofu gives body and a subtle creaminess to the filling. Crumbling it mimics the texture you want so the filling is cohesive. Firm tofu holds up during mixing and baking without becoming mushy.
- 2 tablespoons of soy sauce: Soy sauce brings savory depth and seasoning. It’s the backbone of flavor in the filling and helps everything taste integrated.
- 1 tablespoon of sesame oil: A little sesame oil adds a toasty, warm note. It’s a finishing flavor, so a small amount goes a long way.
- 1 teaspoon of garlic powder: Garlic powder is an easy way to add aromatic savory flavor without chopping fresh garlic. It mixes evenly and keeps the filling reliably seasoned.
- Salt and pepper to taste: These are the final balance. Salt lifts flavors, and pepper gives a subtle bite. Taste as you go and remember that baking concentrates flavors slightly, so a gentle hand is fine.
Together, these ingredients create a balanced filling that’s textured, flavorful, and easy to work with. None require special preparation skills — simple chopping, crumbling tofu, and mixing are all accessible techniques.
Directions
- In a mixing bowl, combine flour and water. Knead until smooth. Cover and let it rest for 10 minutes.
- In another bowl, mix chopped vegetables, crumbled tofu, soy sauce, sesame oil, garlic powder, salt, and pepper.
- Roll out dough and cut into circles.
- Place a spoonful of the filling on each circle, fold, and seal.
- Preheat the oven to 425°F (220°C).
- Place dumplings on a baking sheet, brush with oil, and bake for 15-20 minutes until golden brown. Serve hot.
Supportive guidance around the steps
- Step 1 (dough): When you combine the flour and water, the mixture will look shaggy at first. That’s normal. Knead until the surface becomes smooth and slightly elastic. It should feel soft but not sticky. If it’s sticky, dust your hands and work surface lightly with flour — a little flour on the outside is fine. Covering and letting it rest for 10 minutes relaxes the dough, making it much easier to roll; you’ll notice it stops springing back under the rolling pin.
- Step 2 (filling): As you mix the vegetables and tofu, look for a uniform texture where the vegetable pieces and tofu are evenly distributed. The mixture should feel moist but not wet. If it seems too watery, press gently with a spoon to remove excess liquid from the vegetables — especially from cabbage or mushrooms. The soy sauce and sesame oil will turn the filling slightly darker and give it a glossy sheen; you’ll pick up the aromas of sesame and umami as you stir.
- Step 3 (rolling and cutting): Roll the rested dough into a smooth disk dusted with flour, then roll out to an even thickness — about the thickness of a quarter is a good visual. Use a biscuit cutter or a glass to cut circles. If the dough shrinks back when you cut, let it rest a minute longer; that elasticity will relax. Keep the unused dough covered so it doesn’t dry out.
- Step 4 (filling and sealing): Place a modest spoonful of filling in the center of each circle — don’t overfill, as that makes sealing harder. Fold in half or pleat if you like, and press the edges firmly to seal. If the edges won’t stick, wet them lightly with a finger dipped in water and press again. Imperfect seals are okay; a small opening is fixable by pressing a little flour into a patch and resealing.
- Step 5 (preheat): Preheat the oven early so it’s ready when your dumplings are assembled. A fully heated oven ensures even browning and a crisp exterior.
- Step 6 (bake): Arrange dumplings with a bit of space between them so air can circulate and the bottoms can crisp. Brushing with oil helps them turn a warm golden brown and gives a light, appetizing gloss. Bake for 15–20 minutes; at about 12 minutes you’ll see color forming. When tops and edges are golden and the bottoms feel firm when nudged with a spatula, they’re done. Serve hot.
If something looks different — dough a touch thick, filling a touch damp — that’s okay. Small adjustments during rolling and sealing will get you to a delicious result.
Key techniques you’ll practice in this recipe
- Kneading and resting dough: You’ll learn how to bring flour and water together into a smooth dough and why resting makes rolling easier. This skill applies to flatbreads, pasta, and other filled pastries.
- Even rolling and cutting: Practicing even thickness makes for consistent cooking. This technique helps in tart shells, flatbreads, and other rolled dough preparations.
- Filling balance and moisture control: You’ll learn to judge when a filling is too wet and how to correct it by draining or pressing. This is useful in pies, stuffed vegetables, and any filled pastry.
- Sealing dough edges: Simple sealing techniques — pinch, fold, press — keep fillings contained during cooking. Once comfortable, you can explore pleating or different sealing styles for other dumplings or pastries.
These are foundational skills: gentle pressure, observation, and small corrections. They’ll serve you well beyond this single recipe.
Common mistakes and how to avoid them
- Dough too sticky: If the dough sticks to your hands or surface, sprinkle a little flour and knead briefly. Avoid adding large amounts at once; small adjustments keep the dough soft.
- Overfilling dumplings: Too much filling makes sealing difficult and can cause leaks. Use a modest spoonful and distribute filling evenly. If a dumpling bursts slightly in the oven, press it back together and continue baking — it will still taste good.
- Soggy filling: Some vegetables release a lot of moisture. To prevent sogginess, squeeze excess water from cabbage or mushrooms in a clean towel, or toss them in a colander and press gently before mixing with tofu.
- Poor seals: If edges won’t stick, wet them lightly with water before pressing. Working quickly helps because dough dries and becomes less sticky; keep unused wrappers covered.
- Overbrowning or undercooking: Ovens vary. Use the color cue — warm golden brown — as your guide. If they brown quickly but still seem undercooked, lower the oven temperature a little and bake a bit longer.
If something goes off track, small fixes usually work: adjust moisture, reseal, or redistribute on the baking sheet. You don’t need to start over.
How to adjust confidently without changing the recipe
- Portion scaling concepts: To scale this recipe, increase ingredients proportionally. If making twice as many dumplings, double each ingredient. Work in batches when assembling so dough and filling stay manageable.
- Flavor preference adjustments: You can conceptually make the filling more savory or brighter by adding acid or spices later, but don’t change the listed ingredients — instead, think about how much soy sauce or sesame aroma you prefer and adjust within the given amounts by eye. Small increases or decreases won’t break the process.
- Texture tweaks — conceptually only: If you prefer a firmer filling, chop vegetables smaller or press out more moisture; if you like a softer interior, chop slightly larger pieces. The basics of dough-to-filling ratio remain the same, so these tweaks are about texture, not altering steps or measures.
These are conceptual ideas to help you feel in control without changing the recipe’s structure.
Serving, storage, and reheating made simple
Serving: Serve hot, right from the oven. A simple dipping sauce of soy sauce and a splash of vinegar or chili oil complements the savory filling. Place dumplings on a warm platter with a small bowl of sauce, and they’re ready to enjoy.
Storage: Let leftovers cool to room temperature no longer than two hours, then store in an airtight container in the refrigerator for up to 3 days. If you want to freeze them, arrange on a baking sheet so they don’t touch and freeze until solid, then transfer to a sealed bag for up to 1 month.
Reheating: To revive baked dumplings, reheat in a 350°F (175°C) oven for about 8–10 minutes until warmed through and re-crisped. If frozen, bake from frozen at 375°F (190°C) for 12–15 minutes. Avoid microwaving if you want to keep the exterior crisp; microwaving will make them soft, but it’s fine if you prioritize speed and convenience — just put them on a plate and heat in short bursts, checking frequently.
Questions new cooks often ask about this recipe
- How firm should the dough be after kneading? It should be smooth and slightly elastic, not sticky. If it clings to your fingers, dust lightly with flour and knead until it feels cohesive.
- Do I need special tools to cut circles? No. A drinking glass, small bowl, or biscuit cutter works well. The exact size isn’t critical — pick a size that fits your palm comfortably.
- Is it normal for filling to leak a little during baking? Small leaks can happen if the seal wasn’t tight or the filling was overstuffed. Press the edges if needed and bake. They’ll still be tasty.
- Can I make the filling ahead? Yes — you can prepare the filling a few hours in advance and refrigerate it, but make sure it’s not too wet before filling wrappers.
- What’s a good dipping sauce? A simple mix of soy sauce, a splash of rice vinegar, and a few drops of sesame oil is classic and easy. Adjust to your taste.
If you feel unsure at any step, slow down and check the visual cues: smooth dough, cohesive filling, even golden color in the oven. Those signs are your best guides.
Final encouragement from Carla
Cooking is a practice, and every batch of dumplings you make teaches you something useful. If your first set looks a little rustic, that’s a sign of honest home cooking — and still delicious. Keep the pace relaxed, focus on the simple checkpoints I’ve described, and celebrate the small wins: a dough that rolls easily, a filling that tastes balanced, or a tray that turns a warm golden brown.
You’re learning practical skills — dough handling, filling balance, and finishing in the oven — that will serve you well in many recipes. Enjoy the process, trust the visual cues, and remember that progress matters more than perfection. I’m cheering you on from RecipesCabin, and I can’t wait for you to make these dumplings again and again.
Conclusion
If you’d like to see another take on baked vegan dumplings for inspiration, check this version at Vegan Baked Dumplings – The Hidden Veggies for additional serving ideas. For a one-pan, viral-style dumpling bake that can spark creativity with presentation, this guide is helpful: Dumpling Bake (Viral One Pan Dumplings) – Cooking With Ayeh.

Vegan Baked Dumplings
Ingredients
Method
- In a mixing bowl, combine flour and water. Knead until smooth. Cover and let it rest for 10 minutes.
- In another bowl, mix chopped vegetables, crumbled tofu, soy sauce, sesame oil, garlic powder, salt, and pepper.
- Roll out dough and cut into circles.
- Place a spoonful of the filling on each circle, fold, and seal.
- Preheat the oven to 425°F (220°C).
- Place dumplings on a baking sheet, brush with oil, and bake for 15-20 minutes until golden brown. Serve hot.