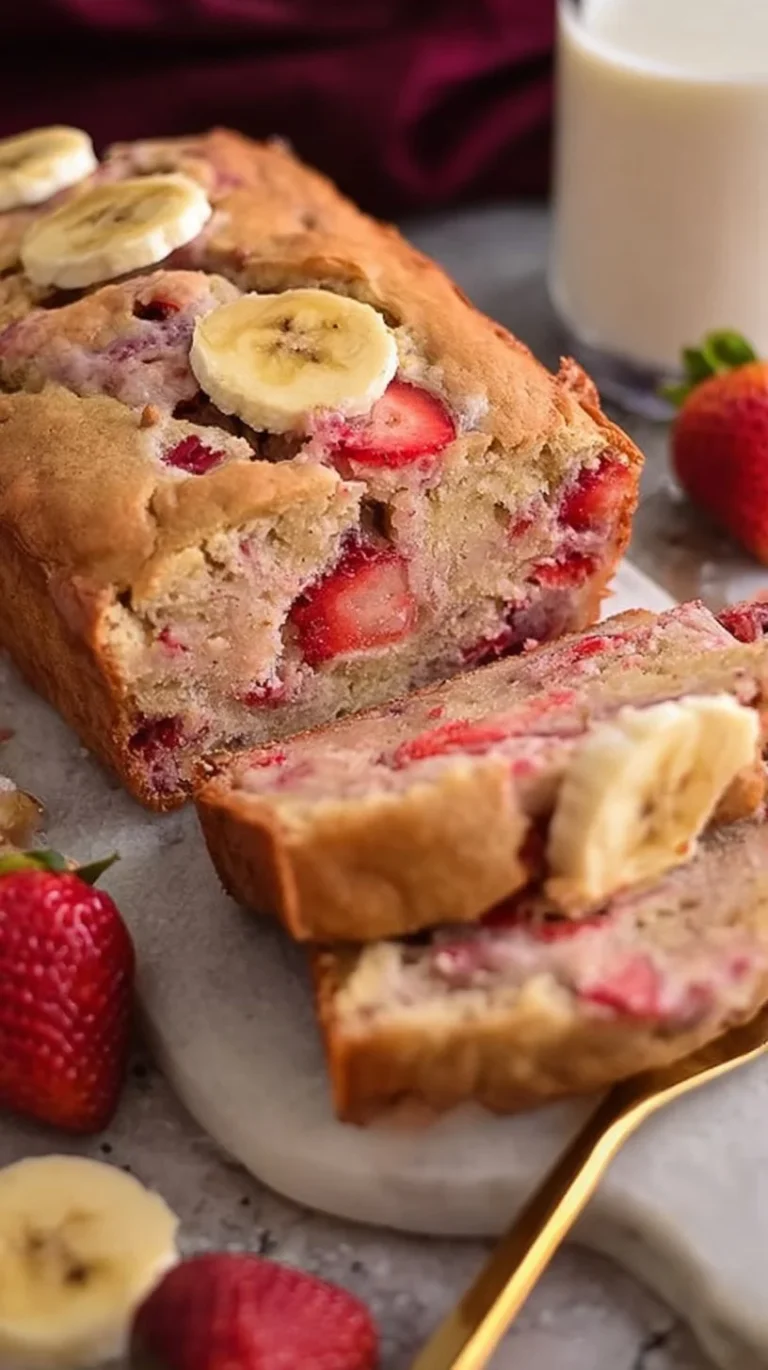
Fuel Your Day: The Ultimate High Protein Banana Bread (Seriously Delicious!)
Hi — I’m Carla Carter, Founder & Recipe Developer of RecipesCabin. This high-protein banana bread is for anyone who wants a reliable, comforting loaf that pulls double duty: it tastes like familiar banana bread while giving you a protein boost to fuel your day. Whether you’re new to baking, returning after a few kitchen misadventures, or simply want a healthier twist on a classic, this recipe is built to be approachable and encouraging.
If you enjoy stretching one recipe into several meals or snacks, this loaf is a great starter for meal prep and pairs perfectly with other simple high-protein ideas like the ones I’ve shared for the week in my easy guides — here’s a helpful example for planning: easy high-protein meal prep for the week. Read on and I’ll walk you through each step so you feel calm and capable at the counter.
Why this recipe is easy to get right
This banana bread is forgiving for a few reasons. First, the wet ingredients (bananas, applesauce, yogurt) make a loose, moist batter that tolerates small measurement differences and still yields a tender loaf. Second, the protein powder and oats or whole wheat flour add structure without demanding exact precision the way cake flour sometimes does. Finally, the flavor profile is familiar — ripe banana, a touch of cinnamon, a nutty finish — so even if your loaf looks a little rustic, it will almost always taste good.
Where you can be flexible: swap the nut mix or skip the peanut butter swirl and still succeed. Where precision helps: measuring flour and checking doneness at the end of baking. But I’ll also show simple visual cues so you don’t need a scale to feel confident.
How to make Fuel Your Day: The Ultimate High Protein Banana Bread (Seriously Delicious!)
Start by gathering everything. Mise en place (having ingredients ready) reduces stress — peel and mash bananas, measure the dry flour, and preheat the oven.
First, you’ll mash the bananas and combine them with applesauce, maple syrup, oil, eggs, yogurt or cottage cheese, and vanilla. This creates the wet base that brings moisture, sweetness, and structure. You’ll notice the batter looks glossy and slightly thick after stirring; that’s exactly what you want.
Next, the protein powder is folded in to boost protein and slightly thicken the batter. Make sure it dissolves without lumps — a few quick stirs will do. Separately whisk the dry ingredients (flour, baking soda, cinnamon, salt) so leavening is evenly distributed: that helps the loaf rise uniformly.
When combining wet and dry, mix slowly and stop as soon as the streaks disappear — overmixing activates gluten in the flour and can make the crumb tougher. If you’re adding nuts or peanut butter, gently fold them in last to avoid deflating the batter.
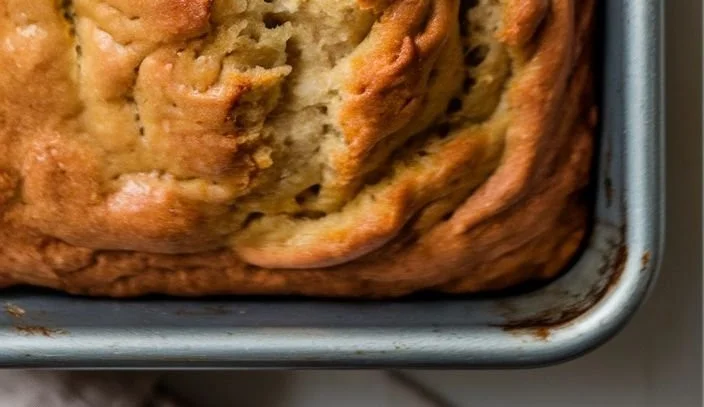
Pour into a prepared loaf pan and bake until a toothpick comes out clean. The center should be set and the edges slightly pulled away from the pan. After baking, resting the loaf in the pan for 10 minutes helps it firm up so it transfers to a cooling rack without falling apart.
Where beginners should slow down: while mixing the dry into wet, and when checking doneness. Those are the two moments where a gentle, patient approach pays off.
Ingredients
3 ripe bananas, mashed (about 1 ½ cups), ½ cup unsweetened applesauce, ¼ cup maple syrup or your favorite sugar substitute, ¼ cup melted coconut oil or vegetable oil, 2 large eggs or egg substitute, ½ cup Greek yogurt or cottage cheese (for moisture and extra protein), 1 tsp vanilla extract, 2 scoops (around ½ cup) vanilla or chocolate protein powder, 1¾ cups oat flour or whole wheat flour, 1 tsp baking soda, ½ tsp ground cinnamon, ¼ tsp salt, ½ cup chopped walnuts or pecans (optional), ¼ cup peanut butter (optional, for added protein and flavor)
Each ingredient plays a clear role, and none are scary:
- Bananas (3 ripe, mashed): They bring sweetness, moisture, and natural binding. The riper the banana, the sweeter and more flavorful your loaf will be.
- Applesauce (½ cup unsweetened): Adds moisture without a lot of fat or sugar and keeps the crumb tender. It’s a gentle, reliable binder.
- Maple syrup (¼ cup) or sugar substitute: Sweetens and contributes to browning. You can pick a substitute you’re comfortable with and still get good results.
- Melted coconut oil or vegetable oil (¼ cup): Fat keeps the loaf tender and helps carry flavor. Melted oil mixes smoothly into the batter.
- Eggs (2 large) or egg substitute: Help with structure and lift. They make the crumb cohesive and give the loaf a nice rise.
- Greek yogurt or cottage cheese (½ cup): Adds moisture, tang, and extra protein — cottage cheese can be blended slightly for a smoother texture if you prefer.
- Vanilla extract (1 tsp): Simple flavor booster that ties everything together.
- Protein powder (2 scoops, ~½ cup): Increases protein and slightly thickens the batter. It’s forgiving — vanilla or chocolate both work depending on the flavor you want.
- Oat flour or whole wheat flour (1¾ cups): The base dry ingredient that creates structure. Oat flour gives a softer crumb; whole wheat is heartier.
- Baking soda (1 tsp): The leavening agent that reacts with the acidic yogurt or bananas to help the loaf rise.
- Ground cinnamon (½ tsp) and salt (¼ tsp): Cinnamon adds warmth; salt enhances the overall flavor.
- Chopped walnuts or pecans (½ cup, optional): Add crunch and flavor — fold in gently.
- Peanut butter (¼ cup, optional): For a swirled peanut flavor and extra protein — fold or swirl to keep texture interesting.
None of these are complicated. Think of them as a team where wet ingredients make the batter pliable and moist, dry ingredients provide lift and crumb, and additions like nuts or peanut butter add texture and personality.
Directions
Set your oven to 350°F (175°C). Grease and lightly flour a 9×5 inch loaf pan., In a large mixing bowl, mash the bananas. Add applesauce, maple syrup, oil, eggs, yogurt (or cottage cheese), and vanilla. Stir until everything is smooth and combined., Stir in the protein powder and mix until no lumps remain., In another bowl, whisk together the flour, baking soda, cinnamon, and salt., Slowly mix the dry ingredients into the wet mixture. Stir just until blended—don’t overmix., Fold in nuts or peanut butter if using., Pour the batter into your prepared pan. Bake for 45–55 minutes, or until a toothpick inserted in the center comes out clean., Let it rest in the pan for 10 minutes, then transfer to a wire rack to cool completely.
Supportive guidance for each step:
- Preheat and prepare: When the oven reaches 350°F (175°C) it’s ready. Grease and lightly flour the pan so the loaf releases easily. If you don’t have flour, parchment paper also works — it’s okay to use what’s available.
- Mash bananas and combine wet ingredients: Mash until mostly smooth with a few small chunks for texture. The mixture should appear glossy and homogenous after stirring. If it looks slightly thin, that’s fine — protein powder and flour will thicken it.
- Protein powder step: Stirring the protein powder in next prevents clumps. If you see a few stubborn bits, press them against the bowl with your spoon; a quick extra stir will smooth them out.
- Whisk dry ingredients separately: A uniform mix of flour, baking soda, cinnamon, and salt makes sure the loaf rises evenly and flavor is consistent throughout.
- Mixing wet + dry: Add dry slowly and fold until there are no obvious streaks of flour. Small lumps are okay — they often disappear as the loaf bakes. Resist the urge to overmix; stop when the batter looks cohesive.
- Fold-ins: If using nuts, fold gently so they distribute evenly. If swirled peanut butter is used, dollop it and run a knife lightly through the batter.
- Baking: Place the pan in the center of the oven. The top will color to a light golden brown and the edges will begin to pull away slightly. At about 45 minutes, check with a toothpick; it should come out clean or with a few moist crumbs. If the top browns too quickly before center is set, lightly tent with foil.
- Cooling: Let the loaf rest in the pan for 10 minutes to firm up, then ease it out onto a rack. Cooling fully makes slicing cleaner — but a warm slice is perfectly fine for immediate eating.
If at any point things don’t look perfect — a slightly lumpy batter, a loaf that cracked on top — know that these are normal signs of a homemade bake and often don’t affect flavor. Trust the visual cues above to guide you.
Key techniques you’ll practice in this recipe
This loaf practices several fundamental skills useful in many kitchens:
- Mashing and judging wetness: You’ll learn how banana texture affects batter consistency — valuable for muffins, pancakes, and quick breads.
- Folding dry into wet: Gentle mixing to avoid overdeveloping gluten is a transferable technique for cakes and quick breads.
- Checking doneness: Using a toothpick and observing color and edge pull are simple tests that apply to any baked good.
- Gentle fold-ins: Adding nuts or swirls teaches how to preserve air in batter, important for light muffins or soufflés.
These are quietly powerful skills — simple, repeated practice builds confidence for many more recipes.
Common mistakes and how to avoid them
- Overmixing the batter: This makes the crumb dense. Fix: Stop mixing when no flour streaks remain. A few small lumps are fine.
- Using underripe bananas: If bananas are too firm and pale, the loaf will lack sweetness and flavor. Fix: Let them ripen on the counter until spotted and fragrant.
- Not checking doneness: Pulling the loaf too early can leave it gummy. Fix: Use the toothpick test and check the center; if it’s still wet, give it 5–10 more minutes.
- Oven temperature surprises: If your oven runs hot or cool, the bake time will vary. Fix: If the top browns quickly, tent with foil; if it’s taking longer, keep checking in five-minute intervals.
- Skipping the rest in the pan: Removing the loaf immediately can cause it to fall apart. Fix: Let it relax for 10 minutes so it firms up.
If something goes off track — for example, the center is slightly underbaked — let the loaf finish cooling and slice it thinly to serve slightly warm; it often improves as it cools.
How to adjust confidently without changing the recipe
You’re welcome to adjust conceptually without altering the listed ingredients or steps:
- Portion scaling concepts: For a smaller loaf, halve the batter and bake in a smaller pan — watch time closely. For muffins, fill tins and check doneness earlier.
- Flavor preferences: If you like more cinnamon, add a small extra pinch next time. Prefer more nuttiness? Increase the optional nuts slightly when you’re comfortable.
- Texture tweaks: Want a moister loaf? Use Greek yogurt rather than cottage cheese. Want a firmer, chewier crumb? Swap oat flour for whole wheat flour.
These are ideas to explore on future bakes; the original recipe is already balanced so small tweaks are a gentle learning process rather than a requirement.
Serving, storage, and reheating made simple
Serve slices plain, spread with a thin layer of nut butter, or warmed with a little extra peanut butter on top. It’s excellent for breakfast with a cup of coffee or as a post-workout snack.
Storage: Cool completely, then wrap tightly in plastic wrap or place in an airtight container. At room temperature it will last 2–3 days, in the fridge up to a week, and in the freezer for 2–3 months. Slice before freezing for convenient portions.
Reheating: For a warm slice, microwave for 10–20 seconds (short bursts preserve texture) or warm in a 325°F (160°C) oven for 5–10 minutes. If frozen, thaw in the fridge overnight before reheating.
If you’re looking for other simple protein-rich snack ideas to pair with slices, try these bagel bite-style snacks as an easy side: high-protein bagel bites.
Questions new cooks often ask about this recipe
- How ripe should bananas be? The riper, the better — brown-spotted skins and a sweet smell signal peak banana flavor.
- Do I need to sift ingredients? No. Whisking the dry ingredients together is enough to distribute the baking soda and cinnamon.
- My loaf cracked on top — is it ruined? Not at all. Cracking is normal and often means the interior rose well. It’s a cosmetic issue only.
- Can I use a different protein powder? Yes — vanilla or chocolate both work. Taste the batter briefly (don’t swallow raw batter) to check flavor balance before baking.
- What if the center is underbaked but the top is done? Tent with foil and return to the oven for 5–10 minutes, or lower the oven temperature slightly and continue baking until the center tests clean.
- Do I need special equipment? Just basic mixing bowls, a spoon or spatula, a 9×5 inch loaf pan, and a cooling rack. No intimidating tools required.
Final encouragement from Carla
Baking is equal parts science and patience, and this banana bread is an ideal recipe to gently build your skills. Small imperfections — a slightly lopsided top, an extra nut here and there — are part of homemade charm and won’t stop you from enjoying a wholesome, protein-rich treat. Each bake teaches you something new; celebrate the progress, and know that even experienced bakers have batches that surprise them. Keep practicing, and remember that consistent, calm steps make excellent results far more often than perfection.
Conclusion
If you’d like another take on a high-protein banana bread for comparison or inspiration, this version from a dietitian is a thoughtful read: High Protein Banana Bread – The Oregon Dietitian. For more protein-packed breakfast ideas without protein powder, check out this roundup that pairs well with slices of banana bread: High Protein Oatmeal (No Protein Powder!) – Abbey’s Kitchen. If you’re curious about a gluten- and dairy-free twist on protein banana bread, here’s an alternative recipe to explore: Delicious Protein Banana Bread Recipe (Gluten & Dairy Free).
High Protein Banana Bread
Ingredients
Method
- Preheat your oven to 350°F (175°C) and grease and lightly flour a 9x5 inch loaf pan.
- In a large mixing bowl, mash the bananas. Add applesauce, maple syrup, oil, eggs, yogurt, and vanilla. Stir until smooth.
- Stir in the protein powder until no lumps remain.
- In another bowl, whisk together the flour, baking soda, cinnamon, and salt.
- Slowly mix the dry ingredients into the wet mixture, stirring just until blended—do not overmix.
- Fold in nuts or peanut butter if using.
- Pour the batter into the prepared pan. Bake for 45–55 minutes, or until a toothpick inserted in the center comes out clean.
- Let the loaf rest in the pan for 10 minutes, then transfer to a wire rack to cool completely.