Healthy Cottage Cheese Recipes: Breakfast Casserole & Quiche for Brunch Delight
Introduction
This recipe is about simple building blocks: eggs, fillings you like, and a gentle oven finish. If you want more breakfast ideas while you gather ingredients, take a look through my breakfast recipes collection for inspiration and reassurance — you’ll find dishes that use many of the same techniques and flavors, so success here will carry over to other morning favorites.
I’ll walk you through what’s happening at each stage, what to look and listen for, and how to feel confident even if things aren’t perfectly tidy. Small imperfections are normal — the oven and time do a lot of the work — and I’ll show you how to recognize the right moments so you can stop worrying and start enjoying the process.
Why this recipe is easy to get right
What makes a breakfast casserole friendly is its forgiving nature. Unlike delicate pastries or fast-moving stovetop sauces, a casserole is sturdy. Ingredients get mixed or layered, then baked slowly. That means:
- Timing is lenient. A few extra minutes in the oven won’t ruin the dish; it usually just deepens color and flavor.
- Quantities are flexible. Casseroles welcome a little more or less cheese, veggies, or protein without collapsing.
- Visual cues matter more than strict timers. Golden edges, a gently puffed center, and a toothpick that comes out clean or nearly clean are good signs.
Because components are often pre-cooked or combine well raw (like eggs and milk), the risk of something failing spectacularly is low. If you’re nervous about exact temperatures or fancy techniques, this recipe lets you focus on simple checkpoints — whisking, distributing fillings, and watching the bake — which are perfect skills to practice and repeat.
How to make Healthy Cottage Cheese Recipes
Here’s the overall flow you’ll follow, and what each stage is doing for you:
- Prep the fillings and mix the custard (first).
- What happens: Prepping means chopping vegetables, grating cheese, or warming pre-cooked meats. This step sets you up so assembly moves quickly.
- Focus: Make pieces bite-sized and even so every spoonful has balanced flavor. If the recipe calls for sautéing onions or peppers, do that until they’re softened and just starting to brown — that brings out sweetness without bitterness.
- Where to slow down: If you’re new to chopping, take your time and use a stable cutting board; uneven pieces won’t ruin the dish, but uniformity helps even cooking.
- Assemble in a baking dish (next).
- What happens: You’ll layer or evenly distribute the base starch (if there is one), then add fillings, and pour a mixture of eggs and dairy over everything.
- Focus: Make sure fillings are spread so each portion gets a bit of everything. Pour the custard slowly and let it settle into nooks rather than trying to press it in.
- Where to slow down: If you notice pockets where the custard isn’t seeping, tilt the dish gently so liquid flows and fills gaps.
- Bake until set (last).
- What happens: The oven gently cooks the egg mixture into a tender, set interior while browning the top and edges for flavor.
- Focus: Look for a lightly puffed center and edges that are golden. A toothpick or a knife inserted near the center should come out with moist crumbs, not wet egg.
- Where to slow down: Rest the casserole after baking. Cooling for 10–15 minutes helps it finish setting and makes slicing much cleaner.
If you’d like a similar flavor profile where a creamy protein is baked with eggs, my baked cottage cheese eggs post shows the same comforting logic and is a great practice run: baked cottage cheese eggs.
Ingredients
Because this casserole is built from familiar pantry and fridge items, none of the ingredients are meant to intimidate. Here’s what each typical component contributes to the finished dish — think of it as a quick map of roles rather than a strict list:
- Eggs: They’re the structure. Eggs bind everything together and create the custardy texture that makes a casserole feel like a complete meal.
- Milk or cream (if used): This lightens the egg mixture and produces a tender, silky interior. The richer the dairy, the more custardy the texture.
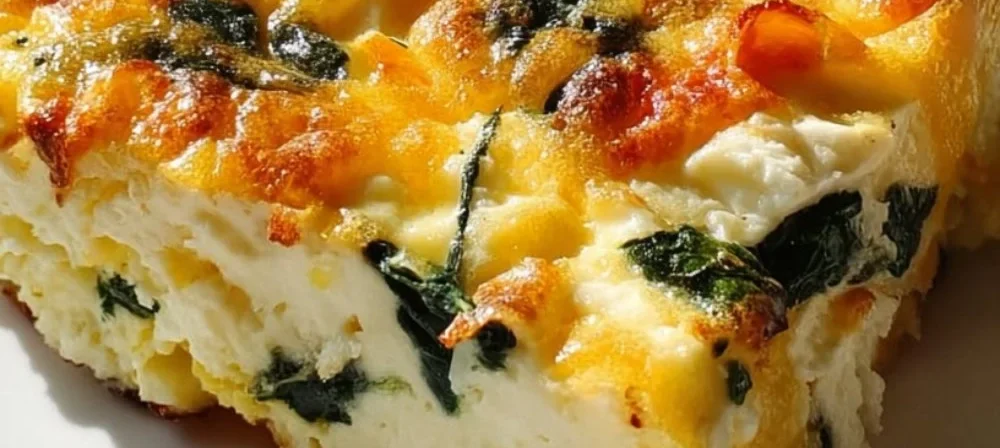
- Cheese: Adds flavor, salt, and gooeyness. Melting cheese also helps the casserole hold together when sliced.
- Vegetables (onions, peppers, spinach, etc.): They contribute brightness, texture, and moisture. Cooking firmer vegetables first concentrates their flavor and removes excess water.
- Cooked meats (ham, sausage, bacon): These bring savory depth and protein. Since they’re already cooked, they just need warming and even distribution.
- Starch (hash browns, bread cubes, or potatoes): If included, starch absorbs flavors and creates contrasting texture — crispy edges around the perimeter, tender interior.
None of these ingredients are complicated or exotic; they’re predictable, which is a gift for learning. When they come together, eggs bind, dairy smooths, cheese flavors, vegetables add freshness, and starch gives substance — a balanced dish that’s easy to taste and tweak.
Directions
I won’t change the directions you’ll follow, but I will give visual and tactile guidance to support each step so you can be confident as you go.
- Prep and preheat: When the recipe says to preheat, set it early so the oven is ready. You’ll hear the oven click and feel warm air if you hold your hand above the open door briefly (careful not to touch). This ensures even baking from the start.
- Mixing: Whisk the eggs and dairy until smooth and slightly frothy. This incorporates air and helps a lighter texture. The mixture should look even — no streaks of yolk or white — and feel silky when you lift the whisk.
- Layering: Spread fillings evenly. Visually scan the dish: you want coverage from edge to edge, not concentrated piles. If cheese or meat floats to the top during baking, it’s okay — it will crisp and add flavor.
- Baking: The top will go from pale to lightly golden, and the center will rise a little. The smell becomes warm and savory. Check by gently jiggling the dish; the center should wobble slightly but not be liquid. A toothpick should come out mostly clean.
- Resting: Give it 10–15 minutes out of the oven. This rest period lets steam redistribute and makes slicing neater. If you serve immediately, it can be a bit loose.
If any step seems to take longer or shorter, remember: ovens and ingredient temperatures vary. Rely on visual cues and gentle checks rather than strict times. If you want another casserole-style idea that bakes together lovingly, try the blueberry cottage cheese breakfast bake for a sweet-salty lesson in custards and fruit: Blueberry cottage cheese breakfast bake.
Key techniques you’ll practice in this recipe
This casserole helps you practice a few fundamentals that matter in many kitchens:
- Even chopping: Learning to cut vegetables into similar-sized pieces helps them cook evenly elsewhere — from skillet dinners to soups.
- Whisking for texture: Whisking eggs with dairy until smooth teaches you how gentle aeration affects tenderness in custards, quiches, and scrambled eggs.
- Layering and distribution: Arranging ingredients so each portion tastes balanced applies to lasagnas, gratins, and sheet-pan meals.
- Oven monitoring: Reading visual cues — color, jiggle, toothpick test — builds practical judgment that’s more reliable than rigid timers.
Mastering these techniques gives you confidence across recipes: you’ll know when a filling is ready, when an egg custard is set, and how to adjust heat and timing intuitively.
Common mistakes and how to avoid them
Here are a few things I see beginners worry about, and how to handle them calmly:
- Mistake: Overcrowding the baking dish.
- Why it happens: Trying to squeeze more in than the pan can comfortably hold.
- How to avoid: Use a dish that matches the recipe size. If you don’t have the exact size, spread ingredients loosely and expect a slightly different bake time. If the casserole looks very deep, plan for extra baking time.
- Mistake: Too-wet vegetables making the casserole soggy.
- Why it happens: Vegetables release water as they cook.
- How to avoid: Sauté watery veggies briefly to evaporate moisture, or lightly squeeze cooked spinach to remove excess. Small amounts of extra moisture are fine, but large pools mean a longer bake time to evaporate liquid.
- Mistake: Undercooked eggs in the center.
- Why it happens: Oven temperature variation or overly deep dish.
- How to avoid: Check with a toothpick or gentle jiggle. If center is still very wet, return to the oven and cover loosely with foil to prevent over-browning while finishing.
- Mistake: Overbrowned top.
- Why it happens: Oven runs hot or cheese is too exposed.
- How to avoid: If the top is browning too quickly, tent foil lightly over the dish for the remaining bake time.
If something goes off track — say, too much liquid — don’t start over. Drain excess with a spoon, bake a bit longer, or let it rest and slice carefully. Rescue is usually possible with a few simple adjustments.
How to adjust confidently without changing the recipe
You asked how to personalize without altering steps or measurements — the trick is understanding concepts rather than swapping specifics.
- Scaling portions (conceptual): A deeper dish holds more, so expect longer bake times. A shallower dish will set faster and brown sooner. Keep an eye on visual cues instead of relying solely on minutes.
- Flavor adjustments (conceptual): If you like more savory punch, increase salty components like cooked bacon or sharper cheeses; for milder flavor, choose milder cheeses and add herbs. Small shifts affect taste more than texture.
- Texture tweaks (conceptual): If you prefer a firmer slice, use slightly less dairy relative to eggs. For a creamier interior, a bit more dairy yields a softer custard. Since we’re not changing the written recipe, try to achieve these textures by paying attention to how long the casserole rests and how fully it bakes — longer rest equals firmer slices.
These conceptual tweaks let you make the dish your own while following the recipe’s steps and measurements exactly.
Serving, storage, and reheating made simple
Serving:
- Let the casserole rest so slices come out tidy. Serve warm with a simple side salad or fruit to balance richness.
- Garnish with fresh herbs or a sprinkle of cheese if you like a bright finish.
Storage:
- Cool completely, then cover and refrigerate within two hours. Stored in an airtight container, it keeps well for 3–4 days.
- For longer storage, slice and freeze portions on a tray before transferring to a freezer-safe bag; frozen portions keep for up to 2 months.
Reheating:
- From the fridge: Reheat covered in a 350°F oven for 10–15 minutes until warmed through, or microwave single slices for 1–2 minutes, flipping halfway.
- From frozen: Thaw overnight in the fridge and reheat as above. If reheating straight from frozen, add extra time in a covered dish to prevent drying.
To retain texture, avoid overheating. Gentle, even warming keeps the custard tender and the edges pleasant rather than rubbery.
Questions new cooks often ask about this recipe
- “How do I know when it’s done?”
- Look for a lightly browned top and a center that’s set with only a small wobble. A toothpick should come out mostly clean.
- “Can I use frozen vegetables?”
- Yes. Thaw and squeeze excess water first, or sauté briefly to evaporate moisture. Frozen veggies often release water as they heat, so manage that to prevent sogginess.
- “What pan is best?”
- A glass or ceramic baking dish heats evenly and shows browning, while metal pans may brown faster. If you use metal and notice rapid browning, tent with foil.
- “Is it okay if my fillings float to the top?”
- Absolutely. That can create deliciously crispy spots. Distribution at the start helps, but floating pieces are not a failure.
- “Will it be okay if I overmix the eggs?”
- Overmixing isn’t a huge issue here; the goal is a smooth, homogenous mixture. A few extra whisk strokes will just incorporate more air and may yield a slightly lighter texture.
If you’re ever unsure, slow down. Pause between steps, look closely, and rely on simple tests (toothpick, jiggle, color). You’re not racing; you’re creating.
Final encouragement from Carla
I want you to feel calm and capable. This casserole is a forgiving project that rewards attention, not perfection. Every time you make it you’ll learn something — how your oven behaves, how long your fillings take, and what balance of flavors you prefer. Those are wins.
If you have one imperfect outcome, remember: learning in the kitchen is cumulative. Each casserole teaches a small lesson that makes the next one smoother. Keep going, trust your senses, and enjoy the meals you make for yourself and others. You’re doing great — and cooking more will only make it easier and more joyful.
Conclusion
If you’d like a variation that focuses on leafy greens and melting cheese, see the Spinach and Mozzarella Egg Bake – Kalyn’s Kitchen for ideas you can adapt. For a potato-forward, make-ahead casserole with savory mix-ins, the Cheesy Overnight Hash Brown Egg Casserole – The Food Charlatan shows a similar, friendly approach. If you’re exploring plant-based textures, learning to crisp tofu can be a useful skill — try the techniques in The Best Crispy Baked Tofu | Munching with Mariyah. And if you like the idea of comforting fillings wrapped in warmth, the chicken enchilada method in White Chicken Enchiladas – The Skinnyish Dish may spark other casserole inspirations.

Breakfast Casserole
Ingredients
Method
- Preheat the oven to 350°F (175°C).
- Chop vegetables, grate cheese, and warm pre-cooked meats.
- Whisk eggs and milk until smooth and slightly frothy.
- Spread base starch in a baking dish.
- Layer or evenly distribute vegetables, meats, and cheese.
- Pour the egg mixture over the layered fillings.
- Bake in the preheated oven for about 45 minutes until the center is set and golden on top.
- Rest for 10–15 minutes before slicing.