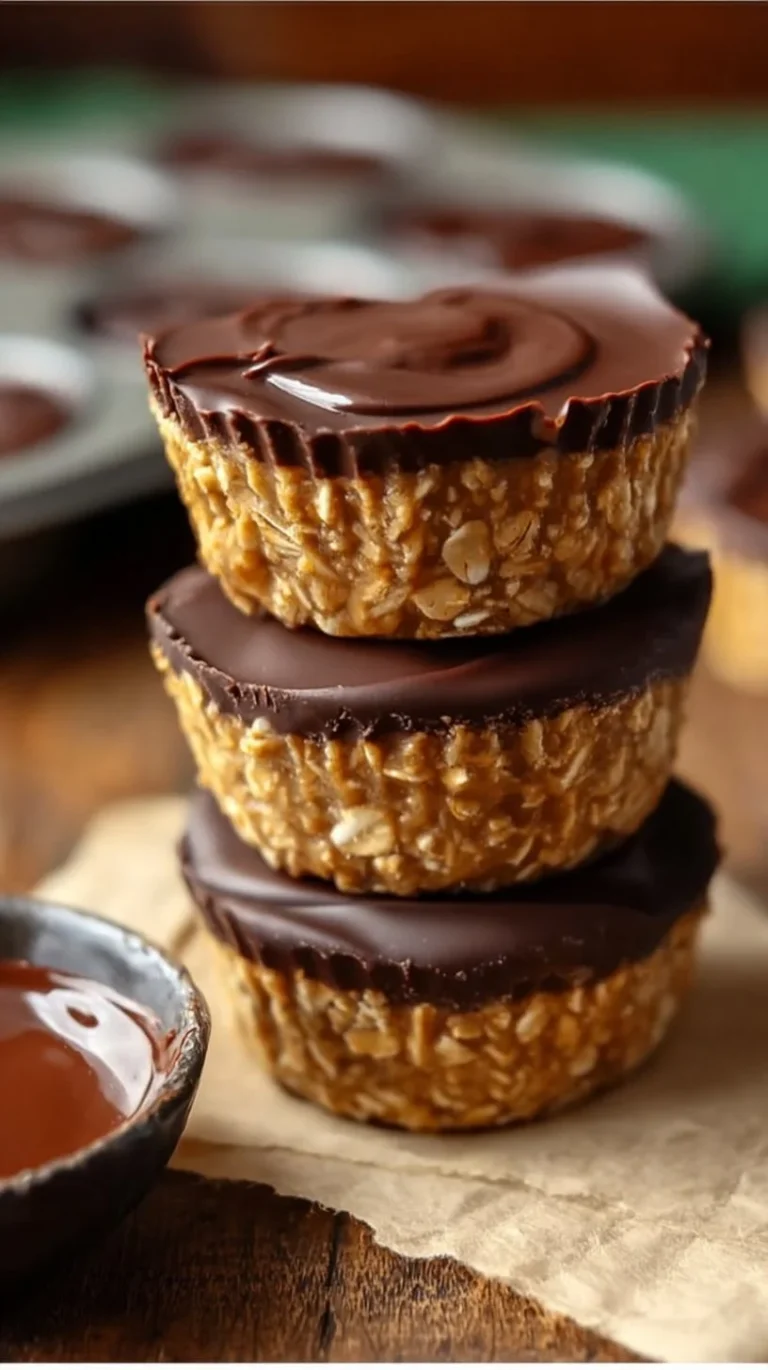
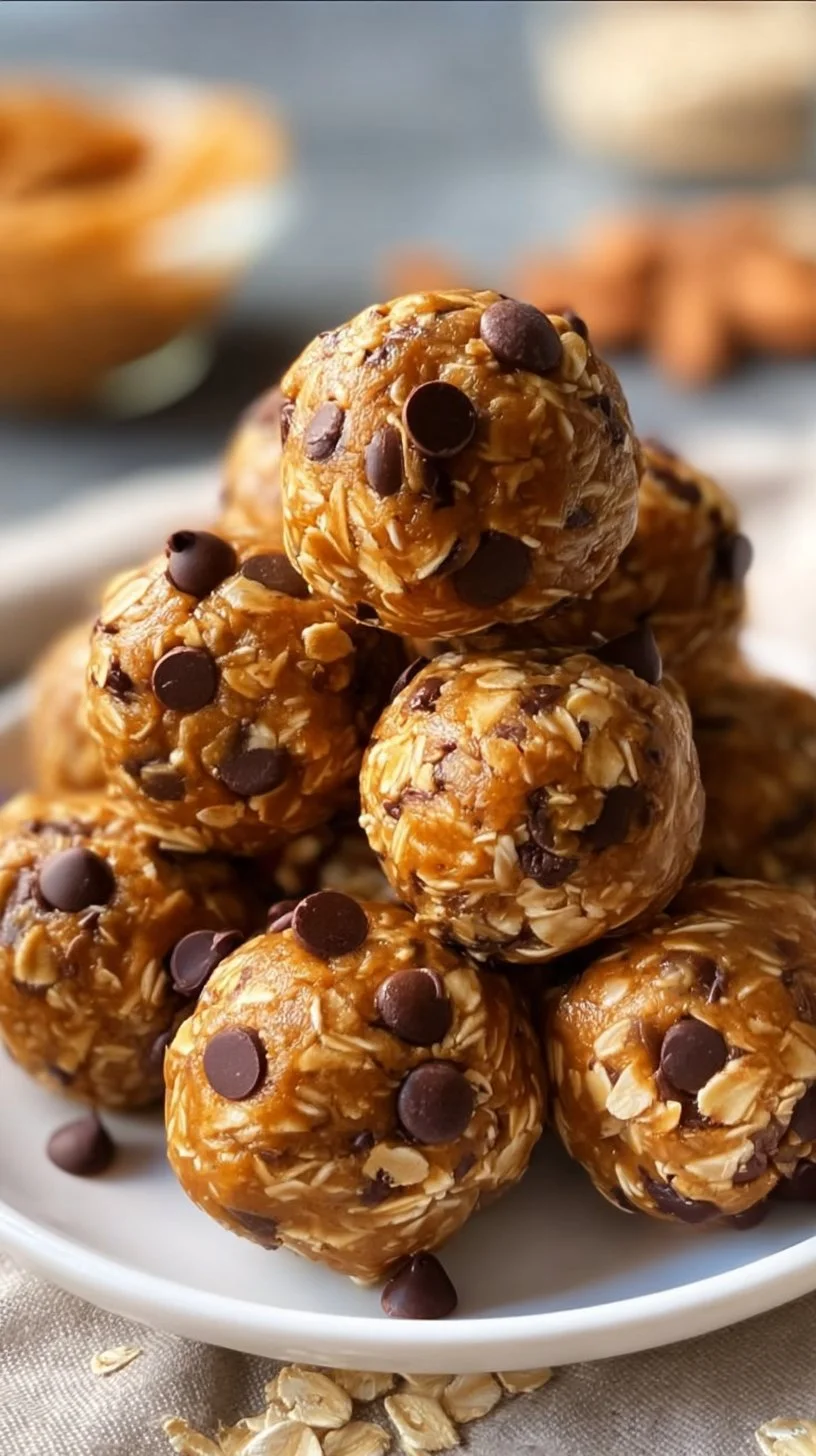
No-Bake Protein Balls
If you’re someone who wants a quick, satisfying snack without a lot of fuss, these No-Bake Protein Balls are for you. They’re the kind of recipe I make for busy mornings, for packing into lunchboxes, or for a little afternoon pick-me-up. You don’t need special equipment, and the ingredients are familiar — which means it’s approachable whether you’re new to the kitchen or returning after a few cooking misadventures.
I design recipes to help you build confidence one simple step at a time. If you enjoy playful, protein-packed snacks, you might also like my take on Strawberry Cheesecake Protein Balls, which follows the same no-bake, low-stress spirit but with a different flavor profile. In this article I’ll walk you through what’s happening during each step, what to look for, and how to feel sure of success the first time.
Why this recipe is easy to get right
This recipe is forgiving in the best possible way. It doesn’t call for precise oven temperatures, tricky timing, or delicate techniques. The main reasons it’s easy to succeed:
- No heat or baking to worry about — that removes a big source of uncertainty for new cooks.
- The mixture holds together through the natural stickiness of the peanut butter and honey, so small variations in measurements rarely ruin the results.
- Rolling by hand gives you tactile feedback: you can feel if the mixture is too dry or too sticky and adjust your approach (without changing the listed ingredients).
Where this recipe allows flexibility is in the texture and finish — if you like firmer bites, chill longer; if you prefer softer centers, slightly shorten the refrigerator time. Because the ingredients are simple and common, you can focus on the method and learn the sensory cues — how it looks, feels, and smells — rather than memorizing precise technical details. That’s what makes it so suitable for all skill levels.
How to make No-Bake Protein Balls
Overall, the process is short and very direct: combine, mix, scoop, chill, and store. Here’s what happens first, next, and last, and what to focus on at each stage.
First: gather ingredients and set up a bowl and spoon. Having everything in one place makes the whole process calm and efficient. When you read “combine,” imagine a soft, slightly glossy mixture; that’s what we’ll aim for.
Next: mix until everything is evenly incorporated. This is where you’re watching for consistency. The oats will absorb some of the moisture from the peanut butter and honey, and the chocolate chips will distribute through the mixture. Use a spatula or wooden spoon and press the mixture against the side of the bowl occasionally — that helps combine without overworking.
Then: scoop and roll tablespoon-sized portions. Rolling is a tactile check — if the mixture crumbles, it’s a little dry; if it sticks all over your hands, it’s a bit wet. Either situation is easy to handle, and I’ll explain how below.
Last: refrigerate to firm up. The refrigerator brings everything together and makes handling and storing simple. A minimum of 30 minutes gives you nicely set bites you can enjoy right away.
Where beginners should slow down: the mixing stage. Take an extra minute to see that the oats are evenly moistened and the chocolate chips are not all clumped in one spot. That small pause prevents uneven balls and makes the assembly stage much more pleasant.
Ingredients
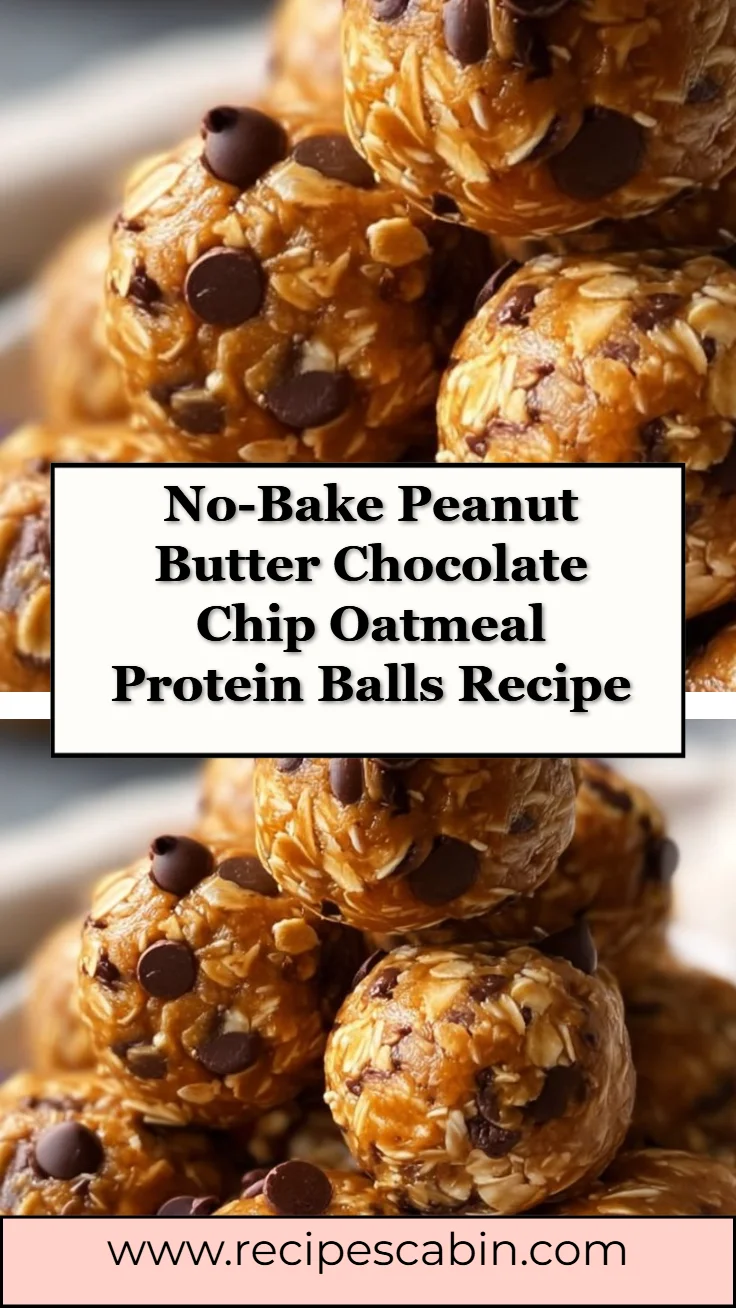
1 cup peanut butter, 1 cup rolled oats, 1/2 cup honey, 1/2 cup chocolate chips
Each ingredient plays a clear, familiar role:
Peanut butter: This is your binder and flavor base. It’s where the mixture gets its richness and the stickiness that helps the oats and chips come together. It also provides protein and satisfying mouthfeel. No need to be intimidated — jarred nut butters are designed for this kind of use.
Rolled oats: Oats add body, chew, and structure. They soak up some of the moisture from the peanut butter and honey, creating the texture you expect from a protein ball. Rolled oats are forgiving — they don’t require cooking here, and they keep the snack wholesome and filling.
Honey: Honey sweetens and adds a bit more stickiness. It helps the mixture hold shape during rolling and chilling, and it adds a gentle, floral sweetness that balances the peanut butter.
Chocolate chips: These are the fun part and give bursts of chocolate in each bite. They don’t melt into the mixture (unless your room is very warm), so you get pleasing, familiar chocolate bits. None of these ingredients are complicated or intimidating — they’re pantry basics that work together to create a balanced texture and flavor.
Directions
- In a mixing bowl, combine peanut butter, rolled oats, honey, and chocolate chips., 2. Mix until well combined., 3. Scoop tablespoon-sized portions of the mixture and roll into balls., 4. Place the protein balls on a baking sheet lined with parchment paper., 5. Refrigerate for at least 30 minutes to set., 6. Store in an airtight container in the refrigerator.
Here’s supportive guidance for each numbered step so you can see and feel what to expect.
Step 1 visual cues: When you add everything to the bowl it will look a little clumpy and glossy from the peanut butter and honey. If your peanut butter is very thick and cold, give it a quick stir in its jar so it loosens — that makes mixing easier.
Step 2 texture and timing hints: As you mix, the oats will become moistened and the mixture will form a cohesive mass. Aim for a consistency that holds together when pressed. If it seems crumbly, press firmly while mixing to encourage the oils in the peanut butter to distribute; if it’s overly wet, don’t worry — chilling will help firm it up. Mix until you no longer see dry oats and the chips are spread evenly.
Step 3 tactile guidance: Use a tablespoon to scoop and then roll between your palms. If the mixture sticks to your hands, lightly wetting them or dusting with a few more oats can help. Imperfections in shape are normal — they still taste great.
Step 4 placement note: Space the balls an inch or so apart on the parchment so they chill evenly. If some are different sizes, that’s fine — just be aware they may set at slightly different rates.
Step 5 fridge timing: At least 30 minutes gives a nice firm bite. If you want them firmer, leave them longer. If you’re in a hurry, a short stint in the freezer (10–15 minutes) will also work for quick setting.
Step 6 storage reassurance: Use an airtight container and keep them in the refrigerator for freshness. They’re easy to grab for snacks and they hold up well for several days.
If things don’t look perfect immediately — say the mixture looks a touch too dry or too sticky — remember that chilling can rescue texture, and small adjustments at the mixing stage (like pressing firmly or slightly wetting your hands for rolling) will fix most issues without changing ingredients.
Key techniques you’ll practice in this recipe
There are a handful of basic techniques here that build kitchen confidence:
Measuring and combining: Learning to gather ingredients and combine them in one bowl is a foundational skill that reduces clutter and stress. It’s a practice in organization that helps with everything from breakfast to weeknight dinners.
Mixing to the right texture: You’ll learn to recognize when dry ingredients are fully incorporated and how to judge the moisture level by feel. This tactile awareness transfers to cookie dough, meatball mixes, and more.
Portioning and forming: Using a tablespoon to portion ensures even bites and helps you practice consistent shaping. Rolling by hand gives you immediate feedback on texture and helps develop a sense for dough and mixture behavior.
Chilling for set: Understanding that chilling can change texture — firming fats and setting sugars — is useful across no-bake desserts and some savory preparations.
If you want further inspiration using similar skills on different breakfasts or snacks, consider trying my recipe for Easy Healthy Protein Waffles, which uses simple mixing and composition for a different result.
Common mistakes and how to avoid them
Here are typical errors and how to recover without panic:
Mistake: Mixture feels too dry and crumbly.
Fix: Press the mixture firmly while mixing so the peanut butter releases oils and binds the oats. If it still seems too dry, rolling the mixture into balls can compress it enough to stick together. Minor crumbly spots are normal and won’t ruin the batch.Mistake: Mixture sticks to your hands constantly.
Fix: Lightly wet your palms with water (just a finger dip) or rub a tiny bit of oil on your hands. Alternatively, use a small sheet of parchment to press and shape. This keeps things tidy without changing the recipe.Mistake: Chocolate chips clump into a single spot.
Fix: Stir a few extra times to redistribute them. If some chips melted or softened because of very warm peanut butter, chilling the bowl briefly makes them firmer and easier to distribute.Mistake: Balls spread or soften after chilling.
Fix: If your refrigerator is very warm or the peanut butter was runny, give them more time to chill. If you need them firmer quickly, use the freezer for 10–15 minutes, then transfer to the fridge for storage.
If something feels off, take a breath and assess the texture rather than starting over. Most issues are recoverable with a little pressing, extra mixing, or extra chill time.
How to adjust confidently without changing the recipe
You asked how to tweak things without altering listed ingredients or steps — here are conceptual ideas you can use next time or if you scale the batch up.
Portion scaling concepts: Double or halve the recipe by keeping the ratios the same. The method doesn’t change — combine, mix, scoop, chill. If you double the recipe, use a larger bowl and mix in stages if necessary to ensure even distribution.
Flavor preference adjustments: While we’re not changing the ingredients here, think about how intensity works. More peanut butter will make a richer flavor and firmer binding; slightly more honey will sweeten and add stickiness. When you’re ready to experiment beyond this exact recipe, small, gradual shifts are the safest way to adapt.
Texture tweaks — conceptually only: If you want chewier balls in future attempts, try using slightly coarser oats or letting the mixture rest a few minutes for the oats to hydrate. For a crisper bite, chilling longer or briefly using the freezer can firm up fats and make the texture snappier.
These are conceptual notes to help you plan future adjustments. For this recipe as written, follow the listed ingredients and steps to build confidence first.
Serving, storage, and reheating made simple
Serving: These protein balls are ready to eat straight from the fridge. They’re great with a cup of tea or coffee, as a post-workout snack, or tucked into lunchboxes. Serve them on a small plate for guests or in a resealable bag for on-the-go convenience.
Storage: Keep them in an airtight container in the refrigerator — they’ll stay fresh for several days. If you make a larger batch and want longer storage, you can freeze them in a single layer on a baking sheet, then transfer to a freezer-safe container; they’ll keep well and defrost quickly.
Reheating: These don’t need reheating. If you prefer them softer, let them sit at room temperature for 10–15 minutes before eating. If you like them firmer, pop a few in the freezer for 10 minutes before serving. These simple options let you control texture without complex steps.
If you’re exploring other protein-rich breakfasts or snacks that use similar storage and serving logic, my recipe for Baked Cottage Cheese Eggs offers another make-ahead approach to protein-rich eating.
Questions new cooks often ask about this recipe
Q: How long will these keep?
A: In the refrigerator, expect several days of freshness. For longer storage, freeze them. Use airtight containers to protect texture and flavor.
Q: Do I need any special equipment?
A: No. A bowl, spoon, tablespoon for scooping, and your hands are all you need. Parchment paper is helpful for easy cleanup, but you can use a plate if needed.
Q: Is it normal for some balls to be imperfect in shape?
A: Absolutely. Small size differences or slightly uneven surfaces are normal and don’t affect taste. Focus on flavor and texture rather than perfect appearance.
Q: What if my peanut butter is very runny or very stiff?
A: If it’s runny, chilling helps firm the finished balls. If it’s stiff, warm it slightly (by stirring or letting it sit at room temperature) so it mixes smoothly. Either way, the method adapts.
If you’re curious about other no-bake treats that use similar mixing and chilling steps, take a look at my No-Bake High Protein Cheesecake Fluff for a gentle next step.
Final encouragement from Carla
You don’t need perfection to make something delicious. The act of mixing, shaping, and chilling these No-Bake Protein Balls is practice in being comfortable in your kitchen. Small imperfections are part of the process; they’re proof you’re learning. If something doesn’t look exactly like the picture, that’s okay — it will still taste wonderful. Trust your senses: look for even distribution of ingredients, feel for a cohesive texture, and use chill time to bring everything together.
Keep cooking in small, confident steps. Each recipe you try builds experience and calm in the kitchen. I’m cheering you on — one little protein ball at a time.
Warmly,
Carla Carter, Founder & Recipe Developer of RecipesCabin
Conclusion
If you’d like variations and inspiration from other cooks who focus on approachable no-bake protein snacks, see this thoughtful roundup from No-Bake Protein Balls Recipe – Love and Lemons and this practical four-way guide at Easy No Bake Protein Balls – Eating Bird Food.

No-Bake Protein Balls
Ingredients
Method
- In a mixing bowl, combine peanut butter, rolled oats, honey, and chocolate chips.
- Mix until well combined.
- Scoop tablespoon-sized portions of the mixture and roll into balls.
- Place the protein balls on a baking sheet lined with parchment paper.
- Refrigerate for at least 30 minutes to set.
- Store in an airtight container in the refrigerator.