Easy Air Fryer Grilled Cheese Sandwich
Introduction
Hi, I’m Sarah Collins. If you’re juggling work, homework, activities, and the constant question of “what’s for dinner?”, this Easy Air Fryer Grilled Cheese Sandwich is one of those small wins every busy household needs. It hits the comfort-food sweet spot — warm, melty cheese tucked between golden, crisp bread — but it also saves you time and attention compared with standing over a skillet. I reach for this recipe when I need something quick, predictable, and universally loved: children, teenagers, and adults can happily eat it without a fuss.
This recipe works for weeknights when time is tight, for lazy weekend lunches, and even as a speedy warm-up at gatherings where people graze. It’s also an easy make-and-reheat option for packed lunches if you cool it slightly, wrap it well, and reheat carefully (I’ll share tips on that below). When life feels like a series of quick decisions, having a handful of go-to recipes like this one keeps me sane — and it will help you too.
If you’re collecting reliable, no-fuss dinner ideas, I often point people toward my collection of easy weeknight recipes for other family-friendly options. They’re the kind of dishes that require little thought, come together fast, and taste like home — which is exactly what this air fryer grilled cheese does.
How to make Easy Air Fryer Grilled Cheese Sandwich
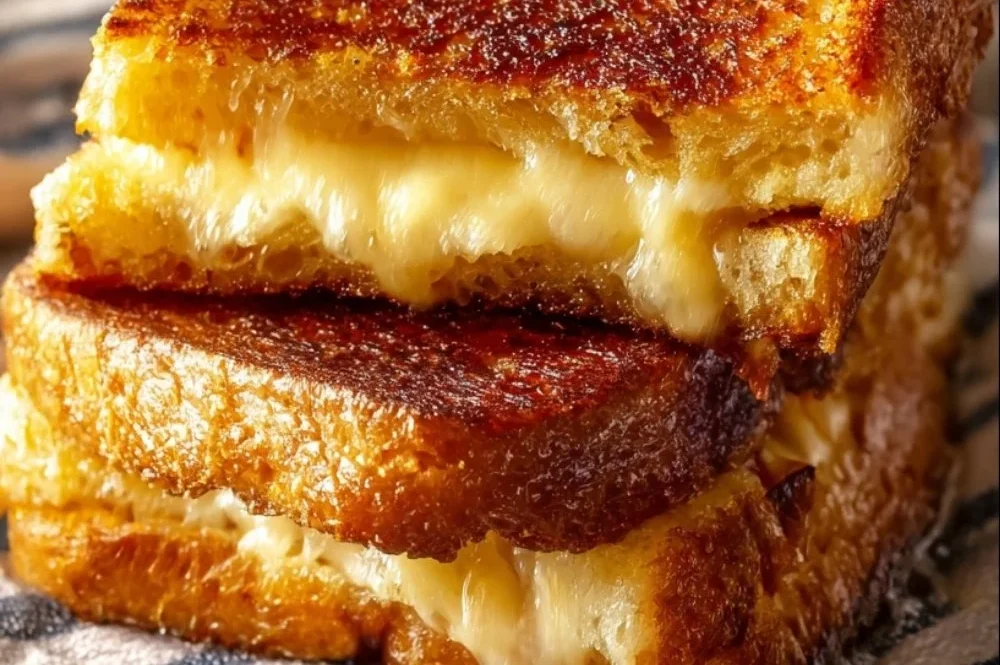
Making this grilled cheese in an air fryer is almost embarrassingly simple, and that’s the point. Expect three basic stages: prep, assembly, and quick cooking. Prep is as minimal as buttering bread, assembly is layering the cheese, and cooking is a short turn in the air fryer. For newcomers to air frying, the sweetness of this recipe is that you don’t need precise technique — you just need to watch the bread’s color the first few times to find the sweet spot in your particular appliance.
At each stage you can slow down or speed up depending on how rushed you are. Take a minute in prep to butter the bread evenly; that’s where the golden crust comes from. When assembling, don’t overstuff with extra fillings unless you’re confident the cheese and bread will contain them; this keeps melting predictable. During cooking, flipping halfway through creates even browning without the fuss of constant attention. Shortcuts? Use pre-sliced cheese and a stick of softened butter to shave a minute off prep, and you’ll still get the same comfort-packed result.
If you’re a beginner, pay attention to the first cook so you learn how your air fryer behaves. Once you’ve made it twice, this will be a no-brainer in your rotation.
Ingredients
2 slices of bread, 2 slices of cheese (cheddar or your choice), Butter or cooking spray
Each ingredient here does something simple and important. The bread is the crunchy, golden shell that makes a grilled cheese feel like a treat; choosing a slightly sturdy sandwich bread helps it hold up while the cheese melts. The cheese is the heart of the sandwich — cheddar is classic for its flavor and melt, but the recipe leaves room for your preferences. Butter (or cooking spray) is what creates that crisp, browned exterior and gives the sandwich its lovely, savory finish.
None of these are special-order items, which is part of why this recipe is so reliable. You can keep these staples on hand and have a satisfying meal in minutes. If you’re out of butter, a light spray of oil works; if you like a softer crust, skip the butter on the inside-facing side and only butter the outside surface. Small decisions like those let you tailor the sandwich without complicating the recipe.
Directions
- Preheat the air fryer to 350°F (175°C).
- Butter one side of each slice of bread.
- Place one slice of bread butter-side down in the air fryer basket.
- Layer the cheese on top of the bread.
- Place the second slice of bread on top, butter-side up.
- Cook in the air fryer for about 5-7 minutes, flipping halfway through, until the bread is golden brown and the cheese is melted.
- Remove from the air fryer, let it cool for a minute, then slice and serve.
Those are the seven simple steps — nothing sneaky, just straightforward action. A few friendly notes to help you get consistent results:
- Step 1: Preheating matters less for texture and more for timing. If your air fryer has a preheat function, use it; otherwise, set it for a minute or two before you slide the sandwich in so the basket isn’t cold. A slightly warm environment helps the bread brown evenly.
- Step 2: Buttering is worth the small effort. I recommend spreading butter to the very edges of the bread. If you’re short on time, spray the outside with cooking spray, but butter gives the best flavor and color.
- Steps 3–5: Assemble on a plate or cutting board first, then transfer to the basket. For neatness, keep the buttered sides out so they face the hot air and crisp up. If you prefer a heartier melt, choose cheeses that melt well (cheddar, American, mild mozzarella). Don’t over-stuff — it can make flipping and even cooking trickier.
- Step 6: Flip at the halfway mark. This is the secret to evenly golden bread without burning. Check the first few times at the 4-minute mark so you understand if your air fryer tends to run hot or cool. The sandwich should be golden and sound slightly firm when you press it gently; the cheese should be visibly melted at the edges.
- Step 7: Rest for a minute to let the cheese settle so it’s not a molten lava flow when you slice. Use a serrated knife or let it cool enough to cut cleanly.
Common small mistakes to avoid: putting two sandwiches in a crowded basket without space (they need airflow), buttering too sparingly, and skipping the flip. None of these are catastrophic, but they affect the crispness and melt.
Why families love this dish
There are few family meals as universally comforting as a grilled cheese. The flavor is familiar and reassuring — warm, toasty, and cheesy. Children often love the predictable texture and taste, while adults appreciate the nostalgia and ease. It’s a go-to when someone needs something simple but satisfying, whether that’s after school, during a quick work break, or as an easy night in.
The dish is forgiving: small variations in cheese or bread won’t ruin it, and the cooking time is short, which makes it perfect for when you need dinner fast. It’s also versatile for picky eaters: the basic sandwich is plain and dependable, yet easily tailored with add-ins for more adventurous eaters. Because it’s quick, it’s great for pairing with simple sides to make a balanced family meal without a lot of extra work.
Smart substitutions and simple variations
The beauty of this recipe is that the core ingredients stay the same, but you can adapt to preferences without complicating the process. Here are a few ideas that keep the method and overall feel intact:
- Cheese swaps: Stick with cheeses that melt well. If you want something milder than sharp cheddar, try Colby or American. For a stretchier texture, a mix of cheddar and mozzarella works nicely.
- Bread choices: A sturdier white or sourdough holds up best, but whole wheat or seeded breads work too. Slightly thicker slices produce a heartier sandwich.
- Butter alternatives: If you prefer not to use butter, a light coating of cooking spray or olive oil will brown the bread, though the flavor will be slightly different.
- For picky eaters: Keep one sandwich plain with just cheese, and make another with a thin spread of mustard or a slice of ham for adults. You can do this without changing the method — just assemble differently while keeping the buttered outsides the same.
These swaps let you adapt the sandwich to what’s on hand or to individual tastes, while keeping the recipe’s reliability intact.
Pairing ideas for a complete, satisfying meal
A grilled cheese is an easy centerpiece, and it pairs beautifully with quick sides that round out the meal without extra fuss:
- A simple tomato soup is classic and comforting; use a low-effort canned soup warmed on the stove or in the microwave when time’s tight.
- Fresh fruit or a small salad adds brightness and balance — think apple slices, grapes, or a bagged salad with a light vinaigrette.
- Roasted or steamed vegetables like carrots, green beans, or broccoli can be prepped while the sandwich cooks.
- For a crunchy side, oven fries or sweet potato chips are crowd-pleasers that families often enjoy.
If you want more ideas for simple dinners that fit the same practical, family-focused approach, I’ve gathered a few more options in my list of simple dinners for busy families. These pairings keep dinner feeling complete without adding stress.
Make-ahead tips, leftovers, and storage
This sandwich is best eaten fresh, but it does keep reasonably well if you need to prep in advance. Store cooled sandwiches in an airtight container in the fridge for up to 2 days. For reheating, the air fryer or a skillet work best to restore crispness; reheat at a lower temperature (around 325°F/160°C) for a few minutes to warm through without over-browning, or use a skillet over medium heat with a cover to encourage even melting.
If packing for lunch, let it cool slightly and wrap tightly in foil; reheat in an oven or air fryer at moderate heat to avoid sogginess. Avoid microwaving if possible — the bread tends to get soft and chewy rather than crisp. If you must microwave, do so briefly and finish in a toaster oven or hot skillet to rebuild some texture.
Leftovers can also be repurposed: chop into small pieces and use as a warm addition to a simple pasta bake or cut into strips for dipping.
Common questions home cooks ask about this recipe
Q: How long should I actually cook it?
A: The recipe gives a 5–7 minute window, and that’s because air fryers vary. Start checking at 4 minutes the first time and flip at halfway. You want golden brown bread and melted cheese.
Q: Can I add fillings like tomato or ham?
A: Yes — but keep them modest in volume so you don’t overwhelm the bread or prevent the cheese from melting fully. Pre-slice tomatoes thin and pat dry to avoid soggy bread.
Q: Can I make more than one at a time?
A: You can, provided your air fryer basket has room for airflow around each sandwich. Crowding leads to uneven browning. Cook in batches if needed.
Q: My bread isn’t browning evenly — what’s going on?
A: Make sure the butter is spread all the way to the edges and that the basket isn’t overcrowded. Different breads brown differently; adjust time slightly for denser loaves.
Q: How do I scale this for more mouths?
A: Multiply ingredients by the number of sandwiches and cook in batches. Prep all sandwiches on a tray so they’re ready to go into the air fryer one after another.
These are the practical questions I hear most often, and once you’ve made the sandwich a couple of times, you’ll find a rhythm that works for your family and your particular air fryer.
Final thoughts from Sarah
This Easy Air Fryer Grilled Cheese Sandwich is exactly the kind of recipe I keep returning to: straightforward, comforting, and hard to mess up. It’s an ideal fallback when time is short or when everyone needs something familiar and satisfying. The technique is simple enough for kids to help with, and flexible enough to serve different tastes without losing its reliable core.
If you’re building a mental list of “recipes to know,” this one belongs at the top. It’s quick to make, predictable in results, and always welcomed at the table — the very definition of family-friendly cooking in my book. Give it a try on a busy evening and see how it slot into your weeknight routine. Warm wishes and happy cooking — Sarah
Conclusion
If you’d like to see another take on an air fryer version with photos and tips, this Air Fryer Grilled Cheese Recipe is a helpful reference.

Air Fryer Grilled Cheese Sandwich
Ingredients
Method
- Preheat the air fryer to 350°F (175°C).
- Butter one side of each slice of bread.
- Place one slice of bread butter-side down in the air fryer basket.
- Layer the cheese on top of the bread.
- Place the second slice of bread on top, butter-side up.
- Cook in the air fryer for about 5-7 minutes, flipping halfway through, until the bread is golden brown and the cheese is melted.
- Remove from the air fryer, let it cool for a minute, then slice and serve.