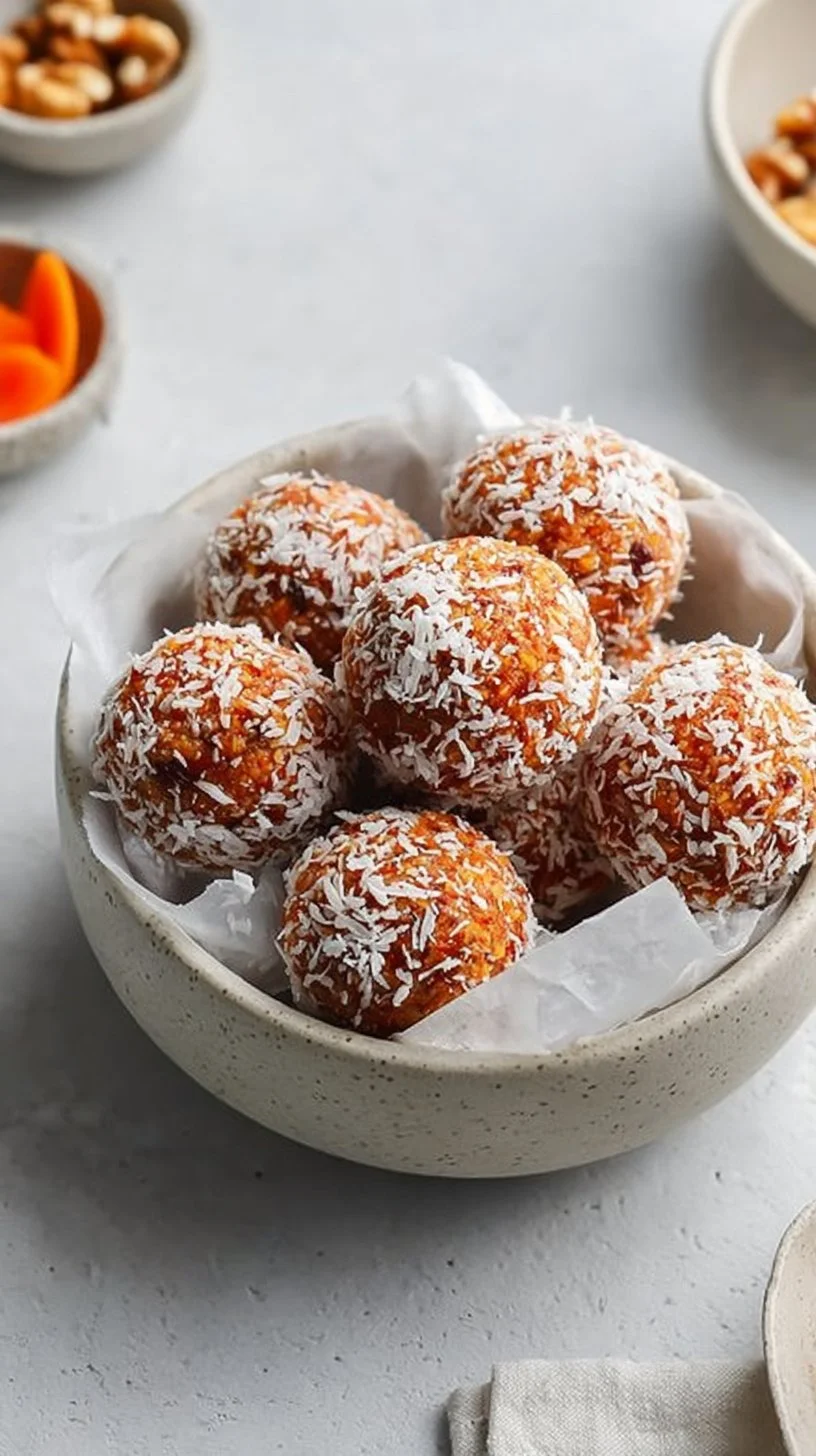
No Bake Carrot Cake Protein Balls
Hello — I’m Carla Carter, Founder & Recipe Developer of RecipesCabin. If you’re reading this, you might be looking for a snack that’s quick, wholesome, and forgiving to make. No Bake Carrot Cake Protein Balls are a perfect place to start. They’re for the person who wants something nourishing without a lot of fuss: busy parents, people who want a healthy post-workout bite, or anyone who wants to learn a simple no-bake technique that builds confidence in the kitchen.
This recipe is approachable because it uses whole-food ingredients you can recognize and handle easily. There’s no oven to preheat, no timers to babysit, and no fancy equipment required. I developed this recipe to teach basic mixing and binding techniques while delivering familiar, comforting carrot cake flavor in a tidy, portable bite. If you’ve been nervous about “messing up” in the kitchen, this one is a gentle, low-pressure way to practice — and to enjoy something tasty at the end.
I’ll walk you through the why and the how in a calm, step-by-step way. Small imperfections are fine here — a ball that’s slightly lopsided still tastes great. My goal is to help you feel capable and content with the process, so you’ll be ready to make these again and to try similar no-bake recipes confidently.
Why this recipe is easy to get right
This recipe is forgiving for several reasons. First, it relies on simple binding: sticky dates and nut butter hold the oats, nuts, and carrots together. Those two ingredients are very tolerant — if your dates are a little drier, a touch more nut butter or syrup can bring things back. If the mixture is a little too wet, chilling tightens everything up.
Second, the texture is flexible. “Carrot cake” evokes a moist, tender crumb, but in these balls we’re aiming for a dense, chewy bite that holds together. That means small variations in moisture or ingredients rarely ruin the snack; they just shift the chewiness. You don’t need millimeter precision.
Third, the steps are straightforward: combine dry items, add sticky components, optionally stir in protein powder, then shape and chill. No complex timing or delicate temperature control. That makes it suitable for beginners and for people returning to the kitchen after a break. If you’ve had a kitchen mishap before, know that this recipe is designed so a small misstep won’t require starting over.
Finally, the ingredients themselves are common and easy to substitute mentally if you’re out of something — though for this exercise we’re keeping the ingredient list exact. The overall method gives you a reliable result with minimal stress.
How to make No Bake Carrot Cake Protein Balls
Start by setting up your workspace: a mixing bowl, a spoon or spatula, a baking sheet lined with parchment, and a plate for rolling if you like. Good mise en place — meaning your ingredients ready at hand — makes mixing calm and efficient.
First, combine the dry and textured ingredients so you can judge how everything fits together. That means the oats, chopped nuts, dates, shredded carrots, and cinnamon go in together. This helps you see the overall moisture level before adding the sticky binders.
Next, add the nut butter and maple syrup (if using). These are your glue — they coat the oats and dates and bring the mixture together. Stir until you have an even, tacky mixture that holds when pressed. If you’ve chosen to use protein powder, fold it in after the nut butter to avoid drying the mixture prematurely.
Last, shape the mixture into small balls and chill. Rolling into 1-inch balls is a gentle, almost meditative step. Chill them so the fat in the nut butter firms and the dates tighten their hold — that’s what gives each bite structure.
Where beginners should slow down: when assessing the texture after adding the nut butter. Press a small amount together to see whether it holds. If it crumbles, it needs a touch more binder; if it’s gummy, chill and it will firm up. These checkpoints are simple and reliable — you’ll learn to trust your hands and eyes.

Ingredients
1 cup rolled oats, 1/2 cup nuts (like walnuts or pecans), chopped, 1/2 cup dates, pitted and chopped, 1 cup shredded carrots, 1/2 teaspoon cinnamon, 1/4 cup nut butter (like almond or peanut butter), 1 tablespoon maple syrup or honey (optional), 1/4 cup protein powder (optional)
Each ingredient here has an easy, comforting role:
1 cup rolled oats: The oats are the bulk and structure. They provide chew, soak up moisture, and give the balls a familiar, hearty texture. Rolled oats are soft enough to be pleasant raw and don’t require cooking, which is what makes this no-bake approach so simple.
1/2 cup nuts (like walnuts or pecans), chopped: Nuts add crunch, healthy fats, and flavor depth. Chopping them keeps the texture balanced — you’ll get little crunchy pockets without big pieces that make rolling difficult.
1/2 cup dates, pitted and chopped: Dates are the natural sweetener and the primary binder. They’re sticky and pliable, so they help everything adhere. They also add a caramel-like note that pairs beautifully with cinnamon and carrots.
1 cup shredded carrots: Carrots bring moisture, freshness, and the classic carrot cake identity. Shredded carrots blend into the mix and help keep the bites tender without adding raw vegetable grit.
1/2 teaspoon cinnamon: Cinnamon gives warmth and the recognizable spice of carrot cake. It’s a small amount that lifts the whole mixture without overpowering.
1/4 cup nut butter (like almond or peanut butter): Nut butter is a big part of the binding system and contributes fat and flavor. It softens the mix and helps the balls hold their round shape after chilling.
1 tablespoon maple syrup or honey (optional): This step is optional for extra sweetness and moisture. It’s helpful if your dates are less sticky or if you prefer a sweeter result. A little goes a long way.
1/4 cup protein powder (optional): Optional for added protein. If you include it, it increases the chew and can slightly dry the mixture, so fold it in gently and judge texture before shaping.
None of these ingredients are complicated: they’re pantry-friendly and straightforward to measure. Together they balance texture, flavor, and binding in a way that’s easy to manage and forgiving of small adjustments.
Directions
- In a mixing bowl, combine the rolled oats, chopped nuts, dates, shredded carrots, and cinnamon., 2. Add the nut butter and maple syrup (if using) to the mixture and stir until well combined., 3. If using, mix in protein powder for added nutrition., 4. Form the mixture into small balls, about 1 inch in diameter., 5. Place the balls on a baking sheet lined with parchment paper., 6. Refrigerate for at least 30 minutes to firm up., 7. Enjoy as a post-workout snack or anytime!
Supportive guidance for these steps
Step 1: When you mix the oats, nuts, dates, carrots, and cinnamon, look for even distribution. The colors should be speckled — orange from the carrots, darker flecks from the dates and nuts. If the dates are in slightly larger pieces, they’ll still soften as you stir.
Step 2: As you add the nut butter and maple syrup, stir deliberately. You’re watching for the mixture to clump together. It should feel tacky and stick to itself when pressed between your fingers. If it slides apart, add a touch more nut butter or a half teaspoon of syrup.
Step 3: If you choose protein powder, fold it in gently. It will thicken the mix; watch the texture so it doesn’t become overly dry. If it seems dry, a small splash of water or an extra teaspoon of nut butter will restore balance.
Step 4: Roll into 1-inch balls. Don’t worry about perfect spheres — even slightly imperfect shapes will taste the same. Use lightly damp or clean hands to make rolling smoother and to prevent the mixture from sticking to your palms.
Step 5: Parchment keeps cleanup easy and stops the balls from sticking. Lay them with a little space between — they won’t spread, but give them room.
Step 6: Chilling for at least 30 minutes firms the balls and lets the flavors settle. If you’re impatient, a short freezer stint (10–15 minutes) speeds things up, but don’t forget them in the freezer where they can become rock-hard.
Step 7: Enjoy. These are portable, satisfying, and mild-flavored. If a ball seems looser straight out of mixing, don’t panic — chilling is the final step that brings it all together.
If things don’t look perfect: small crumble or slight stickiness can often be corrected by pressing the mixture together firmly before chilling, or by adding just a little more nut butter. If it ends up too wet, pop the tray in the refrigerator for a bit longer; chilling resolves many texture issues without starting over.
Key techniques you’ll practice in this recipe
Mixing for even distribution: You’ll learn how to combine ingredients so textures and flavors are balanced. This skill helps with everything from granola to energy bars.
Judging texture by feel: Pressing a small amount between your fingers to see if it holds is a fundamental no-bake check. This tactile feedback teaches you to adjust moisture and binder — a useful intuition for many recipes.
Rolling with your hands: Gentle shaping builds fine motor control in the kitchen and helps you learn about portion size. Rolling also lets you sense when the mixture is too dry or too wet.
Chilling to set structure: Understanding how cold helps fats and sticky ingredients firm is important. Many no-bake recipes rely on this step, so seeing how 30 minutes in the fridge changes anything from squishy to sliceable is a small but valuable lesson.
These techniques are basic but widely applicable. Once you practice them here, you’ll use them again for snack bites, raw bars, and other simple refrigerated snacks.
Common mistakes and how to avoid them
Mistake: Mixture is too dry and crumbles when you try to form balls.
- Fix: Add a small extra spoonful of nut butter or a teaspoon of maple syrup, then press again. Mix and test until it holds.
Mistake: Mixture is too sticky and won’t roll neatly.
- Fix: Chill the bowl for 10–15 minutes or refrigerate the formed rough shapes to firm them before final rolling. Slightly damp hands or a light dusting of oats on your palms can help as well.
Mistake: Dates are hard or not sticky enough.
- Fix: Soak pitted dates in warm water for 10 minutes, drain, and chop. That softens them without cooking. You can also use a food processor briefly to make them easier to incorporate.
Mistake: Balls fall apart after chilling.
- Fix: Ensure the dates and nut butter were well mixed in step 2. Press each ball firmly when shaping and allow adequate chilling time for the fats to firm.
Mistake: Overpacking the nuts so balls are too crunchy.
- Fix: Chop nuts smaller or pulse them lightly in a food processor for a more even, less chunky texture. That keeps the bites cohesive.
Recovering without starting over is usually simple: extra binder or a short chill is all you need. The recipe’s forgiving nature means a fix is often a single additional tweak.
How to adjust confidently without changing the recipe
Although you’re not changing ingredients or steps, you can conceptually adapt portions and preferences:
Portion scaling: The batch size here makes a modest tray of bites. Tripling or halving the quantities keeps the same proportions and the method identical — just use a larger or smaller bowl. When scaling, ensure pieces still have space on the tray and chill in a container that lets air circulate.
Flavor preference adjustments (conceptual): If you like more spice, consider mentally noting that you could increase cinnamon in a future run — but for now, work with the balance provided and get comfortable with the basic taste first. If you prefer nuttier notes, choose a nut butter with a strong flavor in the current recipe.
Texture tweaks (conceptual): Want a chewier bite? Use slightly more dates next time. Prefer a firmer ball? Add a touch more oats. These are adjustments you’ll learn to make by feel — once you’ve made the original as written, you’ll recognize what to tweak.
The key is learning to judge texture and flavor so you can tweak later with confidence — not to change the recipe mid-step. Practicing the original helps you build that intuitive sense safely.
Serving, storage, and reheating made simple
Serving:
- These balls are best served chilled or at cool room temperature. They make a great post-workout snack, a lunchbox treat, or an afternoon pick-me-up. Arrange them on a small plate or in a jar for portability.
Storage:
- Store in an airtight container in the refrigerator for up to 7 days. Because they have nut butter and carrots, refrigeration keeps them fresh and prevents softening. For longer storage, freeze them on a tray until firm, then transfer to a zip-top bag or container for up to 3 months.
Reheating:
- These don’t need reheating — they’re a no-bake item intended to be eaten cold or room temperature. If you prefer them slightly softer after refrigeration, let a few sit at room temperature for 10–15 minutes before eating. Avoid microwaving, which can change texture and melt the nut butter unevenly.
Portability tip: Keep a small ice pack in your lunch bag if you’ll be gone most of the day — this keeps the balls firm and pleasant.
Questions new cooks often ask about this recipe
How long do these take to make? The active mixing and shaping is about 15–25 minutes, plus 30 minutes of chilling. The chill is important; don’t skip it.
Do I need a food processor? No — you can chop the nuts and dates by hand. A processor speeds things up, but it’s not required.
Is it normal if the mixture looks sticky? Yes. It will often be slightly tacky after mixing. Chilling is what firms it up.
Can I use other sweeteners? The recipe lists maple syrup or honey as optional. If you use either, add only a small amount at a time. These sweeteners also affect texture — honey will add a little more chew than maple syrup.
What if my dates are hard? Soak them briefly in warm water for about 10 minutes, drain, and chop. That softens them and makes them blend more easily.
Will protein powder make it chalky? If you add protein powder, fold it in gently and check texture. Different powders have different textures; a scoop or two usually works fine, but too much can dry the mix.
These are normal moments of doubt, and each one has a simple fix. You’ll gain confidence fast by trying the recipe once as written.
Final encouragement from Carla
I want you to know that cooking — especially baking or no-bake assembly — is a skill learned with small, steady steps. This recipe is a gentle place to practice listening to texture, using your hands to shape, and trusting simple visual checkpoints. If a ball isn’t perfect, it’s still a success: you’ve combined whole ingredients into a nourishing snack. Celebrate that.
Come back to this recipe whenever you need a reliable, low-stress win in the kitchen. Every time you make it, you’ll feel a little more confident, and those instincts will carry over to other recipes.
Happy rolling, and enjoy the process — you’re doing great.
— Carla Carter, Founder & Recipe Developer, RecipesCabin
Conclusion
If you’d like to see another take on carrot cake-style no-bake bites for inspiration, here’s a helpful version from Hummusapien’s No-Bake Carrot Cake Protein Bites that explores a slightly different texture and ingredient balance. For a perspective from a registered dietitian with tips on energy-ball nutrition, check out Walder Wellness’ Healthy Carrot Cake Energy Balls.

No Bake Carrot Cake Protein Balls
Ingredients
Method
- In a mixing bowl, combine the rolled oats, chopped nuts, dates, shredded carrots, and cinnamon.
- Add the nut butter and maple syrup (if using) to the mixture and stir until well combined.
- If using, mix in protein powder for added nutrition.
- Form the mixture into small balls, about 1 inch in diameter.
- Place the balls on a baking sheet lined with parchment paper.
- Refrigerate for at least 30 minutes to firm up.
- Enjoy as a post-workout snack or anytime!