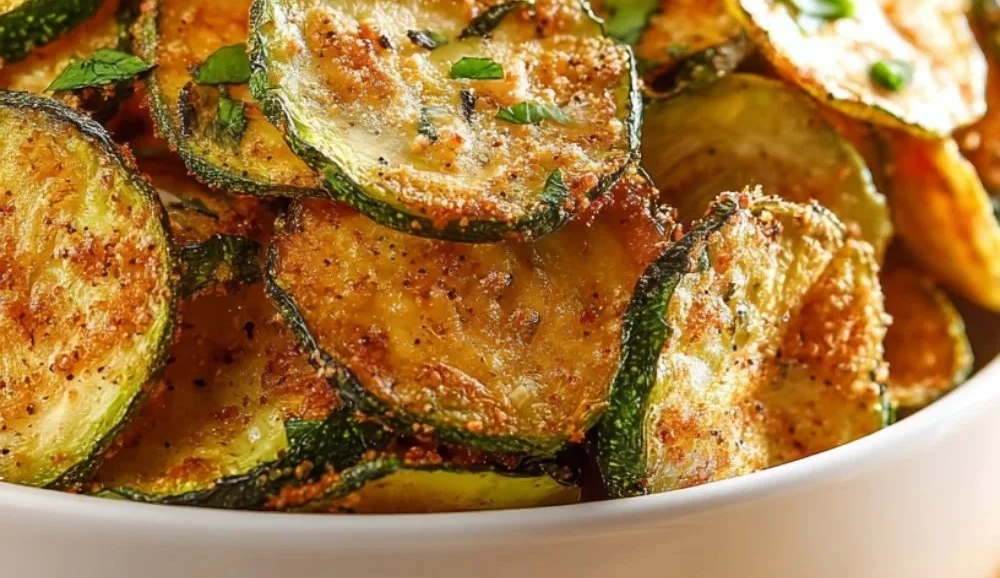
Oven-Baked Zucchini Chips
Introduction
Hello — I’m Carla Carter, Founder & Recipe Developer of RecipesCabin. If you’ve ever felt a little nervous about trying a new snack recipe or worried that your oven skills aren’t up to par, you’re in the right place. Oven-Baked Zucchini Chips are a gentle, friendly recipe that welcomes cooks of every level. They’re simple to make, forgiving when you’re learning, and give you a crispy, savory snack that feels special without being fussy.
This recipe is for anyone who wants a fresh, lighter alternative to potato chips, parents looking for a way to get more vegetables on the snack table, or busy folks who want a satisfying crunch without deep frying. It’s approachable because it uses a very small number of ingredients and a straightforward method. You don’t need fancy tools or a long list of pantry staples — just a few minutes to prepare and an hour or two in the oven while you do something else. My goal is to walk beside you through each step, explain what to watch for, and help you feel comfortable making this at home.
Why this recipe is easy to get right
What makes Oven-Baked Zucchini Chips forgiving is the simplicity of the ingredients and the slow, gentle cooking method. At a low oven temperature and with a long bake time, you give the zucchini slices a chance to dry out and crisp without the risk of burning quickly. That slower pace gives you room to learn and correct small missteps — like slightly thicker slices or a little extra moisture — without the whole batch being ruined.
There’s flexibility in how thin you slice and how golden you like the chips, so precision is not strictly required. If slices vary a bit in size, simply arrange them with similar pieces together on the tray and check the thinner ones earlier. The Parmesan coating naturally compensates for small imperfections by adding flavor and encouraging crisping. It’s a recipe that encourages small adjustments rather than perfection, which is perfect for cooks who are returning to the kitchen or trying something new for the first time.
How to make Oven-Baked Zucchini Chips
Overall, this is a three-part rhythm: prepare the zucchinis, coat them, then bake and cool. First you’ll handle the zucchinis — slicing and removing surface moisture — which creates the foundation for crispness. Next you’ll mix the Parmesan and seasonings and coat each slice, which adds flavor and helps create a crunchy exterior. Finally, you’ll bake low and slow until the chips turn golden and feel crisp, then let them cool so they firm up.
Start by setting your oven to the correct temperature so it’s ready when you need it. When slicing, aim for thin, even slices; a mandoline helps but a steady hand with a knife works just as well. After slicing, blotting moisture is worth the few extra minutes — it’s what keeps the chips from steaming in the oven. When baking, patience is rewarded: at 225°F (110°C) the zucchini releases water and the Parmesan browns without burning. The cooling step is important — they’ll feel softer when hot and firm up as they rest.
Beginners should slow down at two places: slicing and the initial drying. Take your time with each zucchini to keep the slices consistent, and press gently but thoroughly with paper towels to remove surface moisture. These small pauses make it much easier to get crisp chips at the end.
Ingredients
2 medium zucchinis, 1 cup grated Parmesan cheese, 2 teaspoons garlic powder, Salt and pepper to taste, Olive oil spray
Each ingredient plays a simple, clear role:
- 2 medium zucchinis: The star of the show. Zucchini is mild and slightly watery when raw, which is why we dry it and roast it low and slow. It provides the base texture that will transform into a chip-like crunch.
- 1 cup grated Parmesan cheese: Parmesan is both flavor and texture. As it bakes, it melts, browns, and forms a golden, crisp coating. Its saltiness also seasons each bite so you don’t need many additional spices.
- 2 teaspoons garlic powder: This adds a warm savory note that pairs beautifully with Parmesan. Garlic powder distributes evenly, so every slice gets a gentle flavor lift without extra effort.
- Salt and pepper to taste: Basic seasoning that brings out the zucchini’s natural flavor. A light hand is all you need because the Parmesan already contributes salt.
- Olive oil spray: A light mist prevents sticking and helps the cheese adhere to the zucchini. It also promotes even browning without adding a lot of extra oil.
None of these items are intimidating — they’re common, easy to measure, and do clear jobs. Together they create a balance of crisp, savory, and lightly seasoned notes that feel vibrant and satisfying.
Directions
- Preheat the oven to 225°F (110°C)., 2. Slice the zucchinis thinly and place them on a paper towel to absorb moisture., 3. In a bowl, mix Parmesan cheese, garlic powder, salt, and pepper., 4. Lightly spray a baking sheet with olive oil., 5. Coat each zucchini slice in the cheese mixture and arrange them in a single layer on the baking sheet., 6. Bake for 1-2 hours until the chips are golden and crispy., 7. Allow to cool before serving.
Supportive guidance around the steps:
- Step 1 — Preheat: Give the oven a good 10–15 minutes to reach 225°F (110°C). Low and steady heat is the key here; it’s what slowly removes moisture and crisps the cheese. If your oven runs hot or cold, an inexpensive oven thermometer is a helpful, confidence-boosting tool.
- Step 2 — Slice and dry: When you slice the zucchinis thinly, you’re aiming for even pieces about the thickness of a coin or a little thinner. If slices feel floppy or release a lot of water when you press them with a finger, blot them on paper towels and let them sit briefly — that surface moisture is what would otherwise steam in the oven and delay crisping.
- Step 3 — Mix the coating: The Parmesan and garlic powder blend will feel slightly granular. That’s good — the texture helps it cling to the wet zucchini. Taste a tiny pinch of the mixture before coating if you want to adjust salt and pepper.
- Step 4 — Prepare the tray: A light spray is enough. You don’t want the zucchini sitting in a pool of oil — just a fine mist to prevent sticking and help browning.
- Step 5 — Coat and arrange: Press the cheese mixture gently into each slice so it adheres. Lay the slices in a single, even layer with a little space between each. Crowding traps steam and slows crisping. If you have slices that vary in thickness, keep the thinner ones toward the oven center where heat tends to be a bit stronger.
- Step 6 — Bake: The range 1–2 hours depends on how thin your slices are and how crispy you like them. Start checking at the 45–50 minute mark for thinner slices, but expect thicker ones to need longer. You’re looking for golden edges and a clear, crisp texture. If some slices brown faster, remove just those and let the rest continue.
- Step 7 — Cool: Cooling is essential. A freshly baked slice will feel soft and fragile; as it cools it firms up and becomes chip-like. Place them on a wire rack if you have one — that lets air circulate and prevents sogginess.
If your first batch isn’t uniformly crisp, don’t worry. Small variations are normal. You can re-bake slightly underdone pieces for a few extra minutes until they reach the texture you like.
Key techniques you’ll practice in this recipe
This recipe is a gentle way to practice several fundamental kitchen skills that are useful across many recipes:
- Knife control and even slicing: Learning to slice consistently helps food cook evenly. You’ll get a better feel for pressure, stability, and rhythm.
- Moisture management: Blotting the zucchini and understanding how moisture affects texture teaches a basic principle used in roasting, sautéing, and baking.
- Coating and adhesion: Pressing the Parmesan mixture onto the slices is a basic technique for creating a crust or topping — useful for roasted vegetables, chicken, or fish.
- Low-and-slow oven cooking: Watching how the oven gradually removes moisture and browns the cheese gives you an intuitive sense of temperature and timing that transfers to drying herbs, slow-roasting vegetables, or making dehydrated snacks.
Each of these skills builds confidence because they’re visible — you can see and feel the difference as you improve. They also apply to many other simple recipes.
Common mistakes and how to avoid them
Here are the typical errors beginners make and practical fixes you can use right away:
- Mistake: Slices too thick, so they never crisp. Fix: Take time to slice thinner, or accept that thicker slices will take longer in the oven. If you already have a batch that’s limp, extend the baking time and keep a close eye to prevent burning.
- Mistake: Not blotting moisture. Fix: Press slices gently between paper towels until the surface feels dry. Even a short pause here prevents a lot of steaming in the oven.
- Mistake: Overcrowding the pan. Fix: Use two baking sheets if needed and give each slice a little breathing room. Air circulation equals better crisping.
- Mistake: Baking at too high a temperature. Fix: Stick to the specified 225°F (110°C). Higher heat can brown the cheese too fast while leaving the centers soft.
- Mistake: Expecting perfect uniformity the first time. Fix: Accept small differences in color and size — flavor will still be delightful. Remove finished chips as they’re ready so the rest can finish without over-browning.
If a batch ends up softer than you like, you can give the whole sheet a few extra minutes in the oven or place individual slices back on the tray for additional time. Recovery is often as simple as patience.
How to adjust confidently without changing the recipe
You’re not changing the recipe when you adjust how you approach it. Here are safe, conceptual changes you can make while keeping ingredients and steps identical:
- Scaling portions: To make more or fewer chips, simply increase or decrease the number of zucchinis and adjust baking in batches so you don’t overcrowd the tray. Baking more at once risks steaming; it’s better to work in additional batches if you want larger quantities.
- Flavor preferences: If you like stronger garlic flavor, press more garlic powder into the Parmesan mixture before coating. If you prefer milder seasoning, use less salt at the table rather than over-salting the mix.
- Texture preferences: For extra-crispy chips, slice thinner and bake toward the longer end of the time range. For a slightly chewier bite, leave slices a little thicker and pull them earlier. The concept is that thinner equals crisper, thicker equals softer — the recipe itself stays the same.
- Timing concepts: If you’re short on time, you can start slicing in the evening and dry the slices on paper towels in the fridge overnight to help remove moisture faster before baking. That doesn’t change any steps or measurements — it just spreads the work out.
These ideas let you tune results to your liking without altering the heart of the recipe.
Serving, storage, and reheating made simple
Serving: These chips are best enjoyed at room temperature, once they’ve cooled and firmed. Serve them on a simple platter with a small bowl of yogurt-based dip, marinara, or your favorite herb dip — the chips are flavorful on their own, but a dip adds a nice contrast.
Storage: If you have leftovers, let the chips cool completely to room temperature, then store in an airtight container at room temperature for up to 2 days. Keeping them sealed stops moisture from softening them. Avoid storing them in the refrigerator, which can introduce condensation and make them lose crunch.
Reheating: To refresh chips that have softened, a quick return to a low oven works well. Preheat to 225°F (110°C) and bake for 5–10 minutes, watching closely until they crisp again. The oven’s dry heat removes any surface moisture and brings back the crunch. Avoid the microwave — it will steam them and make them soggy.
Questions new cooks often ask about this recipe
- How thin should I slice the zucchinis? Aim for uniform slices about as thick as a coin or slightly less. Thinner slices crisp faster; if you’re nervous about slicing evenly, use a mandoline or practice slicing a couple of spare zucchinis first.
- My chips browned unevenly — is that normal? Ovens have hot spots and slices vary in thickness. Remove the darker ones first and let the rest continue. Rotating the baking sheet halfway through can also help even browning.
- Can I skip drying the zucchini? You can, but expect a longer baking time and a higher risk of softer chips. Blotting with paper towels makes the biggest difference for crispness.
- Do I need a special baking sheet? No — a regular baking sheet with a light spray of oil is fine. If you have parchment, it can make cleanup easier, but it isn’t required.
- Is it okay if some slices are imperfect? Yes. Small color or shape variations are normal and won’t ruin the snack. Taste and texture matter more than perfect appearance.
These are common questions because these little details are where success happens. Take a breath, follow the basic cues, and you’ll do fine.
Final encouragement from Carla
Cooking is a series of small experiments and steady practice. Oven-Baked Zucchini Chips are a wonderful recipe to build confidence because they’re low-pressure, teach useful skills, and reward patience. If your first batch isn’t perfect, that’s part of learning — each try teaches you something about your oven, your knife work, and what you like in terms of texture. Keep notes if you want: a minute more, a thinner slice, or a lighter hand with the salt can make a big difference next time.
You don’t need to be flawless to enjoy good food. Celebrate the crispy pieces, learn from the softer ones, and know that with each attempt you’ll improve. I’m cheering you on — one calm, confident step in the kitchen at a time. — Carla Carter, Founder & Recipe Developer, RecipesCabin
Conclusion
If you’d like to see other takes or visual guides on this snack, these resources can be helpful as gentle references: Crispy Parmesan Baked Zucchini Chips – Healthy Recipes Blog and Easy Oven-Baked Zucchini Chips. They offer slightly different presentations that may inspire small ideas while you keep the steps and ingredients here as your reliable method.