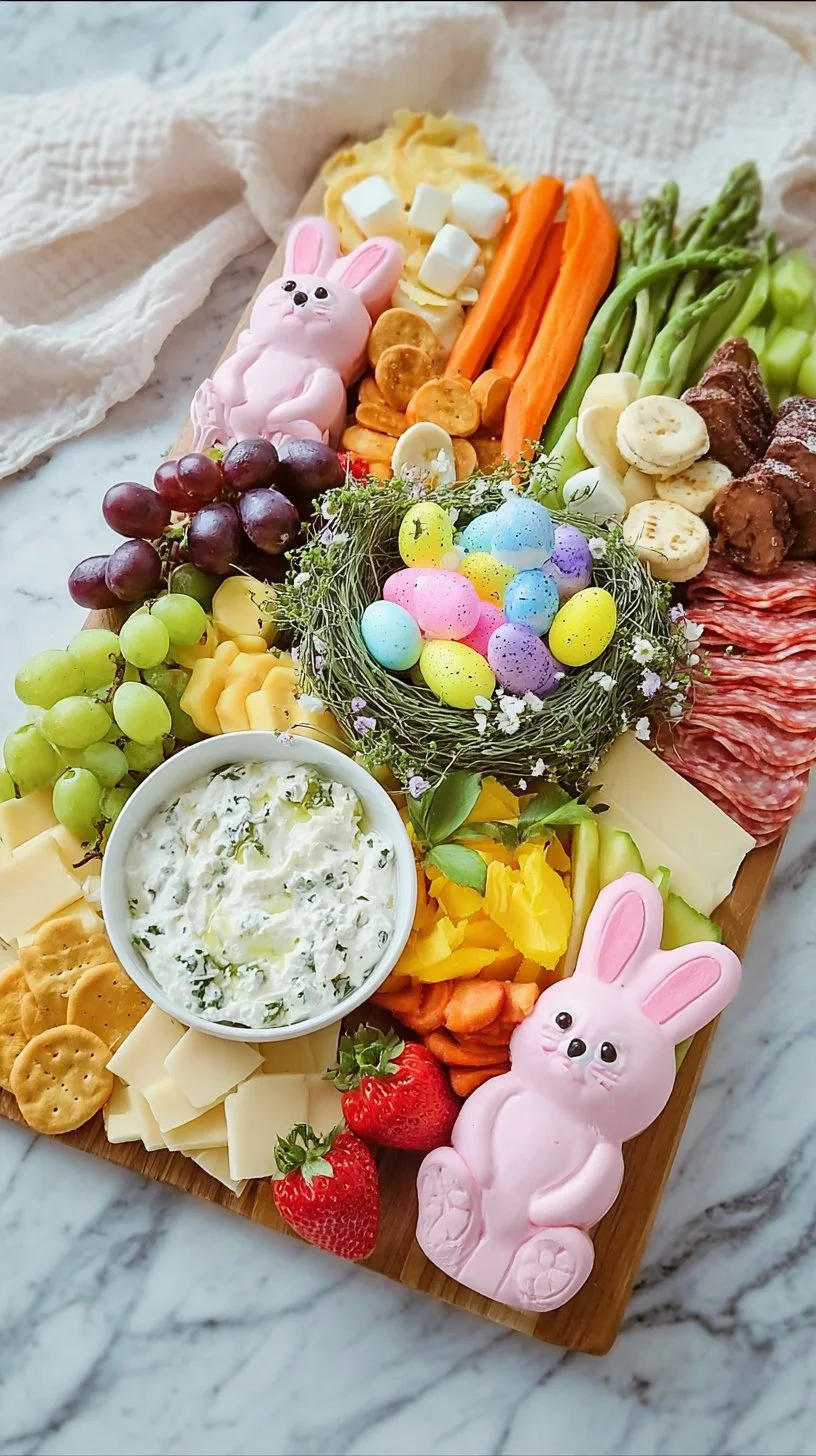
Easter Charcuterie Board
Hi — I’m Carla Carter, Founder & Recipe Developer of RecipesCabin. If you’re here, you’re probably planning something bright and easy for Easter: a colorful Easter Charcuterie Board that looks special without needing complicated cooking. This recipe is for anyone who wants to bring a cheerful, shareable centerpiece to the table — whether you’re a complete beginner, someone who’s cooked a little before, or you’re returning to entertaining after a long break.
This charcuterie board is approachable because it’s more about arranging than precise cooking. You don’t need to heat the oven, master a sauce, or follow exact timing. What matters most is the balance of colors, textures, and simple placement. I’ll walk you through the why and how so you can feel confident creating a board that tastes great and looks inviting.
Why this recipe is easy to get right
A charcuterie board is forgiving by nature — it celebrates variety and the idea that different things belong together. There’s no single “perfect” arrangement, and small imperfections actually add charm. Here’s why this particular Easter Charcuterie Board is a low-stress win:
- No cooking required: Most of the ingredients are ready to eat, so there’s no fear of burning or undercooking. That removes one major source of kitchen anxiety.
- Flexible quantities: You can scale up or down without having to recalculate complex ratios. If you need more meat, add more; if you have fewer guests, buy a little less.
- Visual focus over precision: The goal is an appealing spread. Small variations in slice thickness, the placement of a grape cluster, or how tightly salami is folded won’t hurt the taste.
- Kid-friendly and guest-friendly: There are crunchy, creamy, sweet, and savory choices so everyone can pick what they like.
When things don’t look exactly like a magazine photo, remember this: boards that feel full, balanced, and inviting are successful. Focus on contrasts — soft and crunchy, salty and sweet, bright and neutral — and you’ll succeed.
How to make Easter Charcuterie Board
The overall process breaks down into three main parts: gather, build, and finish. Think of it as set-up, placement, and detail work.
- Gather (first): Lay out your ingredients and tools. This helps you see what you have and prevents last-minute scrambling. Grab a large platter or board, small bowls for nuts or spreads, a knife for the cheeses and fruit, and any small tongs or spoons you like.
- Build (next): Start with the largest items — meats and cheeses — because they anchor the board visually and give you structure. Once those are placed, tuck in vegetables and fruits to create color pockets. Add nuts and sweets for texture and visual interest.
- Finish (last): Fill gaps with crackers or bread on the side, adjust any clusters for balance, and add small bowls for dips if you like. Step back and view the board from a distance to make sure colors and textures are evenly spread.
Where to slow down: When you’re slicing cheese or arranging meats, move deliberately. Slicing cheeses to an even thickness helps guests pick up pieces easily; folding or rolling meats in small, repeatable folds creates a tidy look. But don’t worry about perfection — slightly irregular slices are perfectly fine as long as the board looks inviting.

Ingredients
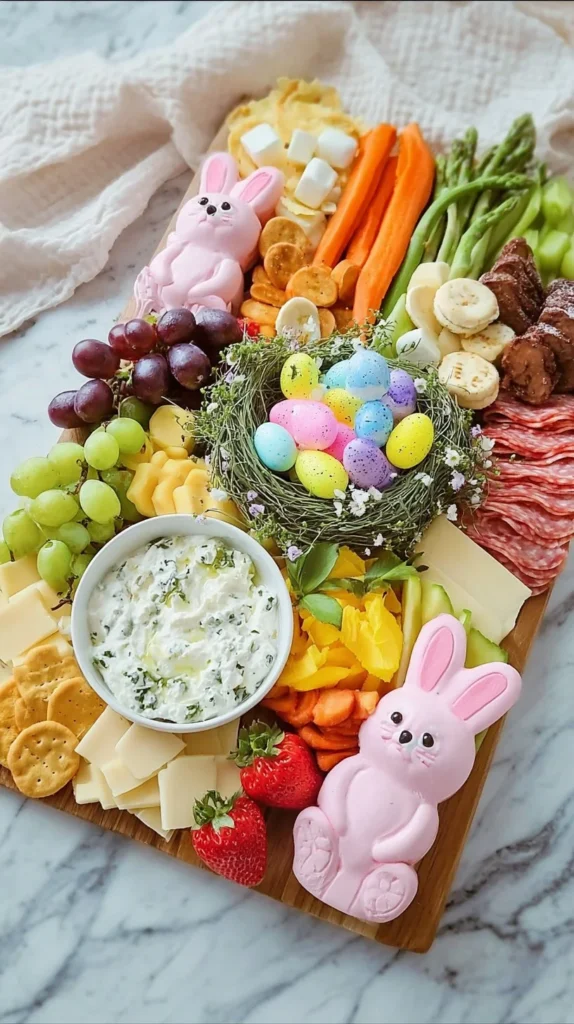
Assorted meats (cured meats, salami, prosciutto), Variety of cheeses (cheddar, brie, gouda), Fresh vegetables (carrots, bell peppers, cucumbers), Fruits (grapes, strawberries, apples), Nuts (almonds, walnuts), Sweets (chocolate, dried fruits), Crackers or bread
- Assorted meats (cured meats, salami, prosciutto): These bring savory, salty flavors and a pleasing chew. Prosciutto drapes well and looks delicate; salami can be folded into little rosettes to add height. None require cooking, which keeps this step simple.
- Variety of cheeses (cheddar, brie, gouda): Cheeses offer creamy, sharp, and mild choices. Cheddar gives a firm, crumbly bite; brie brings a soft, spreadable creaminess; gouda offers a smooth, slightly sweet flavor. Choosing different textures makes the eating experience more interesting.
- Fresh vegetables (carrots, bell peppers, cucumbers): Vegetables add crunch and color, and they act as neutral palate cleansers between bites of cheese and meat. Thin sticks or slices are easiest to pick up and tuck into small gaps on the board.
- Fruits (grapes, strawberries, apples): Fruit adds sweetness and fresh brightness. Grapes cluster naturally and fill space quickly; strawberries and apple slices bring color and a pleasing contrast to savory items.
- Nuts (almonds, walnuts): Nuts add crunch and a toasty flavor. Scatter them in small piles to create texture pockets and make it easy for guests to nibble.
- Sweets (chocolate, dried fruits): A few sweets balance the savory and encourage lingering at the board. Small pieces of chocolate or dried apricots are simple and satisfying.
- Crackers or bread: These are the vessel for building bites. Offer a mix of plain and seeded crackers or sliced bread so guests can choose crisp or soft bases.
None of these ingredients are complicated or intimidating — they are familiar foods you might already have in your kitchen. Each one plays a role: meats and cheeses for substance, produce for freshness, nuts for texture, sweets for balance, and crackers for structure.
Directions
- Arrange the assorted meats on a large platter., 2. Slice and place the cheeses near the meats., 3. Add fresh vegetables and fruits in between the meats and cheeses., 4. Scatter nuts and sweets around the board for decoration and added flavor., 5. Serve with crackers or sliced bread on the side.
Now let’s expand on those steps so you can visualize what’s happening at each moment:
Step 1 — Arrange the assorted meats on a large platter.: Lay out the cured meats first because they form the board’s backbone. Fold slices into loose cones or roll them into little cylinders. Place prosciutto gently draped over itself to create soft curves. The idea is to create small “zones” of meat that guests can come to. If a spot looks sparse, add another small pile rather than stretching one cluster thin.
Step 2 — Slice and place the cheeses near the meats.: Slice harder cheeses into thin wedges or bite-sized cubes; leave softer cheeses like brie whole with a small cheese knife so guests can spread. Put cheeses close to meats so flavors can mingle, but give each cheese a little space so it’s easy to identify and sample. Look for visual contrast — a pale brie next to a deeper-hued cheddar reads well.
Step 3 — Add fresh vegetables and fruits in between the meats and cheeses.: Tuck carrot sticks, pepper strips, and cucumber slices into little gaps. Add clusters of grapes or a small pile of strawberry halves to bring pops of color. This step is where the board starts to feel balanced and lively. Aim for several small groups of fruit and veg rather than one large section.
Step 4 — Scatter nuts and sweets around the board for decoration and added flavor.: Sprinkle almonds or walnuts into empty spaces and place a few small chocolate pieces or dried fruits near cheeses that pair well with them. Nuts and sweets function as both filler and flavor bridges — they make the board feel complete.
Step 5 — Serve with crackers or sliced bread on the side.: Place crackers and bread on a separate small board or at the edge of your platter. This avoids them getting soggy and keeps the main board tidy. Encourage guests to build their own bites; part of the fun is combining items.
Visual cues to watch for: A successful board looks full without being overcrowded. You’ll know you’re on track when there are no huge empty swaths and colors are spread out. Texture hints: include at least one soft cheese, one firm cheese, crunchy vegetables, and crunchy nuts. Timing: this assembly takes 15–30 minutes depending on how many items you prepare; most steps are forgiving and can be tweaked as you go.
If something doesn’t sit perfectly — a cluster looks a bit lopsided or a slice falls — don’t worry. Gently move items or add one more small piece to balance the eye. Small imperfections make the board look handmade and welcoming.
Key techniques you’ll practice in this recipe
This recipe teaches a handful of fundamentals that extend beyond a single board:
- Slicing and portioning: Learning to slice cheeses and fruits to comfortable, pick-upable sizes helps in many recipes and serving situations.
- Visual composition: Placing items in clusters, alternating colors, and filling gaps are basic plating skills that are useful for any type of shared platter.
- Balancing flavors and textures: Thinking about salty, sweet, creamy, and crunchy together trains your palate to compose satisfying bites.
- Gentle handling: Draping delicate foods like prosciutto without tearing teaches patience and fine motor control in the kitchen.
These are simple skills, but practicing them builds your confidence and makes other recipes and presentations easier. You’ll notice, for example, that learning how to slice evenly helps when cutting vegetables for salads or sandwiches.
Common mistakes and how to avoid them
Here are a few typical missteps and how to fix them without starting over:
- Too much of one thing: If the board looks heavy on meat or cheese, pull a few pieces back and redistribute or add more fruit and veg. It’s easier to remove than to add balance later.
- Overly large cheese slices: If cheese pieces are too big, guests struggle to pick them up. Re-slice into smaller wedges or cubes. For soft cheese, leave it whole but provide a small spreading knife.
- Soggy crackers: Don’t place crackers directly on top of moist fruits or cheeses where they can get soggy. Keep crackers on the side or in a separate compartment.
- Crowding items too tightly: If everything is jammed together, the board can look messy rather than abundant. Allow small pockets of breathing space so items are easy to grab.
- Worrying about perfection: If you find yourself obsessing over symmetry, step back and shake your hands out. The goal is a welcoming spread, not a museum display. Little asymmetry is charming.
If something goes off track — for example, a cheese is too soft to slice neatly — adapt by placing it in a small bowl or leaving it whole with a spreader. You don’t need to start over.
How to adjust confidently without changing the recipe
You may want to tailor the board to the number of guests or to personal taste while keeping the same steps and ingredients:
- Portion scaling: For more guests, increase the number of meat and cheese piles and add extra fruit clusters. For fewer guests, reduce the amount of each item but keep the variety. The principle is the same: small groups of many things rather than one large pile of one thing.
- Flavor preferences: If someone prefers milder tastes, offer more fruit and crackers and smaller portions of the stronger cheeses. If guests love bold flavors, place the sharper cheeses in more prominent positions.
- Texture tweaks (conceptual only): To increase crunch, add more nuts and crisp veggies. To emphasize creaminess, include more brie or additional soft cheeses. All adjustments are about shifting emphasis, not changing the recipe.
These adjustments let you personalize the board while honoring the original ingredients and steps.
Serving, storage, and reheating made simple
Serving: Bring the board to the table on the platter you assembled it on. If you’re transporting it, assemble it on a portable flat surface and cover loosely with plastic wrap until you arrive. Offer small plates, napkins, and knives so guests can build bites.
Storage: Cover any leftovers tightly and refrigerate. Most components keep well: meats and cheeses can be refrigerated for a few days, while cut fruit and vegetables will last 1–2 days. Store crackers separately to keep them crisp.
Reheating: This board is mainly served at room temperature, so reheating isn’t typically necessary. If you’d like warm components (such as warmed brie), remove the cheese from the board, warm it gently in the oven or microwave until just soft, and then return to the platter. Do this carefully so you don’t over-soften or melt items that should stay solid.
Questions new cooks often ask about this recipe
- How long will the board stay good at room temperature? Perishable items like cheeses and meats are best enjoyed within two hours at room temperature. If your gathering runs longer, return the platter to the fridge between courses.
- What equipment do I need? A large platter or wooden board, a few small bowls for nuts or spreads, a cheese knife, and a small cutting board for slicing fruit and cheeses are all you need.
- Is it normal if the board looks uneven at first? Absolutely. One of the joys of a charcuterie board is its handmade look. Shift a few pieces, add a sprig of greenery, or sprinkle nuts to even it out.
- Can I prepare parts ahead of time? Yes. Slice cheeses and prepare fruits and veggies up to a day ahead, storing them separately and assembling the board just before serving for the freshest appearance.
- How many people does this serve? That depends on appetite and how many other dishes you serve. As a centerpiece appetizer, plan for the board to serve 6–8 people; for grazing during a party, it might serve fewer.
Final encouragement from Carla
You don’t need perfect placings to make something lovely. Take your time, trust your instincts, and remember that the goal is to create a welcoming moment for your guests. Little experiments — a different cheese, a new fruit, or a small decorative touch — are how you learn and grow. If at first your board looks a bit uneven, that’s okay; every board tells a story and gets better with practice. Keep going — you’re doing great.
Conclusion
If you’d like a visual step-by-step idea to follow along with while you assemble, this guide offers helpful inspiration: How to Make A Spring/Easter Charcuterie Board!. For playful design ideas that lean into an Easter theme, this roundup shows creative layouts and decorations: Easter Bunny Charcuterie Board Ideas – Foxes Love Lemons.
Happy assembling — and remember, the best boards are the ones shared with people you love.
Easter Charcuterie Board
Ingredients
Method
- Gather all ingredients and tools including bowls for nuts or spreads, a knife for cheeses and fruits, and small tongs or spoons.
- Begin by arranging the assorted meats on the large platter.
- Slice and place the cheeses near the meats.
- Add fresh vegetables and fruits in between the meats and cheeses.
- Scatter nuts and sweets around the board for decoration and added flavor.
- Serve with crackers or sliced bread on the side.