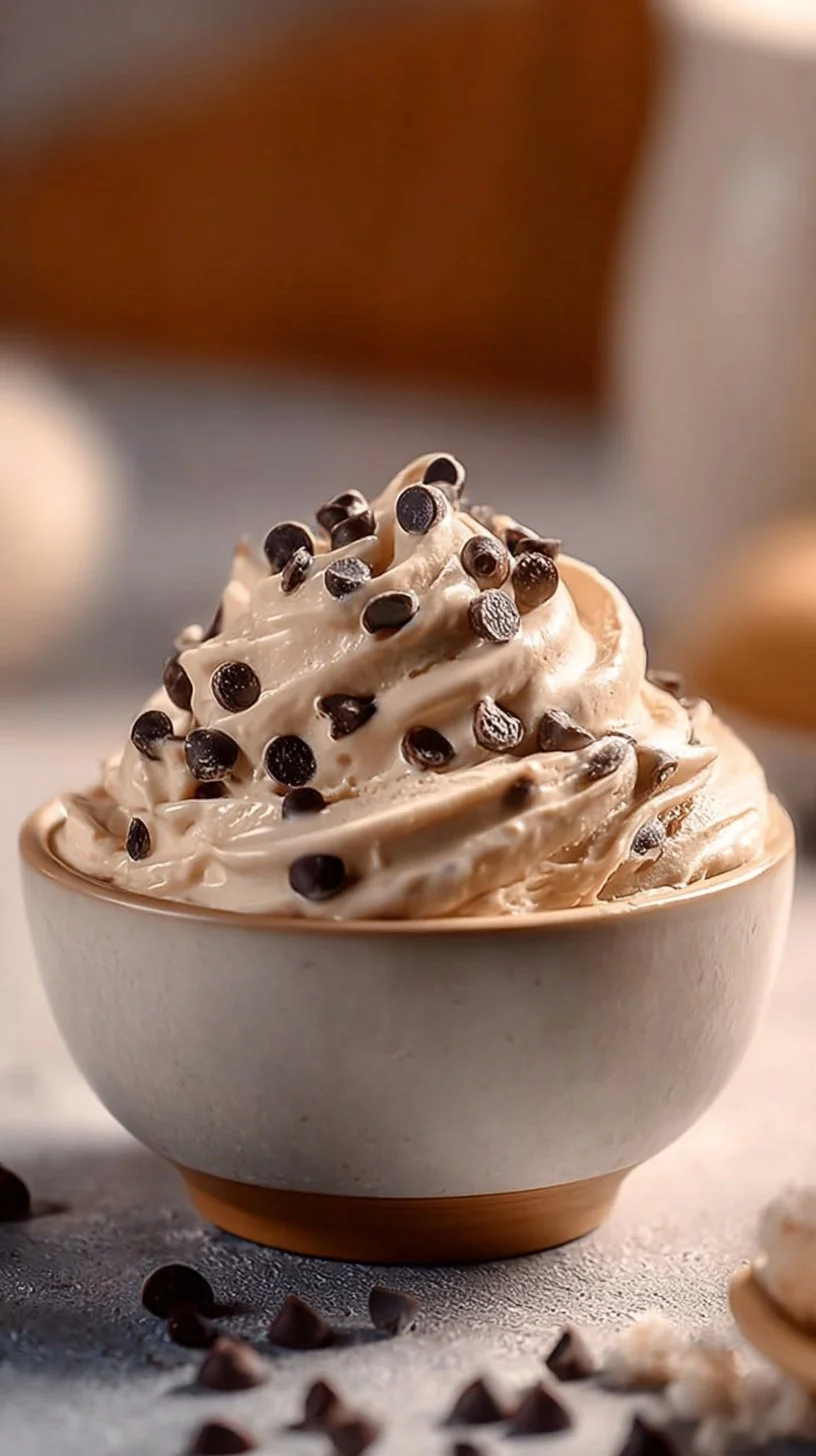
Cookie Dough Protein Dip
Hello — I’m Carla Carter, Founder & Recipe Developer of RecipesCabin. If you’re looking for a simple, comforting treat that tastes like cookie dough but feels wholesome enough to serve at any casual gathering, this Cookie Dough Protein Dip is for you. It’s designed for home cooks who want something fast, forgiving, and reliably delicious — whether you’re new to the kitchen or returning after a long break.
This recipe is approachable because it uses ingredients you probably already have, and it comes together in minutes with just a bowl and a spoon. If you enjoy other easy-to-share sweets from the site, you might also like my recipe for cookie dough frozen yogurt bites — they pair nicely if you’re building a snack spread. My goal here is to walk you through each step so you feel calm and capable, and to explain why each small move matters so you can succeed on the first try.
Why this recipe is easy to get right
This dip is forgiving by design. There’s no oven, no temperamental techniques, and very little chance to “ruin” it — everything is mixed and tasted. Here’s why that matters:
- No precise temperature: You don’t need to manage heat. That removes a lot of pressure for new cooks.
- Few ingredients: With only six ingredients, you can clearly see what’s happening and how flavors build.
- Texture tolerance: A slightly thicker or thinner dip is still delicious. Whether the peanut butter is runny or a bit stiff, it blends in and tastes great.
- Quick feedback loop: You can taste and adjust immediately. If you want a bit more sweetness, add a drizzle of honey; if you want a nuttier note, another half teaspoon of peanut butter does the trick.
Because the recipe is so short, practice is safe. Even if a first attempt looks a little lumpy or not perfectly smooth, a few extra stirs will usually save the day.
How to make Cookie Dough Protein Dip
At its heart, this recipe is a simple three-part process: combine, fold, and serve. I’ll describe what happens at each stage and what to watch for.
Combine: Start by putting the Greek yogurt, peanut butter, honey (or maple syrup), and vanilla extract into a bowl. The goal is to create a smooth base. Use a spoon or a small whisk and mix until the ingredients come together. You’ll know you’re done when the mixture looks glossy and uniform — no streaks of yogurt or thick bridges of peanut butter.
- Why this matters: Thorough mixing ensures even sweetness and a consistent mouthfeel. If you stop too soon, you’ll find pockets of peanut butter or overly tangy yogurt.
Fold: Add the chocolate chips and a pinch of salt, folding them gently into the base. This step introduces texture and balances flavor. Folding (rather than aggressive stirring) helps distribute chips evenly without breaking them.
- Why this matters: Folding keeps the chips intact and provides pleasant little bites across the dip. The pinch of salt brightens the overall flavor and stops it from tasting flat.
Serve: Transfer to a small serving bowl and offer fruit, whole grain crackers, or other dippers nearby. The dip is best enjoyed immediately, when the chips are still firm and the dip has a fresh, cool texture.
- Why this matters: Immediate serving gives you the ideal contrast of creamy dip and crisp dippers. If you wait, the chips can soften slightly, and the texture will change, which is still tasty but different.
Where beginners often slow down: take your time during the initial mixing. It’s tempting to rush, but a patient stir produces the smoothest, most comforting texture. If you encounter lumps, keep stirring — they usually disappear after a few extra turns.
Ingredients
1 cup Greek yogurt, 2 tablespoons peanut butter or nut butter of choice, 2 tablespoons honey or maple syrup, 1/4 teaspoon vanilla extract, 1/4 cup chocolate chips or mini chocolate chips, A pinch of salt
Let’s walk through what each ingredient does and why none of them are intimidating.
- 1 cup Greek yogurt: This is the creamy base. Greek yogurt brings tang, body, and a protein boost that makes the dip feel substantial. If the yogurt is very thick, that’s fine — it simply gives the dip more structure.
- 2 tablespoons peanut butter or nut butter of choice: This adds richness, nutty flavor, and a slightly sticky, cookie-dough-like element. Any spread you prefer will work here; the recipe is written to accept that flexibility.
- 2 tablespoons honey or maple syrup: This is your sweetener. Use honey for floral warmth or maple syrup for a gentle caramel note. The amount is modest; it sweetens without overpowering.
- 1/4 teaspoon vanilla extract: Vanilla ties flavors together and gives that familiar “baked goods” aroma. It’s a small addition with a big payoff.
- 1/4 cup chocolate chips or mini chocolate chips: These bring texture and chocolatey hits. Mini chips spread more evenly, but regular chips are perfectly acceptable.
- A pinch of salt: A tiny salt addition balances the sweetness and lifts the flavors so the dip tastes complete.
All these ingredients are straightforward and commonly available, which makes the recipe stress-free. They work together to mimic the elements of cookie dough: creaminess, nuttiness, sweetness, and chocolate chunks.
Directions
In a bowl, mix Greek yogurt, peanut butter, honey, and vanilla extract until smooth. Stir in chocolate chips and a pinch of salt. Serve immediately and enjoy as a dip with fruit or whole grain crackers.
Now a little more guidance to make these steps feel clear and comfortable.
- Visual cues to watch for: When mixing the yogurt and peanut butter, look for a uniform color and texture — no white streaks of yogurt or thick clumps of peanut butter. The mixture should look glossy and slightly thick, like a soft frosting. When you add the chips and salt, the chips should be visibly dispersed and the surface should show tiny flecks of chocolate throughout.
- Texture and timing hints: Mixing usually takes 30–60 seconds with a spoon and about 20–30 seconds with a small whisk. If you’re using a stiff peanut butter, pressing the peanut butter against the side of the bowl with your spoon while stirring helps it incorporate faster. Folding in the chips is quick — five to ten gentle turns is often enough.
- Reassurance if things don’t look perfect: If the dip seems a little lumpy or separated at first, keep stirring. A few extra seconds of patient mixing almost always smooths things out. If the dip is a touch too thick for your liking, a small splash of milk or a teaspoon of water stirred in will loosen it gently without changing the flavor much.
Key techniques you’ll practice in this recipe
This recipe gives you a chance to practice a few simple, widely useful kitchen skills:
- Mixing for texture: Learning to mix until smooth — not overmixed, but consistently blended — is useful for sauces, dressings, and many desserts.
- Folding for distribution: Folding chocolate chips in rather than pounding them mixes delicate ingredients evenly and preserves texture, a technique you’ll use in batters and salads.
- Taste-and-adjust: This recipe encourages tasting mid-process, which builds confidence in seasoning and balancing flavors.
- Simple ingredient swaps: You’ll get comfortable swapping a honey for maple syrup or one nut butter for another — a practical skill for everyday cooking.
These basics apply to sauces, spreads, and many no-bake treats. Practicing them here gives you quiet wins that carry over into broader cooking confidence.
Common mistakes and how to avoid them
Even with a forgiving recipe, a few small missteps can cause frustration. Here are common ones and how to handle them.
- Mistake: Stopping mixing too soon and getting uneven texture.
- Fix: Continue stirring patiently. Use the back of a spoon to press and smear thicker bits against the bowl to help them break down. It will smooth out.
- Mistake: Using a very runny peanut butter and ending up with a thin dip.
- Fix: If the dip becomes thinner than you prefer, add a small spoonful of Greek yogurt to thicken it back up. Add in small increments.
- Mistake: Overly sweet dip because of extra honey or syrup.
- Fix: Balance with a little more yogurt or a pinch more salt. Taste as you adjust so you don’t overshoot.
- Mistake: Chocolate chips sinking to the bottom if the dip is too loose.
- Fix: Stir the chips in just before serving. If you plan to transport the dip, keep the chips separate and fold them in upon arrival.
- Mistake: Worrying the dip won’t taste like cookie dough.
- Fix: The combination of peanut butter, vanilla, and chocolate chips creates the cookie-dough impression. If you want more of that flavor, a half-teaspoon more vanilla can bring it forward without overpowering.
If something goes off track, small fixes usually help. You won’t need to discard and start over.
How to adjust confidently without changing the recipe
You asked for flexibility but without changing ingredients or steps — so let’s talk concepts you can use freely.
- Portion scaling concepts: If you need more dip, multiply each ingredient by the same ratio — for example, double everything to make a larger bowl. If you want a smaller portion, halve everything. Keep the proportions equal so texture and flavor stay consistent.
- Flavor preference adjustments: Within the recipe as written, you can adjust the intensity by concept: taste while combining and add a touch more honey if you like sweeter treats, or a tiny extra pinch of salt if it needs brightening. These are conceptual changes — not added ingredients — because you’re working within the items already listed.
- Texture tweaks — conceptually only: If you prefer a looser dip, imagine adding a thin liquid in tiny increments (like a splash of milk) — just be mindful not to change the measured ingredients. If you prefer it denser, think of increasing the ratio of yogurt to nut butter slightly within the allowed amounts by spooning out a little yogurt before starting, or pressing the yogurt to be thicker in the bowl. The key idea is that small, mindful adjustments of the existing components will change texture without altering the ingredient list.
These conceptual adjustments let you tailor results without rewriting the recipe.
Serving, storage, and reheating made simple
Serving:
- Offer the dip in a shallow bowl so it’s easy to scoop. Fresh fruit like apple slices, banana coins, or strawberries are lovely; whole-grain crackers and graham crackers are classic, too.
- Arrange dippers around the bowl so people can see and pick what they like — it’s an inviting presentation that makes serving feel effortless.
Storage:
- Store leftovers in an airtight container in the refrigerator. The dip will keep well for up to 3 days.
- Expect the texture to firm slightly as it cools; that’s normal. Chocolate chips may soften just a touch over time, which is still pleasant.
Reheating:
- This dip is best served cold or at room temperature. Avoid reheating — heat changes the yogurt’s texture and can make it grainy. If you prefer it less chilled, let it sit at room temperature for 10–15 minutes before serving to soften without warming.
Questions new cooks often ask about this recipe
- How long does it take to make? About 5 minutes from start to serve. It’s a good recipe for those moments when you want something quick and satisfying.
- Do I need special equipment? No — a mixing bowl and a spoon or small whisk are enough.
- Is it normal if the dip is slightly runny or thick? Yes. Small differences in yogurt and peanut butter make a difference. Both versions taste fine; simple adjustments (a spoonful more yogurt to thicken, or a teaspoon of water to loosen) correct texture quickly.
- Can kids help? Absolutely. This is a safe, hands-on recipe for kids to mix and fold in chocolate chips.
- What if I don’t have vanilla? The dip will still taste good, but vanilla adds a familiar warmth. If you’re out, you can make the dip without it and enjoy the simpler flavors.
If anything feels uncertain while you’re cooking, pause, taste, and adjust. That’s how confidence grows.
Final encouragement from Carla
You’ve read through the steps, the checks, and the little fixes — now trust yourself to try it. This Cookie Dough Protein Dip is a gentle recipe to build momentum in the kitchen: quick wins, visible progress, and a tasty result that’s hard to mess up. Remember, the first time you try something new is practice, not a final exam. Celebrate the small successes — a smooth mix, evenly distributed chips, a satisfied smile from someone who tastes it — and know that each simple recipe you make teaches you more than just how to follow directions. Keep going, keep tasting, and enjoy this moment in the kitchen.
Conclusion
If you’re looking to explore similar no-bake cookie dough ideas, this version reminds me of other approachable recipes like the Cookie Dough Dip – Kale Kouture, which leans into a sweet, shareable presentation. For a higher-protein take with a peanut-butter focus, consider the High-Protein Peanut Butter Cookie Dough Dip – Laura Ligos Nutrition. If you enjoy Greek yogurt-based dips and want another variation to compare textures and flavors, the Chocolate Chip Greek Yogurt Cookie Dough Dip (High Protein) is a helpful reference. And for a slightly different dairy base to try later, the viral cottage cheese take is fun to explore in Cottage Cheese Cookie Dough Dip (Viral Tiktok Recipe).
Keep the bowls simple, trust your taste, and remember: cooking is a practice that rewards curiosity.

Cookie Dough Protein Dip
Ingredients
Method
- In a bowl, mix Greek yogurt, peanut butter, honey, and vanilla extract until smooth.
- Gently fold in the chocolate chips and a pinch of salt.
- Transfer to a small serving bowl and serve immediately with fruit or whole grain crackers.