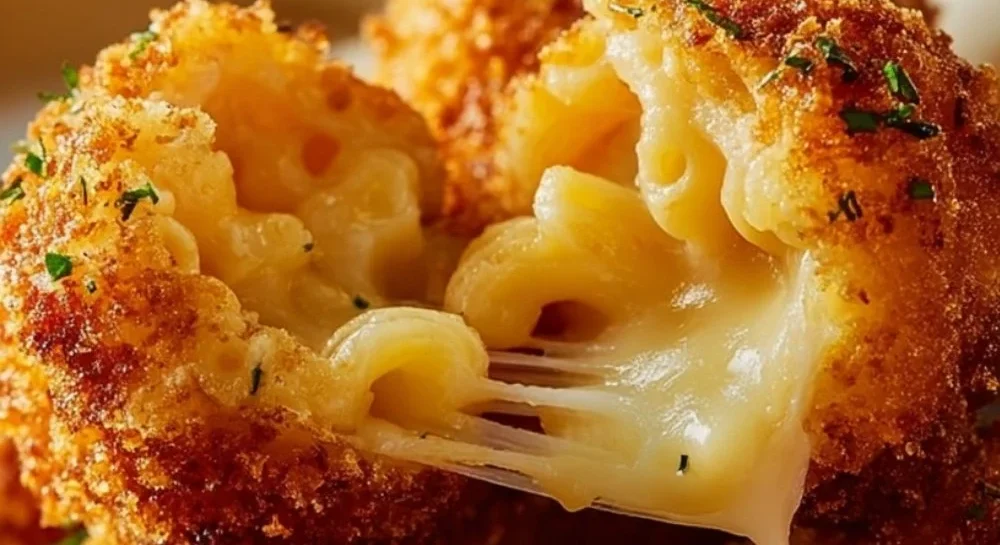
Cheesecake Factory Air Fryer Fried Macaroni and Cheese Balls
Introduction
Hello — I’m Carla Carter, founder and recipe developer at RecipesCabin. If you’ve been curious about making crunchy, gooey fried mac and cheese balls at home but feel a little unsure about frying or using an air fryer, this recipe is for you. Cheesecake Factory Air Fryer Fried Macaroni and Cheese Balls are a comforting, crowd-pleasing snack that teach useful kitchen basics without being fussy. They’re approachable because the technique is straightforward, the ingredients are ordinary pantry staples, and the air fryer takes much of the worry out of deep-frying.
I’ll walk you through what to expect, what to look for, and how small adjustments will affect the final result. Think of me as the friendly voice by your side while you shape, bread, and crisp these little cheese-filled bites. You don’t need perfect technique to make this a success — just a willingness to follow a few simple cues.
Why this recipe is easy to get right
What makes this dish forgiving is its focus on texture and timing rather than exact precision. The macaroni and cheese filling is a creamy mixture that tolerates slight variations in cooling time and shaping. The breadcrumb coating is forgiving — even if a few spots are uneven, the air fryer’s circulating heat will crisp them up nicely.
Flexibility: You don’t have to be precise to the gram. If your macaroni cooks a little longer or shorter, or if the cheese sauce is slightly looser before cooling, the mixture will still hold together once chilled and formed into balls. Timing-wise, the air fryer cooks quickly; you’ll see visual cues (golden brown and crispy) that tell you when they’re done, so you aren’t relying on an exact minute count alone.
Skill level: This recipe suits beginners because it practices basic, repeatable skills — making a simple roux-thickened cheese sauce, mixing pasta into sauce, shaping, breading, and air-frying. Those skills are transferable to many other recipes, so your effort here builds confidence for future cooking.
How to make Cheesecake Factory Air Fryer Fried Macaroni and Cheese Balls
The process happens in three broad stages: make the macaroni and cheese, shape and bread the balls, then air-fry until crisp. First, you cook the pasta and prepare a smooth cheese sauce on the stovetop; the roux (butter + flour) and milk turn into a stable, creamy base. Next, you combine the pasta with the sauce, let it cool so it firms up, and then scoop and form into balls. Finally, you bread the balls, give them a light spray of oil, and air-fry until golden.
At each stage, focus on texture and visual cues. When you’re making the sauce, look for a glossy, lump-free texture and a slight thickening after a few minutes of simmering. When the pasta is mixed in, it should be evenly coated and not swimming in sauce — cooling makes it easier to form. When breading, make sure each ball has a uniform coating; if a spot looks thin, a quick second roll will fix it. In the air fryer, give the balls space so hot air can circulate and crisp each side; they should be a deep, even golden brown when done.
If you’re new, slow down at the sauce stage. Whisk gently and keep the heat moderate so you can control thickening without burning. I’ll point out the key checkpoints as we go.
Ingredients
1 cup elbow macaroni, 2 tablespoons butter, 2 tablespoons all-purpose flour, 1 1/4 cups milk, 1/2 teaspoon garlic powder, 1/2 teaspoon onion powder, 1/2 teaspoon salt, 1/4 teaspoon black pepper, 1 1/2 cups shredded mozzarella cheese, 1/2 cup grated Parmesan cheese, 1 large egg, 1/2 cup bread crumbs, 1/2 cup panko bread crumbs, 1/4 cup all-purpose flour, Vegetable oil for spraying
- 1 cup elbow macaroni: The pasta is the structure of the ball. Elbows hold sauce well and create a satisfying bite. It’s a familiar pantry staple and forgiving if it’s slightly over- or undercooked.
- 2 tablespoons butter: Fat melts into the roux and gives the sauce richness and a silky mouthfeel.
- 2 tablespoons all-purpose flour: Combined with butter to make a roux, flour thickens the milk into a smooth cheese sauce that clings to the macaroni.
- 1 1/4 cups milk: The liquid base for the sauce. It thins the roux into a velvety consistency and carries the seasonings.
- 1/2 teaspoon garlic powder and 1/2 teaspoon onion powder: These powdered aromatics add gentle, even flavor without changing the texture. They’re subtle but important to round out the cheese.
- 1/2 teaspoon salt and 1/4 teaspoon black pepper: Basic seasoning to make the flavors pop. Small amounts are all you need.
- 1 1/2 cups shredded mozzarella cheese: The main melting cheese — stretchy and creamy. It helps create that satisfying gooey interior.
- 1/2 cup grated Parmesan cheese: Parmesan contributes savory depth and a touch of nuttiness to the sauce.
- 1 large egg: Helps the breadcrumb coating adhere to each ball when you dip the shaped macaroni.
- 1/2 cup bread crumbs and 1/2 cup panko bread crumbs: A mix gives the exterior a blend of sturdy coverage (breadcrumbs) and extra crunch (panko). Panko gives that airy, crispy texture.
- 1/4 cup all-purpose flour (for dredging): A light dusting helps the egg stick to the shaped balls, giving a better breadcrumb bond.
- Vegetable oil for spraying: A light spray encourages golden color and crispness in the air fryer without deep-frying.
None of these items are complicated. They are pantry-friendly, easy to find, and work together to create a creamy interior and a crisp exterior. The flour and butter create the sauce’s body; the cheeses create creaminess and flavor; the egg and crumb trio build the crunchy shell.
Directions
Cook the elbow macaroni according to package instructions, drain, and set aside. , In a medium saucepan, melt the butter over medium heat. , Add the 2 tablespoons of all-purpose flour to the melted butter and whisk continuously for about 1-2 minutes, making a roux. , Slowly pour in the 1 1/4 cups of milk while whisking to avoid lumps. , Add the garlic powder, onion powder, salt, and black pepper to the milk mixture and continue to whisk until smooth. , Allow the mixture to simmer for about 3-4 minutes, until it thickens slightly. , Stir in the shredded mozzarella cheese and grated Parmesan cheese until the cheeses are fully melted and the sauce is smooth. , Remove the saucepan from the heat and add the cooked elbow macaroni, stirring to coat the pasta evenly with the cheese sauce. , Let the macaroni and cheese mixture cool for about 15-20 minutes. , Once cooled, scoop small portions of the macaroni and cheese mixture and form them into ball shapes with your hands. , Place the formed macaroni balls on a parchment-lined baking sheet or plate. , In a shallow dish, whisk the large egg until fully beaten. , In another shallow dish, combine the bread crumbs and panko bread crumbs. , Roll each macaroni and cheese ball first in the egg, then coat it in the breadcrumb mixture, ensuring each ball is fully covered. , Place the breaded macaroni balls back onto the parchment-lined baking sheet. , Spray each ball lightly with vegetable oil to help them crisp up during cooking. , Preheat your air fryer to 375°F (190°C). , Arrange the breaded macaroni balls in a single layer in the air fryer basket, making sure they are not touching each other. , Cook the balls in the air fryer for 8-10 minutes, flipping them halfway through, until they are golden brown and crispy on the outside. , Carefully remove the macaroni and cheese balls from the air fryer and allow them to cool slightly before serving. , Serve the fried macaroni and cheese balls with your favorite dipping sauce and enjoy!
Supportive guidance:
- After you cook and drain the elbow macaroni, spread it briefly on a plate or bowl to cool a bit. Hot pasta will loosen the sauce and make forming balls trickier.
- When you melt the butter and whisk in the flour, you are making a roux — look for a smooth, bubbling paste that smells slightly toasty after 1–2 minutes. That toastiness means the raw flour flavor is gone.
- Pour the milk slowly while whisking. The mixture will transform from a thin slurry into a thicker, glossy sauce in a few minutes. If a small lump appears, keep whisking over low heat — it will smooth out.
- The mixture should gently simmer and thicken in 3–4 minutes. You’re aiming for a sauce that coats the back of a spoon. If it’s still very thin, give it another minute; if it gets too thick, a splash more milk will loosen it.
- Stir in the cheeses off the heat if possible — residual heat melts them without making the sauce grainy. The sauce should be smooth and stringy from the mozzarella.
- When you combine the pasta and sauce, make sure the macaroni is evenly coated. The mix should be thick enough to mound slightly on a spoon — cool it for 15–20 minutes until it’s comfortable to handle.
- To form balls, wetting your hands lightly helps prevent sticking. Don’t worry if shapes are not perfect — small imperfections will be hidden once breaded and fried.
- Dredging: flour first, then egg, then breadcrumbs. The flour helps the egg stick; the egg helps the crumbs cling. Fully cover each ball so hot air crisps the coating evenly.
- Spray the balls sparingly with oil — you want a light sheen to encourage browning, not puddles of oil.
- In the air fryer, give each ball space. Flip halfway so both sides get equal color. Cook time varies slightly by air fryer model; aim for a deep, even golden brown.
- Let them cool for a couple of minutes so the filling firms and you don’t burn your mouth. If an interior feels too loose, a minute more in the air fryer will help.
Key techniques you’ll practice in this recipe
- Making a simple roux-based cheese sauce: You’ll learn how butter + flour + milk become a smooth sauce, a basis for many comforting dishes like macaroni, gratins, and creamy soups.
- Melting and emulsifying cheeses: Timing and gentle heat keep cheese from becoming grainy. This helps you gain confidence with other melted-cheese dishes.
- Forming and breading: The three-step breading method (flour → egg → crumbs) is a classic technique used for chicken, vegetables, and other fried snacks.
- Air-frying/crisping: You’ll learn how circulation and light oil create a crunchy exterior without deep frying. This teaches visual doneness cues (golden brown) that apply to many air-fryer recipes.
These are foundational skills that you’ll use again and again in the kitchen.
Common mistakes and how to avoid them
- Sauce too thin: If your sauce doesn’t thicken, give it a minute or two more over medium-low heat while whisking. If it becomes lumpy, strain or whisk vigorously; a small splash of milk can help smooth it.
- Cheese graininess: High heat can make cheese separate. Remove the pan from heat before adding cheese and stir gently until melted.
- Balls fall apart while breading: That usually means the mixture is too warm or wet. Chill the mixture longer, or refrigerate formed balls for 10–15 minutes before breading.
- Uneven browning in the air fryer: Don’t overcrowd the basket. Flip halfway. If crowing is unavoidable, cook in batches.
- Over-browning before interior heats through: If the exterior gets too dark while the interior is still loose, reduce temperature slightly and add a minute or two of cook time. Air fryers vary, so adjust by visual cues.
If something goes sideways (a too-loose filling, overcooked exterior), small fixes are possible: cool and chill to firm up, lower heat to finish cooking, or re-coat and give a short extra crisping cycle.
How to adjust confidently without changing the recipe
- Scaling portions: To make more, multiply each ingredient by the same factor. Keep the ratio of sauce to pasta the same for texture. Work in batches when forming and air-frying so the process stays manageable.
- Flavor preferences: You can conceptually think about adding herbs or spices in future experiments, but for now keep to the original ingredient list and focus on technique. Seasoning balances here — the garlic and onion powders give a mild base that highlights the cheese.
- Texture tweaks: If you prefer a firmer interior, chill the formed balls longer before breading. For extra crunch, use slightly more panko in the crumb mix. These are conceptual tweaks — don’t change the printed quantities while you learn the base recipe.
The key is understanding how small changes affect texture: more chilling = firmer shape; more panko = crunchier shell; hotter, shorter cooking = faster color development.
Serving, storage, and reheating made simple
Serve these balls warm with a dipping sauce such as marinara, ranch, or a simple hot sauce-mayo blend. They make a great appetizer, party snack, or kid-friendly finger food.
To store: Cool completely, then place in an airtight container and refrigerate for up to 3 days. For longer storage, freeze on a tray until firm, then transfer to a freezer bag for up to 1 month.
To reheat: For best crispness, reheat in the air fryer at 350°F (175°C) for 4–6 minutes from refrigerated, or 6–8 minutes from frozen, flipping once. The air fryer restores crunch better than the microwave; use the microwave only if you’re short on time, then accept that the exterior will be softer.
Questions new cooks often ask about this recipe
- How do I know the sauce is thick enough? It should coat a spoon and leave a thin film on the back. If it runs off quickly, it needs a bit more simmering.
- Can I use different pasta? Yes, though the recipe uses elbows because they mingle well with sauce. Slightly smaller or similarly shaped pasta works fine.
- Do I have to use an air fryer? The recipe is written for an air fryer, but you could shallow- or deep-fry with careful temperature control. That’s a different technique and not required here.
- Are small cracks in the breadcrumb coating a problem? Not at all. A few cracks are normal. The filling will stay inside once chilled and the crust will still be enjoyable.
- Is it normal for the cheese to be stringy when I bite in? Yes — that stretchiness is a sign of melted mozzarella and a good, gooey interior.
Final encouragement from Carla
I know trying a slightly fancier snack can feel intimidating, but this recipe breaks the process into manageable steps that reward your attention. Be patient with the cooling and forming stage — that’s where success is most likely. Small imperfections are part of home cooking, and they won’t stop you from serving a delicious, comforting batch of mac and cheese balls that everyone will enjoy. Keep practicing these simple techniques; they add so much versatility to your cooking toolkit.
Conclusion
If you’d like to compare this version with other takes or see a visual walk-through, you can check the original Cheesecake Factory Air Fryer Fried Macaroni and Cheese Balls inspiration at the recipe page on Simply Happenings. Keep going — every attempt builds your confidence, and I’m cheering for you in the kitchen.